Carbon Fibre
http://www.cfsnet.co.uk
That's where I get mine from.
Hairspray will stop it fraying but as you say scissors need to be sharp.
Spray with two pack lacquer to achieve final results.
Hello Guest User,
Please feel free to have a look around the forum but be aware that as an unregistered guest you can't see all of it and you can't post.
To access these 'Registered Users Only' areas simply register and login.
Please feel free to have a look around the forum but be aware that as an unregistered guest you can't see all of it and you can't post.
To access these 'Registered Users Only' areas simply register and login.
Z1000R and Z1000J Project - Oven baked paint - carbonfiber
Moderators: KeithZ1R, chrisu, paul doran, Taffus


Thanks Rich. 
That hairspray trick is neat.
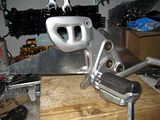
FOOT PEGS.
I have started on the mountings for the foot pegs, and I will use the original Busa pegs, and also have foot pegs for passenger.
Also I have the Busa rear master cylinder, so everything fits at once as soon I have made the adapter.
Its not that important really with the passenger foot peg, but I also need some kind of mounting for the Kerker muffler, and then the mounting need to be a certain size anyway.
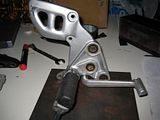
This is what a Busa peg looks like.
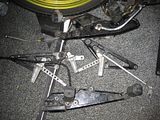
Wonder if there are something here to scavenge.
No.
Those Raask footpegs are for the GPZ1100- 83m--->
Need to check a picture of a Busa, to see what it looks like original.

Making an cardboard template.
Something like this, it needs to be the right angle and its millimeter precision.
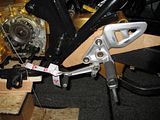
I am not sure if I should cut away some of the metal on the Busa part. That "fence" thing...
Also make the adapter more "light".
Think it looks almost right...Not 100% sure about this, if this is the final solution about the pegs...
That hairspray trick is neat.
FOOT PEGS.
I have started on the mountings for the foot pegs, and I will use the original Busa pegs, and also have foot pegs for passenger.
Also I have the Busa rear master cylinder, so everything fits at once as soon I have made the adapter.
Its not that important really with the passenger foot peg, but I also need some kind of mounting for the Kerker muffler, and then the mounting need to be a certain size anyway.

This is what a Busa peg looks like.

Wonder if there are something here to scavenge.
No.
Those Raask footpegs are for the GPZ1100- 83m--->

Need to check a picture of a Busa, to see what it looks like original.

Making an cardboard template.

Something like this, it needs to be the right angle and its millimeter precision.

I am not sure if I should cut away some of the metal on the Busa part. That "fence" thing...
Also make the adapter more "light".

Think it looks almost right...Not 100% sure about this, if this is the final solution about the pegs...

Z1000J 82 model, and Z1000R 83 model, And The Calfshit-GPZ1100-
CARBON / ALUMINUM
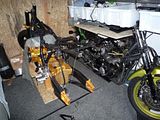
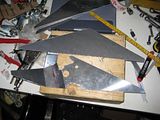
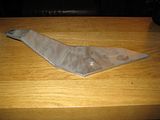
So, I visited the local junkyard and managed to find some aluminum plates, 1mm thickness.
The plan now is to reinforce the alu with carbon, thats something that is used in aircrafts and other lightweight/strong ratio things.
I have made 5 alu pieces after the template, the next now is to make them fit, so I need to make some angles on them.
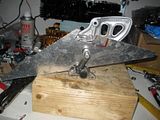
In order to make it fit without touching the swingarm, and make space for the brake cylinder I need to do a little effort in angling here.
I have chopped off the "fence" thingy, it looked not that nice in my configuration.
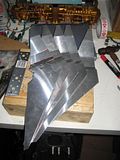
Next now is to make 4 more, total of 5.
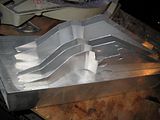
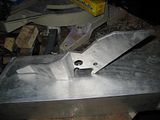
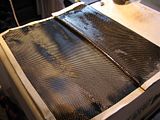
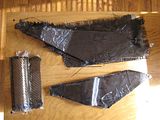
Here they are, degreased and ready for carbon laminating.
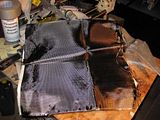
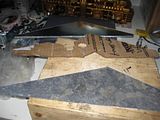
Layer by layer with carbon and aluplate.
Lots of epoxy on both the aluplate and carbon cloth.
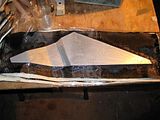
Its total 4 layers with carbon.
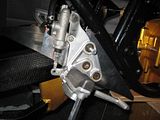
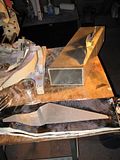
So now its the fine adjust and adapting left.
I am not sure if I will paint it, or use carbon on the sides.
Its a very rigid and stiff construction now, and very light weight.
So, I visited the local junkyard and managed to find some aluminum plates, 1mm thickness.
The plan now is to reinforce the alu with carbon, thats something that is used in aircrafts and other lightweight/strong ratio things.

I have made 5 alu pieces after the template, the next now is to make them fit, so I need to make some angles on them.


In order to make it fit without touching the swingarm, and make space for the brake cylinder I need to do a little effort in angling here.

I have chopped off the "fence" thingy, it looked not that nice in my configuration.

Next now is to make 4 more, total of 5.

Here they are, degreased and ready for carbon laminating.


Layer by layer with carbon and aluplate.
Lots of epoxy on both the aluplate and carbon cloth.

Its total 4 layers with carbon.


So now its the fine adjust and adapting left.
I am not sure if I will paint it, or use carbon on the sides.
Its a very rigid and stiff construction now, and very light weight.
Z1000J 82 model, and Z1000R 83 model, And The Calfshit-GPZ1100-
-
Steve Cooke
- Hardcore

- Posts: 1612
- Joined: 18th Mar 2007
- Location: Southampton
Nice work Roy, it's good to see your use of the Carbon fibre it's a great material with a really good weight/strength ratio, I once replaced the deck of a small racing yacht with it to save a few ounces, it worked as the bloke won a Bronze medal in the Barcelona Olympics. You can also spray the resin on as a top coat and it can polish up like glass.
-
RALPHARAMA

- Area Rep.

- Posts: 3407
- Joined: 19th May 2007
- Location: Pensford, Somerset
- Contact:
I am so impressed with your willingness to experiment with new ideas. I served my time (apprenticeship) with British Aerospace a few years ago ... OK quite a few years ago  ... but I can't remember seeing a mixture of aluminium and composite, mind you, I don't remember carbon fibre then either. We used giant autoclaves in the composites shop then. All the laminated being laid up were put in giant bags that were evacuated of air to force the laminates together. Sadly at the time I had little interest in composites as they didn't seem to be as good as proper metal, to my young and immature mind, wish I had taken more interest now; they do say youth is wasted on the young
  . I should imagine that composites are a much greater portion of aircraft building these days. I my day we didn't use any composites in the airframe construction; all the brackets etc were made from aluminium. The skins used to be Alclad which was aluminium alloy sheet with a few thou (thousandths of an inch - we weren't metric then
  ) of pure aluminium for it's anti corrosion properties.
I am going to be starting on a new project this year and I think I might take a step back and look at carbon fibre as potential material. I did wonder if carbon fibre could be 'laid up' as regular epoxy and glass, but assumed that it couldn't as I'd never heard of anyone doing it. You are truly an inspiration Roy I've been very impressed the way you have attempted all sorts of stuff than most fettlers would sub-contract out
Keep it up Roy - this has to be one of the most interesting threads on this forum
I am going to be starting on a new project this year and I think I might take a step back and look at carbon fibre as potential material. I did wonder if carbon fibre could be 'laid up' as regular epoxy and glass, but assumed that it couldn't as I'd never heard of anyone doing it. You are truly an inspiration Roy
Keep it up Roy - this has to be one of the most interesting threads on this forum
Ralph Ferrand
Z1000A1 (1977), Z1300A5 (1983), Z900A4 (1976) GPZ1100 Unitrak (1983)(project), RD250B (1975)(project), ZRX1200R (2005) DT175MX (1981) YZF R6 (1999)
http://www.bikerstoolbox.co.uk
Z1000A1 (1977), Z1300A5 (1983), Z900A4 (1976) GPZ1100 Unitrak (1983)(project), RD250B (1975)(project), ZRX1200R (2005) DT175MX (1981) YZF R6 (1999)
http://www.bikerstoolbox.co.uk
Thanks boys!
Kano:
Yes, this is the practice run for the ELR! So if I fill the roads with carbon debris I have to to things different.
Hopefully I will soon start a new ELR only thread here, on KZR and on the KZ1000R.com.
Steven Cooke:
Thanks! Yes , I was thinking on spraying the resin over. And then using Turtle Wax Lack repair? (or something like that) now and then to maintain the glossy look.
vduk:
Thanks! I am glad you like my humble project!
Thats why we join a forum, to get new input.
Autoclave would be nice to have...
I like to do new things, it takes longer time, but it becomes as I like it.
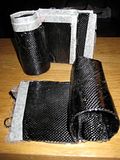
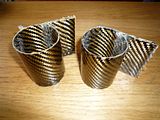
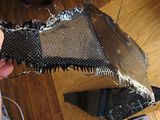
Its a pain in the arse to wrap the carbon over the last time, the finishing, because there are angles and its hard to make the pressure on the carbon.
But I think I managed OK, the other peg adapter it easier to make...

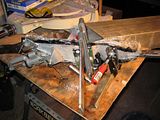
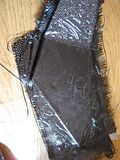
Here is the carbon layers.
The final design.

Straight from the clamps, its a lot of resin on some places, you can see the resin lumps. So the next now is to sand gently down and spray it with resin, all over.
Kano:
Yes, this is the practice run for the ELR! So if I fill the roads with carbon debris I have to to things different.
Hopefully I will soon start a new ELR only thread here, on KZR and on the KZ1000R.com.
Steven Cooke:
Thanks! Yes , I was thinking on spraying the resin over. And then using Turtle Wax Lack repair? (or something like that) now and then to maintain the glossy look.
vduk:
Thanks! I am glad you like my humble project!
Thats why we join a forum, to get new input.
Autoclave would be nice to have...
I like to do new things, it takes longer time, but it becomes as I like it.
Its a pain in the arse to wrap the carbon over the last time, the finishing, because there are angles and its hard to make the pressure on the carbon.
But I think I managed OK, the other peg adapter it easier to make...

Here is the carbon layers.

The final design.

Straight from the clamps, its a lot of resin on some places, you can see the resin lumps. So the next now is to sand gently down and spray it with resin, all over.
Z1000J 82 model, and Z1000R 83 model, And The Calfshit-GPZ1100-
-
RALPHARAMA
- Area Rep.
- Posts: 3407
- Joined: 19th May 2007
- Location: Pensford, Somerset
- Contact:
One tip Roy. I used to paint all my woodwork on my boat with epoxy, but I was warned that it will go milky and yellow if it's not protected from UV from the sun etc. I used to use a two pack polyurethane varnish to cover it. The epoxy gave a fabulous glass like finish over the wood but needed at least three coats of varnish to protect it. For some reason single pack polyurethane won't stick to epoxy. The other thing is to clean the epoxy carefully before re-coating with anything as there is a soapy feeling product of the cure called amine blush, which will stop the varnish from keying.
Ralph Ferrand
Z1000A1 (1977), Z1300A5 (1983), Z900A4 (1976) GPZ1100 Unitrak (1983)(project), RD250B (1975)(project), ZRX1200R (2005) DT175MX (1981) YZF R6 (1999)
http://www.bikerstoolbox.co.uk
Z1000A1 (1977), Z1300A5 (1983), Z900A4 (1976) GPZ1100 Unitrak (1983)(project), RD250B (1975)(project), ZRX1200R (2005) DT175MX (1981) YZF R6 (1999)
http://www.bikerstoolbox.co.uk
vduk:
Yes, thanks for mention it, I will use some UV filter varnish.
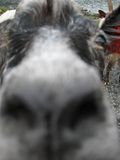
A DIARY OF A MAD MAN (according some H**** driver I met )
Just to clarify it once again, this is a H**** driver:

So, after after we done that, we can focus on the important KAWASAKI stuff.
Got some parts from Z1 Enterprises.
So, then I Gun-Koted the Busa pegs.
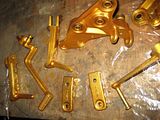
Here are the adapters for pegs.
I will cover them in something nice. :woohoo:
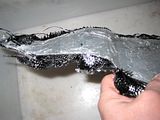
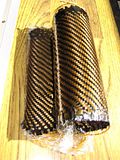
Then I made some carbon stuff, this is the ears that will support the front light.
Its a total of 10 layers with carbon, and I can assure that its rigid and solid.
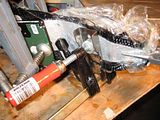
Starting with lots of resin.
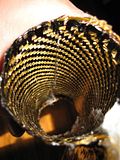
Then I have a socket with a little bigger diameter than the forks.
There are 4 layers with glad pack to prevent the carbon to hardenen togeher.
Clamping it, squeezing the resin and carbon.
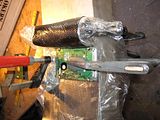
So, now its cutting, shaping, sanding and some 2 component clearcoat/varnish on the carbonstuff that is left to do...
Yes, thanks for mention it, I will use some UV filter varnish.
A DIARY OF A MAD MAN (according some H**** driver I met
Just to clarify it once again, this is a H**** driver:


So, after after we done that, we can focus on the important KAWASAKI stuff.
Got some parts from Z1 Enterprises.

So, then I Gun-Koted the Busa pegs.


Here are the adapters for pegs.

I will cover them in something nice. :woohoo:
Then I made some carbon stuff, this is the ears that will support the front light.
Its a total of 10 layers with carbon, and I can assure that its rigid and solid.
Starting with lots of resin.


Then I have a socket with a little bigger diameter than the forks.

There are 4 layers with glad pack to prevent the carbon to hardenen togeher.

Clamping it, squeezing the resin and carbon.


So, now its cutting, shaping, sanding and some 2 component clearcoat/varnish on the carbonstuff that is left to do...
Z1000J 82 model, and Z1000R 83 model, And The Calfshit-GPZ1100-
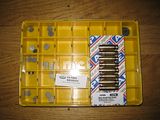
http://www.officegiant.co.uk/binding-an ... ets-a3.asp
the plastic sleeves that are put over paper sheets to make them heard wearing. They are made of polyester and make a good release surface for resins.
the plastic sleeves that are put over paper sheets to make them heard wearing. They are made of polyester and make a good release surface for resins.
Rich
diplomacy is a form of art - I was never any good at art
diplomacy is a form of art - I was never any good at art

-
RALPHARAMA
- Area Rep.
- Posts: 3407
- Joined: 19th May 2007
- Location: Pensford, Somerset
- Contact:
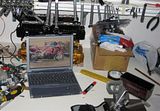
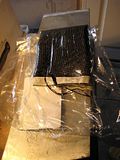
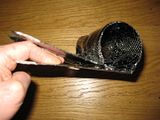
I hope you haven't got any important data on that hard drive 
Point of interest: The magnets inside hard disc drives are really powerful and are really useful in a workshop. I have bolted them to all my drills to hold the chuck keys Always know where they are and it's loads better than string which always makes using them a pain
Point of interest: The magnets inside hard disc drives are really powerful and are really useful in a workshop. I have bolted them to all my drills to hold the chuck keys
Ralph Ferrand
Z1000A1 (1977), Z1300A5 (1983), Z900A4 (1976) GPZ1100 Unitrak (1983)(project), RD250B (1975)(project), ZRX1200R (2005) DT175MX (1981) YZF R6 (1999)
http://www.bikerstoolbox.co.uk
Z1000A1 (1977), Z1300A5 (1983), Z900A4 (1976) GPZ1100 Unitrak (1983)(project), RD250B (1975)(project), ZRX1200R (2005) DT175MX (1981) YZF R6 (1999)
http://www.bikerstoolbox.co.uk
OK.
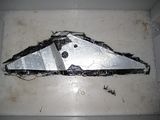
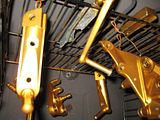
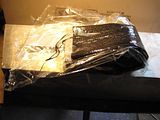
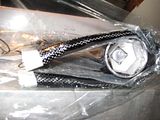
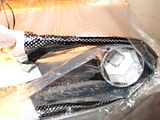
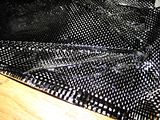
Since last time I have received some new carbon:
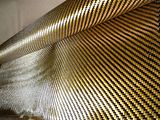
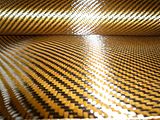
And since this carbon is more "goldish" I of course have to make new headlight ears.
Now its sanding and 2pack UV resistant varnish that is left to do.
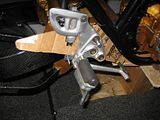
And i have almost done the footrests mounts.
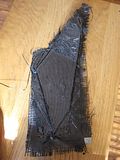
Its sanding and 2 pack UV varnish left to do here as well.
Since last time I have received some new carbon:


And since this carbon is more "goldish" I of course have to make new headlight ears.


Now its sanding and 2pack UV resistant varnish that is left to do.
And i have almost done the footrests mounts.


Its sanding and 2 pack UV varnish left to do here as well.
Z1000J 82 model, and Z1000R 83 model, And The Calfshit-GPZ1100-
Who is online
Users browsing this forum: No registered users and 7 guests