
Guys,
am in the final stages of the restoration and have a bit of a dilemma on the tank badges. It looks as if what I have got are not the originals as the badge holes in the Kawasaki logo do not match the small badge holes in the side of the tank. These badges were stuck on with contact adhesive before.
The tank badge holes seem to be on a metal strip which stands out slightly from the tank sides, but inside a tank indent. Would it be possible to drill new holes in the strip to match those on the badges without risk of penetrating the tank proper?
However it seems to be safer to drill new holes in the badges to match those on the tank and to bog up the original badge holes.
Does anyone know how the badges were originally fitted? The parts book seems a bit obscure showing what look like screws but not identifying the type. Should these be small self tappers or something else?
Hello Guest User,
Please feel free to have a look around the forum but be aware that as an unregistered guest you can't see all of it and you can't post.
To access these 'Registered Users Only' areas simply register and login.
Please feel free to have a look around the forum but be aware that as an unregistered guest you can't see all of it and you can't post.
To access these 'Registered Users Only' areas simply register and login.
Installing tank badges - Drill the tank?
Moderators: KeithZ1R, chrisu, paul doran, Taffus
-
london calling

- Hardcore

- Posts: 3992
- Joined: 16th Apr 2004
- Location: Loughborough, East Midlands

I seem to remember the badges varied and depending on the year the holes were differing distances apart.
I'm sure an expert will come along and either confirm or say I'm talking rubbush. Probably the later
Measure the gaps between the two both on the badge and the tank - this should then assist in working out what badges you need to buy (or again use DS tape !)
I'm sure an expert will come along and either confirm or say I'm talking rubbush. Probably the later
Measure the gaps between the two both on the badge and the tank - this should then assist in working out what badges you need to buy (or again use DS tape !)
Hey - I wasn't talking rubbish for once.
see here
http://www.z1enterprises.com/reference/z1-tank-guide.aspx
see here
http://www.z1enterprises.com/reference/z1-tank-guide.aspx
-
london calling
- Hardcore
- Posts: 3992
- Joined: 16th Apr 2004
- Location: Loughborough, East Midlands
As far as i know the 1000J tank badges are the same on all the post '81 twin shock models including the Lawson,LTD,GPz1100,etc.
I'd get the correct tank badges and some new screws and you're away.
I use stainless steel countersunk screws,with copper grease on the threads and put a thin film of petroleum jelly behind the badge to prevent water ingress.The tank badges trap water and this is why the tanks usually rust around this area. :
:
I'd get the correct tank badges and some new screws and you're away.
I use stainless steel countersunk screws,with copper grease on the threads and put a thin film of petroleum jelly behind the badge to prevent water ingress.The tank badges trap water and this is why the tanks usually rust around this area.
Jack
Kiwiz the screw holes for the badges can be cleaned out by "chasing" the thread with a tap M3x0.6 use the #2(middle) tap.
you would have to use the tap holder too as this will aid the job accurate/ easier
Be carefull when chasing the thread as tap is pointed and you dont want to pierce the tank :
:
The said tools aint cheap especially as its a one off job so see if you can borrow the tools.I did purchase myself the tooling over a decade ago just for the said purpose so little used
but when i got the tanx for the z1r back from the paint shop back in spring,holes clogged with paint,chase the threads, fasteners screw in piece of cake
you would have to use the tap holder too as this will aid the job accurate/ easier
Be carefull when chasing the thread as tap is pointed and you dont want to pierce the tank
: The said tools aint cheap especially as its a one off job so see if you can borrow the tools.I did purchase myself the tooling over a decade ago just for the said purpose so little used
but when i got the tanx for the z1r back from the paint shop back in spring,holes clogged with paint,chase the threads, fasteners screw in piece of cake
Guys,
you are right they are the wrong badges thats why they were glued on!
Due to insomnia I lept out of bed at 3.00Am last night and had a measure of the tank hole spacings: 140MM. Consulting Jeff's site ( thanks for the link guys) it looks like I need the 189MM size and have asked Jeff for a price.
If thats completely over the top I may redrill the existing at 140mm spacings (whose a bodge then?)
Success is the ability to go from one failure to another without loss of enthusiasm
Dave,
your offer is much appreciated.
However I think I may have ordered new ones from Z1 Enterprises in USA. Its an "I think" as the charge has not yet shown up on my card and there is some comment "reorder" on the confirmation. All this adds up to the fact I might need to call them and confirm if the order is being shipped.
I have no idea if the LTD ones would suit the J other than to ask if the holes are 140mm apart? if they are they will probably suit.
thanks
Success is the ability to go from one failure to another without loss of enthusiasm
If you want to clean out threads without going to the expense of buying taps - get a screw of the right thread, cut a slot along the length with a hacksaw (this gives the crap somewhere to go) clean the thread up with a needle file and apply a little oil in use to lubricate. :
Rich
diplomacy is a form of art - I was never any good at art
diplomacy is a form of art - I was never any good at art
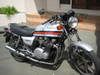
Fitted these last nite after cleaning threads with a correct sized tap. No lack of tools in this workshop, but a bit of a question over the operator!
Looks a million dollars with the badges on and a fresh paint job (close to what it cost too!---talk about overcapitalised!!) :p Now I'm thinking why didn't I paint the fork sliders and frame
Once I get the brakes sorted it will be off to get a Warrant of Fitness (our 6 monthly roadworthiness agony) and off on a bit of a country jaunt to run in the Wiseco, provided my domestic leash will stretch that far.
Well maybe its the chance for some quality time with the other half; its moving into summer down here, comfy seat (well at least more comfy than the Monster) smell of new mown hay etc.
Success is the ability to go from one failure to another without loss of enthusiasm
Who is online
Users browsing this forum: No registered users and 22 guests