Hello Guest User,

Please feel free to have a look around the forum but be aware that as an unregistered guest you can't see all of it and you can't post.

To access these 'Registered Users Only' areas simply register and login.

Valve Clearance, Check Please!

Need help restoring, building, or finding then try here.

Moderators: KeithZ1R, chrisu, paul doran, Taffus

Message
Author
TIKI
Posts: 7
Joined: 10th Dec 2014
Location: Northern Ca.

Valve Clearance, Check Please!

#1 PostAuthor: TIKI » Mon Mar 30, 2015 2:21 am

Hi Guy’s

1973 Z1900 with 5671 miles

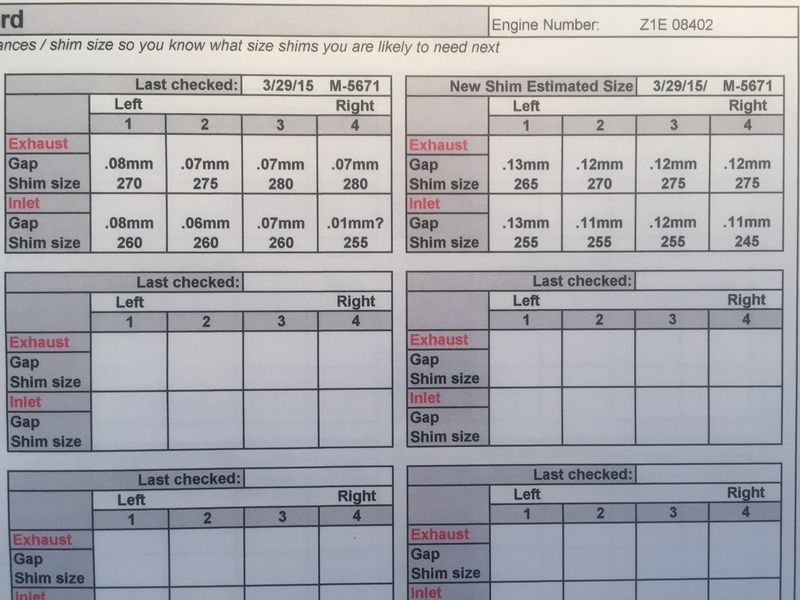
Please check me on this as I am a first timer on adjusting the valve shims. The column on the left “ Last Checked “ is the current size shim and the clearance on each valve as it sits today and the column on the right “ New Shim Estimated Size “ is what I calculate to be the new shim size and clearance to get all valves between .10mm - .15mm of clearance. Intake on #4, I cannot get a .04mm feeler gauge in there as it is too tight, I tried a piece of .02mm aluminum foil but it was too tight. I can rotate the bucket so I know there is clearance I am guessing on the .01mm. I used the Motion Pro shim tool which was less than fun due to its small size and with a little oil on your hands just makes it a real joy to deal with. The Kawasaki tool looks a lot easier to use so I my try to find one before I change the shims out. Thanks

Image
1973 Kawasaki Z1 900 , 1976 Yamaha DT400C , 1971 Suzuki TM-400R Cyclone

User avatar
Pigford
Hardcore
Hardcore
Posts: 13314
Joined: 2nd Jan 2006
Location: North Dorset

#2 PostAuthor: Pigford » Mon Mar 30, 2015 6:27 am

You'll need to remove & measure the current shim - then go down a size or two, then re-check clearance & calculate from there :wink:
And on the 7th day... Zeds were created!

User avatar
zed1015
Hardcore
Hardcore
Posts: 2319
Joined: 2nd Nov 2005
Location: Somewhere between Scunny and Goole.

#3 PostAuthor: zed1015 » Mon Mar 30, 2015 7:23 am

Yes! those figures are correct and if the current shims are in good un worn condition then the replacement sizes should get the clearances you have calculated.
Be wary that the shims become slightly dished in the centre over time and when replaced with a new shim the clearance can still be tighter than anticipated so be prepared to go another shim size thinner if needed.
Those valves that will end up at the lower end of the scale can go another size thinner if required to .016mm.
You can actually go to 0.18mm with no problems and up to 0.20mm with high lift cams.

wilsonsjw11
Hardcore
Hardcore
Posts: 1317
Joined: 18th Jul 2008
Location: West Sussex/Central London

#4 PostAuthor: wilsonsjw11 » Mon Mar 30, 2015 4:38 pm

The M&P shim tool is a lot better than the Motion pro unit(On Ebay.co.uk)
It uses the same method but the handle is chunkier and your hand will not be so prone to slipping with the oil.
Regards
Steve

TIKI
Posts: 7
Joined: 10th Dec 2014
Location: Northern Ca.

#5 PostAuthor: TIKI » Wed Apr 01, 2015 6:41 am

I have the valves dialed in and now new cam end plugs and valve cover gasket. The new cam end plugs are taller than the old ones I removed as they rise above the edge that the gasket sits on I am hoping the plugs will compress once the valve cover is on and tightened down otherwise it looks like the tall plugs will prevent the valve cover gasket from sealing between the two surfaces. Any thoughts. Thanks for your help.
1973 Kawasaki Z1 900 , 1976 Yamaha DT400C , 1971 Suzuki TM-400R Cyclone

User avatar
ADRIAN H
Hardcore
Hardcore
Posts: 4174
Joined: 21st Mar 2009
Location: The Brunswick, Charminster. Bmth

#6 PostAuthor: ADRIAN H » Wed Apr 01, 2015 10:06 am

TIKI wrote:I have the valves dialed in and now new cam end plugs and valve cover gasket. The new cam end plugs are taller than the old ones I removed as they rise above the edge that the gasket sits on I am hoping the plugs will compress once the valve cover is on and tightened down otherwise it looks like the tall plugs will prevent the valve cover gasket from sealing between the two surfaces. Any thoughts. Thanks for your help.


I was told best way to fit camshaft end caps, was to fit them dry.
Fit cam cover dry, (no gasket glue), leave over night.
Take cover and caps off.
Refit cover and caps with a smear of gasket glue.
👀 👀 👀
email - adrianhorsfield@live.co.uk

Steve Cooke
Hardcore
Hardcore
Posts: 1612
Joined: 18th Mar 2007
Location: Southampton

#7 PostAuthor: Steve Cooke » Wed Apr 01, 2015 6:33 pm

Due to the line boring there is always a possibility of a difference in the depth of the casting, even one side to the other so the alloy type caps should be checked for fit first and dressed to fit if needed.


Return to “Bike Help”

Who is online

Users browsing this forum: No registered users and 15 guests