Hello Guest User,

Please feel free to have a look around the forum but be aware that as an unregistered guest you can't see all of it and you can't post.

To access these 'Registered Users Only' areas simply register and login.

Gearbox trouble

Need help restoring, building, or finding then try here.

Moderators: KeithZ1R, chrisu, paul doran, Taffus

Message
Author
User avatar
RALPHARAMA
Area Rep.
Area Rep.
Posts: 3407
Joined: 19th May 2007
Location: Pensford, Somerset
Contact:

Gearbox trouble

#1 PostAuthor: RALPHARAMA » Sun Dec 30, 2007 11:40 pm

I've just un-split the crankcases. After many happy (not) hours degeasin' I finally was ready to glue th ecrank cases back together, Rather than my old faithful (red hermetite) I followed advice from a pal and used Wellseal for a less obvious job. I had torqued down the mains and was just running around the 6mm bolts at 7ft/lb, when I had gried from one bolt. It was turning with too little resitance, but not little enough to be stripping. I had a nasty feeling that it was going to be a weakened bolt and sure enough ir went PING :( The temptation to say ruck it and glue the sod in place was almost too much. But I did the right thing and undid everything and rand round cleaning the uber sticky Wellseal from all mating faces.

Clearly I wasn't gonna find a new bolt that lenghth so I grabbed a bit o 1/4" 316 SS off the shelf and turned the threaded bit down to 6mm, having assertained that the casing holes could accept 1/4". I grabbed a 6mm nut and bored it 1/4" and then TIGGED it to the top of the bar and with a quick faceoff in the lathe I had a new bolt. There was a bit o clenchy sphincter as I torqued it down for the second time, but it was fine proving that the bolt must have been weak.

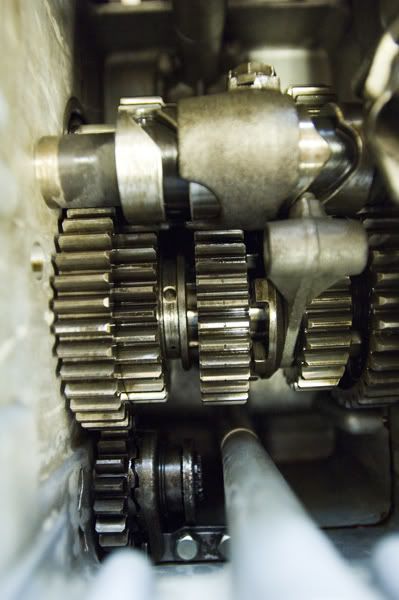
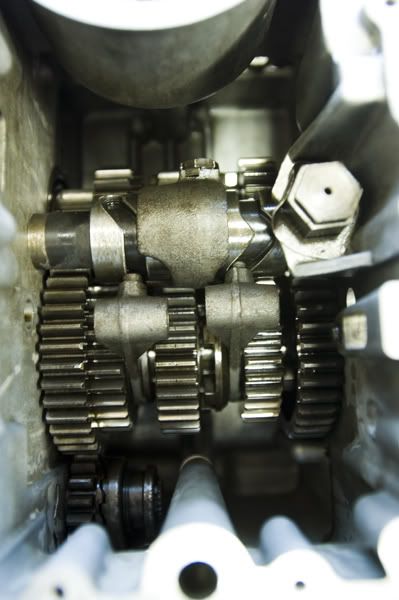
Can you imagine my joy when I found that the fourth gear on the output shaft wont come across enough to fit the selector fork when it is engaged in the profile :swe I have absolutely no idea why the bast#*& wont come across. It doesn't go tight but comes to a positive mechanical stop. :( I just can't work it out but I really, really don't want to split the crankcases again if at allow possible. I never removed the selection drum from the casing and as I only split the crank cases because shit fell down when the barrels where removed I didn't take the clutch off either, and I didn't take either shafts apart either. Something is clearly wrong but I'm buggered if I can work out what :??

Any suggestions would be greatly appreciated.
Thanks
Ralph Ferrand
Z1000A1 (1977), Z1300A5 (1983), Z900A4 (1976) GPZ1100 Unitrak (1983)(project), RD250B (1975)(project), ZRX1200R (2005) DT175MX (1981) YZF R6 (1999)
http://www.bikerstoolbox.co.uk

User avatar
Pigford
Hardcore
Hardcore
Posts: 13314
Joined: 2nd Jan 2006
Location: North Dorset

#2 PostAuthor: Pigford » Mon Dec 31, 2007 9:58 am

Ralph, all I can think of is make sure its nowt to do with the Kawasaki: "can't get into second gear when stationary" mechanism coming into play :!:
I assume ur checking the gears "insitu", so this might have some bearing (lol) on the matter :?:
As it happens, I do have a spare gearbox in me garage, next to ur points cover :wink:
And on the 7th day... Zeds were created!

User avatar
Garn 1
ZedHead
ZedHead
Posts: 1234
Joined: 23rd Sep 2005
Location: Sydney

#3 PostAuthor: Garn 1 » Mon Dec 31, 2007 10:24 am

VduK, lets check some items.
You didn't dismantle Drive shaft (that has the clutch basket on it).
You didn't dismantle the output shaft, except for the sprocket on the end.
I take it, you didn't undo the lock nut and washer from the single shift fork and you didn't remove shift drum.

When bolting the cases together, I always select neutral and leave the shaft, with the two shift forks on it, out and put it in later before the inner sprocket cover. When closing the cases you have to slip that single fork selector into the slot in third gear.

Conclusion... Study the position of the shift drum and the indent ball on the drum shaft. Forget about the shift-pawl and other item outside the inner sprocket cover. Try getting it into neutral and check the your selector fork is in third gear slot.

RegardZ
Garn (Sydney) Z1, Z1A, Z1B and Z900-A4

User avatar
RALPHARAMA
Area Rep.
Area Rep.
Posts: 3407
Joined: 19th May 2007
Location: Pensford, Somerset
Contact:

#4 PostAuthor: RALPHARAMA » Mon Dec 31, 2007 11:52 am

Hi
I've just taken some snaps of the problem to see if this makes it any clearer

Image
This one shows the the fourth gear as far to the right as it will go with the slecter fork in place.

Image
This one is the same view with the selctor fork removed.

To me it looks as though there is room on the output shaft for fourth gear to slide further to the right but it just won't have it and comes to a very definate stop. I sooooo don't want to split the cases again so if anyone has a bight idea .... :idea:
Ralph Ferrand

Z1000A1 (1977), Z1300A5 (1983), Z900A4 (1976) GPZ1100 Unitrak (1983)(project), RD250B (1975)(project), ZRX1200R (2005) DT175MX (1981) YZF R6 (1999)

http://www.bikerstoolbox.co.uk

User avatar
RALPHARAMA
Area Rep.
Area Rep.
Posts: 3407
Joined: 19th May 2007
Location: Pensford, Somerset
Contact:

#5 PostAuthor: RALPHARAMA » Mon Dec 31, 2007 11:55 am

try again -

Image

Image
Ralph Ferrand

Z1000A1 (1977), Z1300A5 (1983), Z900A4 (1976) GPZ1100 Unitrak (1983)(project), RD250B (1975)(project), ZRX1200R (2005) DT175MX (1981) YZF R6 (1999)

http://www.bikerstoolbox.co.uk

Rich
Hardcore
Hardcore
Posts: 2835
Joined: 4th Mar 2003

#6 PostAuthor: Rich » Mon Dec 31, 2007 12:12 pm

Have you taken the selector forks out ? I think there is a difference between them try swapping them round.
Rich
diplomacy is a form of art - I was never any good at art

User avatar
RALPHARAMA
Area Rep.
Area Rep.
Posts: 3407
Joined: 19th May 2007
Location: Pensford, Somerset
Contact:

#7 PostAuthor: RALPHARAMA » Mon Dec 31, 2007 1:07 pm

Yeah, I have tried swapping them even though I know that they are identical :??
Ralph Ferrand

Z1000A1 (1977), Z1300A5 (1983), Z900A4 (1976) GPZ1100 Unitrak (1983)(project), RD250B (1975)(project), ZRX1200R (2005) DT175MX (1981) YZF R6 (1999)

http://www.bikerstoolbox.co.uk

User avatar
RALPHARAMA
Area Rep.
Area Rep.
Posts: 3407
Joined: 19th May 2007
Location: Pensford, Somerset
Contact:

#8 PostAuthor: RALPHARAMA » Mon Dec 31, 2007 5:07 pm

It gets worse :swe

I figured the only way I was to get to bottom of this mystery was to split the bloody cases again. I had dropped a bollock as the needle roller case on the inside end of the output shaft must have been slightly misalligned and had forced the dowel pin deeper into the casting so that it wasn't doing it's job. :oops:

I naturally assumed that this was the problem and made efforts to remove it ... not easy as it was now flush with the bottom of the bearing cup in the casing. First tried a centre drill but the skated across the surface. Tried a gentle tap with a centre punch - that'll need regrinding! The only other way I could see of removing it was to weld something to it and then pull it out. I figured with the heat of the weld that would expand the aluminium faster than the dowel and should make it a goer. Following the advise of my welding guru, I started with a fine ground tungsten and made a weld blob on top using 316 wire and then welded a 304 bolt onto that. Whilst still warm i tried to twist and pull it up put as my pressure increased the bolt simply sheared off ! I turned the end of a bigger bolt to a taper and welded that on, but that broke off also. I figured that the weld blob should be soft enough so I should be able to get a drill started on that, and hopefully the dowel would have lost some of it's temper with the welding ... wrong. I eventually removed the weld blob and tried to drill the dowel in the pillar drill .. not a fakin chance.

At this point I have accepted that the dowel doesn't want to come out. I figured that I should blue up the bearing case and mark position without the the shaft in it and the on final assembly stick the bastard in with Loctite 638. On basis that 638 sticks tighter than a revenue inspector to sole trader, I figured a dry run was wise. After many failed attempts I took everything out of the casings save the selection drum and output shaft, so that I could poke at the back of the roller case if necessary. I am now absolutley sure that this is not the problem as apart from anything else the possible movement in the casing for the roller case isn't enough. The selector fork pawl is at least 1/8" away from where it needs to be. Having played with it now, it seems that first gear can be selected and then neutral, but the misalignment prevents 2nd and onwards.

Had I not ridden the bike, I would be convinced that it could never work ... but it did. I have poured over the workshop manual (genuine Kwak) and parts book and everything seems to be where it should be. I have taken fourth gear off the shaft, (found the balls after they shot across the floor) and the only way I can see to make it work would be to strip the shaft and stick the shaft in the mill and extend the slots that the balls run in. 'Spect it's as hard as a whore's heart and would blunt my milling cutters. :cry: It shouldn't be necessary the bloody thing was running and I haven't changed anything :swe

Any one wanna flog me a running engine cheap :wink:
Ralph Ferrand

Z1000A1 (1977), Z1300A5 (1983), Z900A4 (1976) GPZ1100 Unitrak (1983)(project), RD250B (1975)(project), ZRX1200R (2005) DT175MX (1981) YZF R6 (1999)

http://www.bikerstoolbox.co.uk

User avatar
Pigford
Hardcore
Hardcore
Posts: 13314
Joined: 2nd Jan 2006
Location: North Dorset

#9 PostAuthor: Pigford » Mon Dec 31, 2007 5:18 pm

Ralph, you didn't understand me first comment :?: You say:
Having played with it now, it seems that first gear can be selected and then neutral, but the misalignment prevents 2nd and onwards.

When the bikes not running & moving, Kawasaki designed it so you CANNOT ENGAGE 2nd GEAR, UP WARDS :!:
When stationary, there are ball bearings that lock the gear selection so only neutral & 1st can be selected, until the bikes moving, then they fall into slots enabaling 2nd gear, etc :P
And on the 7th day... Zeds were created!

User avatar
RALPHARAMA
Area Rep.
Area Rep.
Posts: 3407
Joined: 19th May 2007
Location: Pensford, Somerset
Contact:

#10 PostAuthor: RALPHARAMA » Tue Jan 01, 2008 12:18 pm

Now I understand! I thought that you meant that some quacks had a fault making selecting second difficult. :oops:

Have now assertained that all is well. :lol:

Many thanks Mark.

Best I get busy with the Wellseal and torque wrench!

See you soonish
Ralph Ferrand

Z1000A1 (1977), Z1300A5 (1983), Z900A4 (1976) GPZ1100 Unitrak (1983)(project), RD250B (1975)(project), ZRX1200R (2005) DT175MX (1981) YZF R6 (1999)

http://www.bikerstoolbox.co.uk

User avatar
Davy Doherty
Hardcore
Hardcore
Posts: 3009
Joined: 28th Oct 2003
Location: Derry Ireland

#11 PostAuthor: Davy Doherty » Tue Jan 01, 2008 2:14 pm

Pigford to the rescue Well done mark!!Dosen't Dave Marsden mention this very problem in his book he comments about how many calles he gets over it!!
Life's too short!

User avatar
london calling
Hardcore
Hardcore
Posts: 3992
Joined: 16th Apr 2004
Location: Loughborough, East Midlands

#12 PostAuthor: london calling » Tue Jan 01, 2008 3:24 pm

Kawasaki's little joke catches another victim.
One thing's for sure Ralph,you won't get caught again :wink:
Jack

User avatar
RALPHARAMA
Area Rep.
Area Rep.
Posts: 3407
Joined: 19th May 2007
Location: Pensford, Somerset
Contact:

#13 PostAuthor: RALPHARAMA » Tue Jan 01, 2008 7:00 pm

Thanks again Mark :D

The box is back together now. Oddly in the manual it doesn't mention repacing the union/manifoldy casting that acts as the oil pressure switch. All its gives is the torque setting for the plastic part on the top which it describes as the switch but as far as I can see the hole casting is and inherent part of the pressure switch and the bit on top it describes as the switch is only the connection and insulator.

I decided to take the stator windings out of the dynamo casing to bling the casing and remove the gouges caused by a past rider dropping her. When removing the sub loom I realised that the insulation on the wires is dog and ducked, to the point where the conductors are clearly visible though the many cracks. I assume that the wires are sweated onto the copper windings under the bits of varnished fabric type insulation covering the joints. What is the view as to the best way to repair? Make a new sub loom or are they available at a non-pisstake price as a spare. I guess that I can buy all the component parts from Vehicle Wiring Products, though I doubt that colour coded multi plugs are available but possibly new spades could be fitted into the original block? I already have a ratchet crimping to for non-insulated terminals and a good stock of Japanese bullets I sourced for making up bits for the bike.

I am tempted to make up a new loom anyway as the wire insulation in general is bound to have gone a bit hard and therefore more fragile but the thing that has stopped me so far is trying to work out how much of each of the many colours or wire I would require. I do not want loads of extra wire kicking around post project! I have very limited storage space in my new workshop and I already have miles of surplus wire and cable left over from other projects which take up too much space and rarely seem to be required again!
Ralph Ferrand

Z1000A1 (1977), Z1300A5 (1983), Z900A4 (1976) GPZ1100 Unitrak (1983)(project), RD250B (1975)(project), ZRX1200R (2005) DT175MX (1981) YZF R6 (1999)

http://www.bikerstoolbox.co.uk

User avatar
Pigford
Hardcore
Hardcore
Posts: 13314
Joined: 2nd Jan 2006
Location: North Dorset

#14 PostAuthor: Pigford » Tue Jan 01, 2008 7:38 pm

Ralph, if ur good at wiring I may need a hand with my bike as I think its gonna need a bit of 'upgrading' :cry:
And on the 7th day... Zeds were created!

Ed Z1-R
Hardcore
Hardcore
Posts: 2347
Joined: 14th Oct 2005

#15 PostAuthor: Ed Z1-R » Tue Jan 01, 2008 8:30 pm

DIY Loom :up
As for amounts required............
Blk/y, Bn about 5metres each(as need drops)
the rest......................
measure sickle head to toe that amount will do.
REMEMBER......leave the tails long as it'll shrink whilst wrappin it up.

Ps certain colours are NLA


Return to “Bike Help”

Who is online

Users browsing this forum: No registered users and 11 guests