Hello Guest User,

Please feel free to have a look around the forum but be aware that as an unregistered guest you can't see all of it and you can't post.

To access these 'Registered Users Only' areas simply register and login.

Pigford's Red Zed - long term projext XYZ

Work in Progress

Moderators: KeithZ1R, chrisu, paul doran, Taffus

Message
Author
User avatar
Pigford
Hardcore
Hardcore
Posts: 13314
Joined: 2nd Jan 2006
Location: North Dorset

Pigford's Red Zed - long term projext XYZ

#1 PostAuthor: Pigford » Sun Oct 07, 2007 11:27 am

Well, this won't be a quick project, but, heres some for starters :roll:

Image
95% all there :|
Image
Nice condition paint work :wink:
Image
Image
Think carbs are correct, with large brass drain plugs under :?:
Gonna get up and running nicely first then strip frame down & painted :?
Clean motor & get some polishing done ( Mikey :) ).
Got a sound Neta that I'm gonna convert into sumink a bit tastier too :!:Just ordered some bits from Z Power (sorry Fer), brake seal kit, tank rubbers (front round ones) s/s exhaust stud. Gonna use new bits on me good Z1000 & put them on this one :shock:
And on the 7th day... Zeds were created!

User avatar
Pigford
Hardcore
Hardcore
Posts: 13314
Joined: 2nd Jan 2006
Location: North Dorset

#2 PostAuthor: Pigford » Sun Oct 14, 2007 2:49 pm

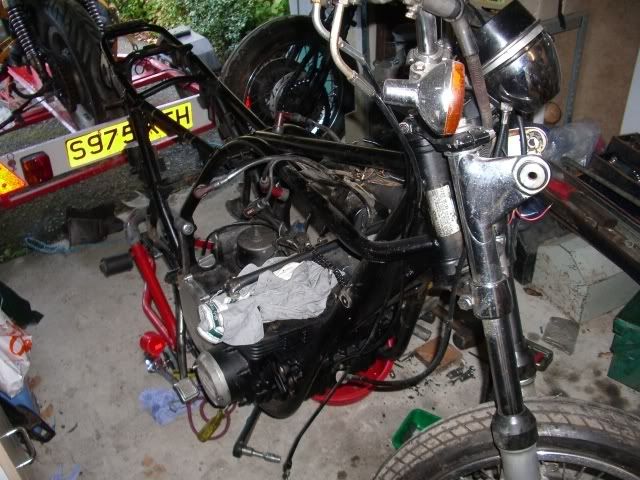
Decided to have a quick look at the engine :??
I removed 6 off the 8 exhaust studs, one has snapped off, another very tight. Oh well, best whip the head off then :roll:
Cam cover & carbs are off, once HT leads are removed, cam cover wriggles off towards rear of head.
Image
Loosen cam journal bolts evenly, and centre roller guide. Remove roller guide (mine has mucho play!) and tie sumink to cam chain so it can't fall down tunnel. Now cam caps can be removed (numbered as machined precisiely to each position in head!) and camshafts.
Image
Its important to work methodically and NOT mix up position of parts. Lables and/or photos help.
Image
I've marked the shims & buckets for easier replacement, even tho I'll have to recheck & probably re-shim later.
Image
Barrel look & feel really good. No scars, scratches or marks :lol:
Image
I need to remove one stubborn exhaust stud & another on has snapped off flush :cry:
And on the 7th day... Zeds were created!

User avatar
london calling
Hardcore
Hardcore
Posts: 3992
Joined: 16th Apr 2004
Location: Loughborough, East Midlands

#3 PostAuthor: london calling » Sun Oct 14, 2007 3:16 pm

1,2,3,4,....11,12,13,14 :?: :?:
Must be some kind of secret ironing board user numerical code.
Jack

Pasc
Hardcore
Hardcore
Posts: 1656
Joined: 4th Jun 2006
Location: W Mids

#4 PostAuthor: Pasc » Sun Oct 14, 2007 3:26 pm

london calling wrote:1,2,3,4,....11,12,13,14 :?: :?:
Must be some kind of secret ironing board user numerical code.

Dorset Binary ?

User avatar
Pigford
Hardcore
Hardcore
Posts: 13314
Joined: 2nd Jan 2006
Location: North Dorset

#5 PostAuthor: Pigford » Sun Oct 14, 2007 4:44 pm

:oops:
I can only count up to 4 :??
And on the 7th day... Zeds were created!

User avatar
simon gilling
Regular Poster
Posts: 96
Joined: 25th Apr 2002
Location: Warwickshire

#6 PostAuthor: simon gilling » Wed Oct 17, 2007 2:03 am

Mark
Nice photo diary of the strip down, have you been checking out Dave Marsden's builds which he photo documents on the Z-Power site?

I like the 'Dorset Binary' but dont' get confused when you re-assemble it because you have marked your exhaust valves up as I1,I2,I3,I4.
I would have marked the Exhaust valves as E1,E2,E3,E4, but then my last project bike is still a non-runner!

Whats the project direction? standard or custom?

Cheers simon
Don't ask me, I just got here myself!

User avatar
Pigford
Hardcore
Hardcore
Posts: 13314
Joined: 2nd Jan 2006
Location: North Dorset

#7 PostAuthor: Pigford » Wed Oct 17, 2007 3:27 pm

Simon, if I'm totally honest, I did start to mark 'em as Inlet, then realised my error (BL**DY GOOD START, HOW CONFIDENT AM I IT'LL EVER RUN) , but have plenty of photos to back it all up :oops:
And on the 7th day... Zeds were created!

User avatar
Pigford
Hardcore
Hardcore
Posts: 13314
Joined: 2nd Jan 2006
Location: North Dorset

#8 PostAuthor: Pigford » Thu Oct 18, 2007 11:55 am

Got the bike stripped down ready for a frame swap at Staffs :shock: with a fellow member :twisted:
Image

Image

This bit was surprisingly, wheelie easy to remove, s/arm spindle slid out no bovver :!:
Image
Getting the engine sprocket off was another story tho :cry: bl**dy endless chains. Been torqued up by Jeff Capes & a 12ft scaffold bar :evil: Shame there's not enough room to lift the chain off the sprocket without having to undo it :roll:
And on the 7th day... Zeds were created!

Padders
Hardcore
Hardcore
Posts: 4875
Joined: 15th Jan 2006
Location: Grimsby Lincolnshire

#9 PostAuthor: Padders » Thu Oct 18, 2007 3:48 pm

Oh the joys of restoration. Years of mis use stupid bodges etc all slowly revealed under the oil and muck.

We must all be mad :lol:

phil churchett
Hardcore
Hardcore
Posts: 3009
Joined: 28th Mar 2003
Location: Warwickshire

#10 PostAuthor: phil churchett » Thu Oct 18, 2007 6:03 pm

Hey Pigford, you must be going up in the world, i spied an M&S bag in one of your pics.
Four pipes rule, anything else is second best.

User avatar
Pigford
Hardcore
Hardcore
Posts: 13314
Joined: 2nd Jan 2006
Location: North Dorset

#11 PostAuthor: Pigford » Thu Oct 18, 2007 6:12 pm

That is definitely, not just an ordinary plastic bag, that is a special M&S limited edition, recyclable carrier :smk
Its become a favourite, as I've re-used it several times already :??
And on the 7th day... Zeds were created!

User avatar
Muddychris
100Club
100Club
Posts: 171
Joined: 14th Aug 2007
Location: Norwich

#12 PostAuthor: Muddychris » Thu Oct 18, 2007 7:30 pm

I had too split my chain to get it off. Bought a new link cost me ?5, Happy with that.

Cheers

Chris
Experience is something you don't get until just after you need it.

User avatar
Pigford
Hardcore
Hardcore
Posts: 13314
Joined: 2nd Jan 2006
Location: North Dorset

#13 PostAuthor: Pigford » Thu Oct 18, 2007 7:38 pm

Muddy, I'd have got me grinder to it, but had to strip the frame down, so didn't matter too much.
I did have a split link, but when I fitted my billet engine mounts, what with the off-set sprocket, the link came off - see marks in mount - but luckily I notice it missing when cleaning the bike :shock:
I only use rivet links now.
Image
And on the 7th day... Zeds were created!

User avatar
debben1
100Club
100Club
Posts: 449
Joined: 17th Feb 2004
Location: Ringwood
Contact:

#14 PostAuthor: debben1 » Mon Oct 22, 2007 4:34 pm

Wow !! Look at those exhaust pipes :yay keep the progress reports coming Pigford, Steve

User avatar
Pigford
Hardcore
Hardcore
Posts: 13314
Joined: 2nd Jan 2006
Location: North Dorset

#15 PostAuthor: Pigford » Mon Dec 03, 2007 6:30 pm

Got me frame, swingarm & battery box back from the sprayers:
Image
Image
Image
Apparently, coz it was only just finished today, I gotta leave it for a few days to harden fully.
Its been blasted, had 1 coat primer, rubbed down, another epoxy primer coat. Then 2 x coats (2-pack) black. Nice job for me ?100 + a bottle of scotch :P
Mikey's got the casings ready for collection this coming Saturday, so I'll put them on here at the weekend :wink:
And on the 7th day... Zeds were created!


Return to “Projects”

Who is online

Users browsing this forum: No registered users and 6 guests