Hello Guest User,
Please feel free to have a look around the forum but be aware that as an unregistered guest you can't see all of it and you can't post.
To access these 'Registered Users Only' areas simply register and login.
Please feel free to have a look around the forum but be aware that as an unregistered guest you can't see all of it and you can't post.
To access these 'Registered Users Only' areas simply register and login.
Z1100ST Resto +
Moderators: KeithZ1R, chrisu, paul doran, Taffus

-
Is Vic There
- Hardcore

- Posts: 1460
- Joined: 8th Nov 2011
- Location: Brisbane, Australia.

-
RALPHARAMA

- Area Rep.

- Posts: 3407
- Joined: 19th May 2007
- Location: Pensford, Somerset
- Contact:
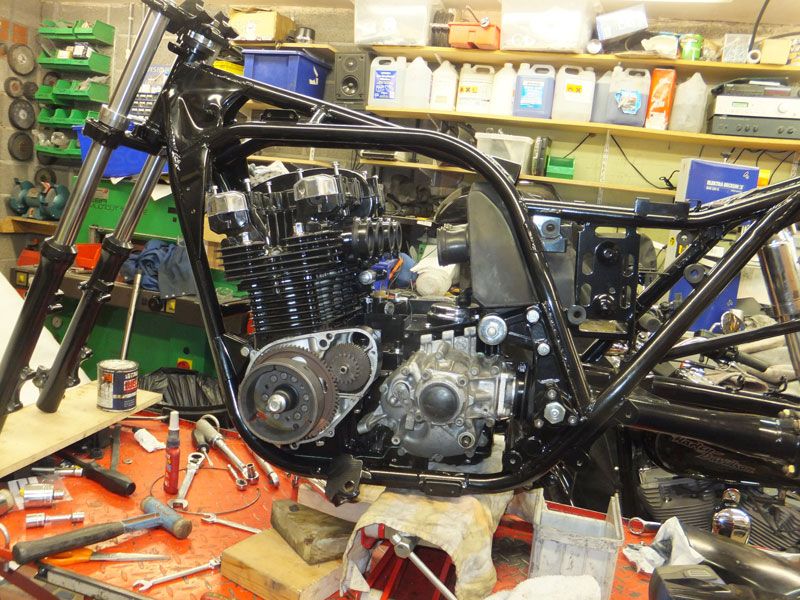
I've been putting in a bit of time in the evenings this week. Big problem I've come up against is that as I had to shelve this project during the summer, to work on a Hardley chop, and then there was the big workshop upheaval; I have been struggling to find some of the little bits and have found myself buying the bloody things again, only to find a week later I had them after all 
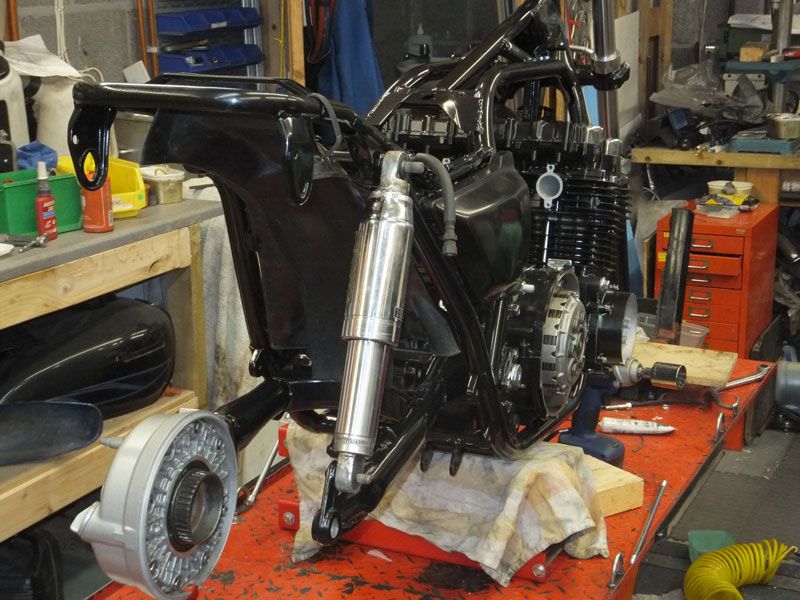
The only bit I didn't totally strip and re-build was the front bevel box. I took some of it apart, but I soon realised that it was probably best left alone as it would appear to be extremely tricky to set up if disturbed, with the requirement for all sorts o measuring and shimming etc. Given that it can't be seen when installed I took the view to leave it be.
Building up the shaft once the bevel box was in place was an interesting job; I'm not sure it was essential, but I found it easiest the take the swinger out again, especially with the coupling boot from the shaft/swinger to the forward bevel box. The swinging arm has to be positioned fairly accurately horizontally using a 1.5mm shim against the frame on the left hand side (I used a drill bit). A big pain was at the other end - there is a splined coupler between the shaft and the rear bevel box. This has to be slid on the shaft and then has a spacer and then a circlip fitted. The circlip however was right up in and none of my circlip pliers would get anywhere near. I bought the longest set I could find, but the bits were two large in diameter to fit the holes in the circlip, so I removed the bits and set them up in the four jaw chuck on the lathe, clocked the pins in and machined them down to fit. This was pretty difficult as they were, of course, good quality and therefore bloody hard and I was only able to take one thou cuts, even with a TC tipped tool! Bit of a palaver, but finally got the rear box on
When I bought the seals for the front forks air balance pipe, I could only get one! This worked out OK as I then miced it up and found to my eternal joy that my big box of 'o' rings had plenty that size These big boxes of 'o' rings can save you a bloody fortune - and yes I do sell 'em on BTB http://www.bikerstoolbox.co.uk/acatalog/Bits_and_Bobs.html  At this point I realised there should be some form of clamp to stop the air balance seal bit moving up the fork leg. I don't remember seeing them when I stripped the bike
  In the parts book they look a bit ugly, so maybe I'll machine something prettier
  Just need to come upon some suitably large ally bar - a visit to the scrapper seem imminent
I picked up some pattern side panels at Stafford, which was a result - £55 a pair I'm going to have to get my self prepared to do some painting soon. I'll probably paint the high build primer at home and get it properly flatted and then put the fancy shit on in a proper spray booth. I still have to get myself sure of colours - I keep swinging from a fairly simple candy red with gold pin strips to a perl black with candy purple panels with silver lines around the panels which would be very difficult to mask - for a rank amateur anyway 
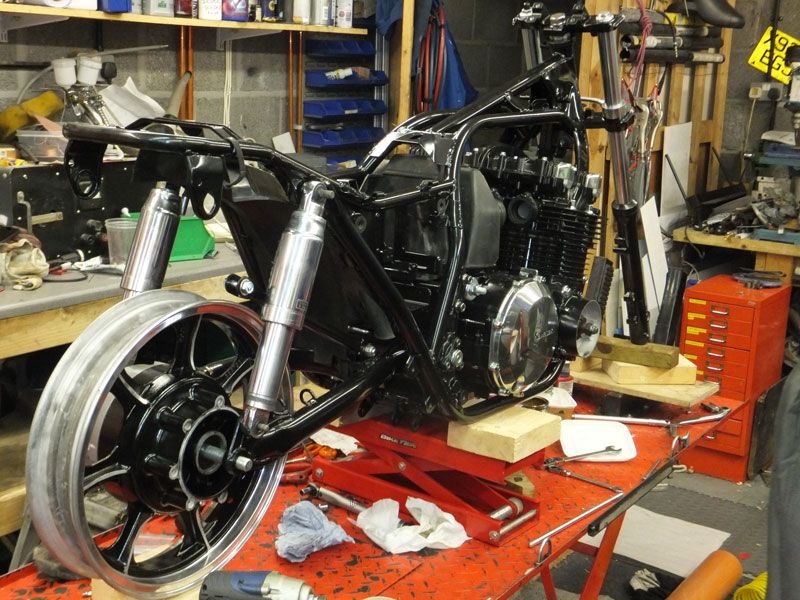
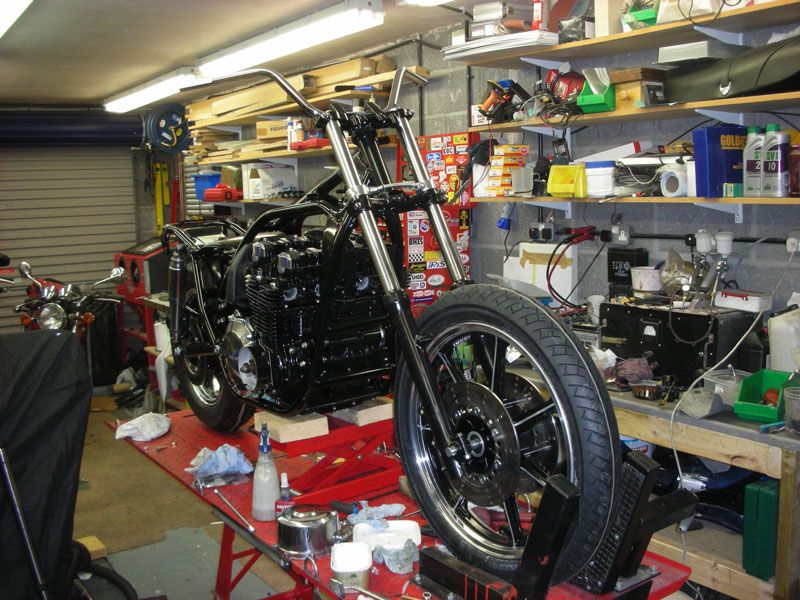
Here's a couple of snaps I took this morning
The only bit I didn't totally strip and re-build was the front bevel box. I took some of it apart, but I soon realised that it was probably best left alone as it would appear to be extremely tricky to set up if disturbed, with the requirement for all sorts o measuring and shimming etc. Given that it can't be seen when installed I took the view to leave it be.
Building up the shaft once the bevel box was in place was an interesting job; I'm not sure it was essential, but I found it easiest the take the swinger out again, especially with the coupling boot from the shaft/swinger to the forward bevel box. The swinging arm has to be positioned fairly accurately horizontally using a 1.5mm shim against the frame on the left hand side (I used a drill bit). A big pain was at the other end - there is a splined coupler between the shaft and the rear bevel box. This has to be slid on the shaft and then has a spacer and then a circlip fitted. The circlip however was right up in and none of my circlip pliers would get anywhere near. I bought the longest set I could find, but the bits were two large in diameter to fit the holes in the circlip, so I removed the bits and set them up in the four jaw chuck on the lathe, clocked the pins in and machined them down to fit. This was pretty difficult as they were, of course, good quality and therefore bloody hard and I was only able to take one thou cuts, even with a TC tipped tool! Bit of a palaver, but finally got the rear box on
When I bought the seals for the front forks air balance pipe, I could only get one! This worked out OK as I then miced it up and found to my eternal joy that my big box of 'o' rings had plenty that size
I picked up some pattern side panels at Stafford, which was a result - £55 a pair
Here's a couple of snaps I took this morning
Ralph Ferrand
Z1000A1 (1977), Z1300A5 (1983), Z900A4 (1976) GPZ1100 Unitrak (1983)(project), RD250B (1975)(project), ZRX1200R (2005) DT175MX (1981) YZF R6 (1999)
http://www.bikerstoolbox.co.uk
Z1000A1 (1977), Z1300A5 (1983), Z900A4 (1976) GPZ1100 Unitrak (1983)(project), RD250B (1975)(project), ZRX1200R (2005) DT175MX (1981) YZF R6 (1999)
http://www.bikerstoolbox.co.uk


-
RALPHARAMA
- Area Rep.
- Posts: 3407
- Joined: 19th May 2007
- Location: Pensford, Somerset
- Contact:
It's been a bit of a frustrating weekend really; the sage of not being able to find bits that I'm fairly sure I should have. Some bits I thought were gone have shown up since I bought new. Progress has been sporadic to say the least and I'm not even sure what I have done now
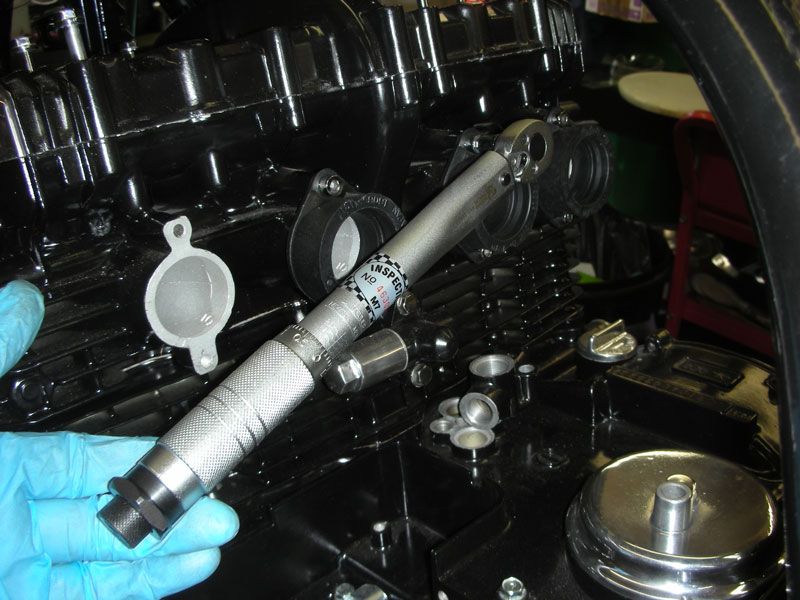
I fitted the carb rubber stub mounts; I know that cos here's a pic of me doing the job with my new 1/4" King Dick (yes that's a cue for Jimmock ) torque wrench, which I have found much lighter and more appropriate on the 6mm bolts in ally.
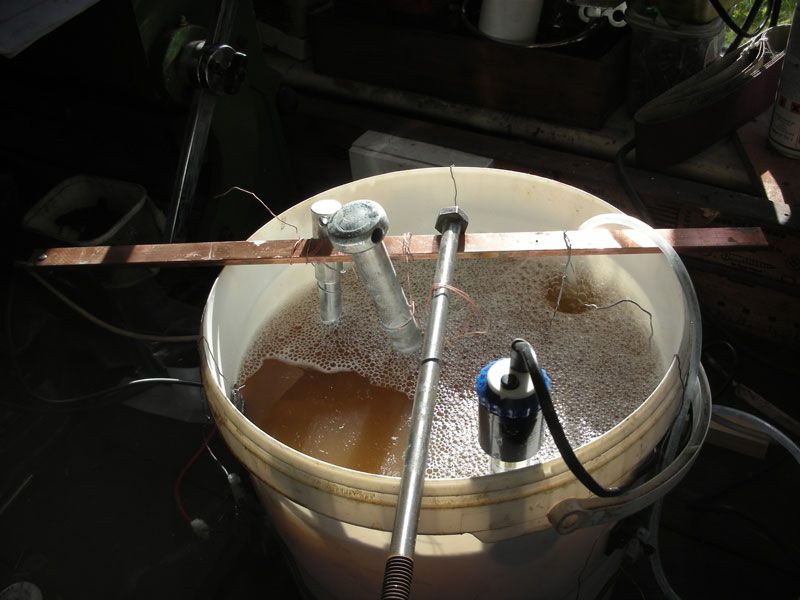
I did loads of zinc plating; as you can see I had to do the wheel spindles in two bites!
That wasn't very good as I had to take most of it off again as the plating made them too bloody big to fit the various holes grr
A couple of side on shots for Mr Puffin:

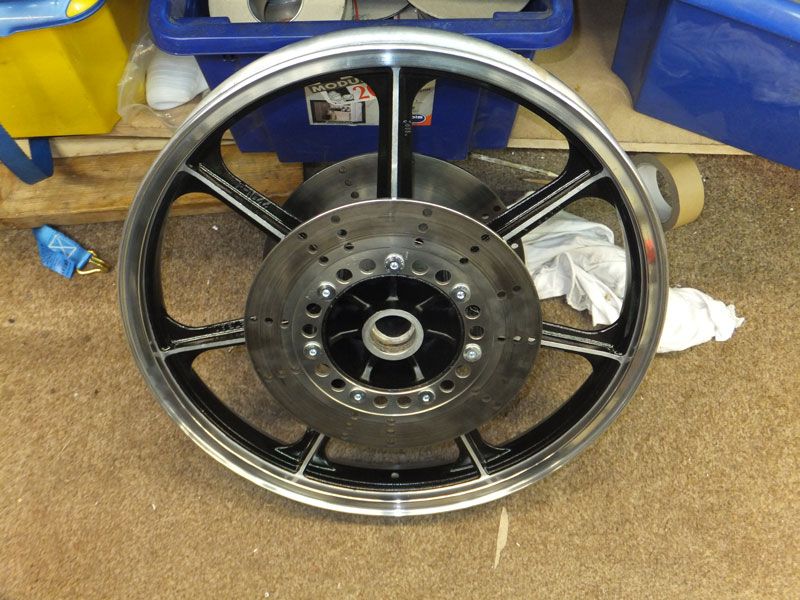
I put the discs on the front wheel, having blown the insides of the wheel over with a bit o paint from a rattle can - yes, I masked the inside bit when I painted 'em first time; forgot you could see through the inside of the discs on these wheels
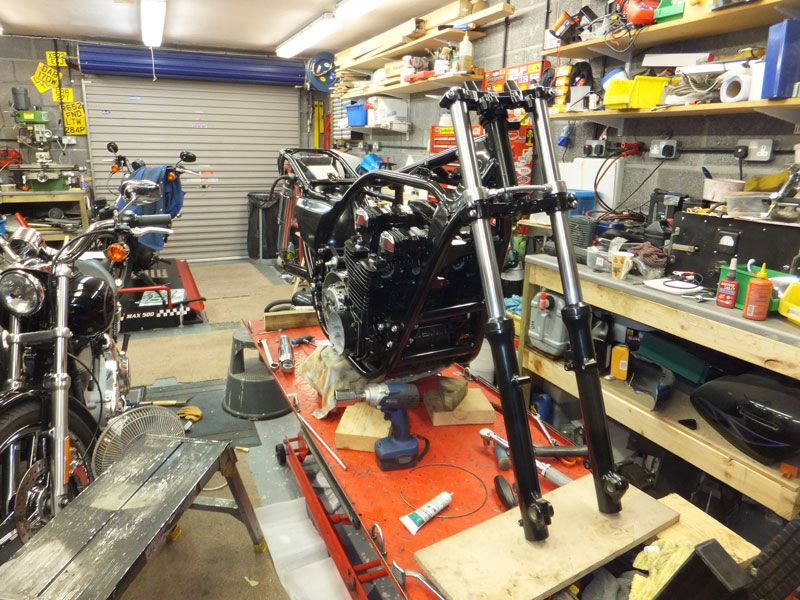
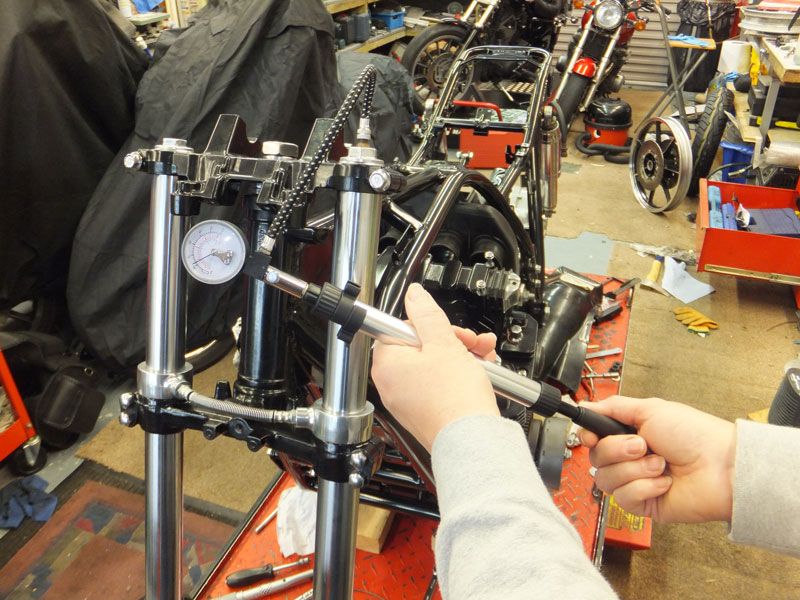
I fitted the front forks which was slightly tricky. With the help of CB I took lots of photos of pumping up the air forks, so we can show how the pump works on the BTB website
I've done lots of machining and polishing of bolts for the screws that hold casings on. Whilst I have been re-plating many of the original flange and numbered bolts, I'm not refitting those poxy philips head screws made of cheese
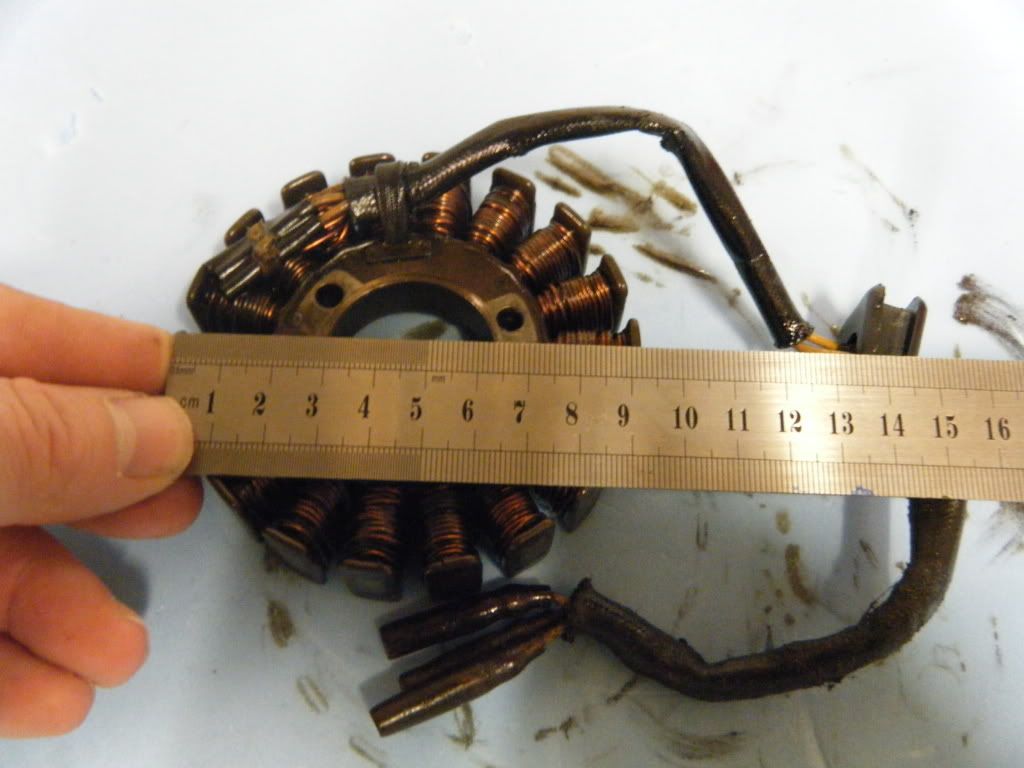
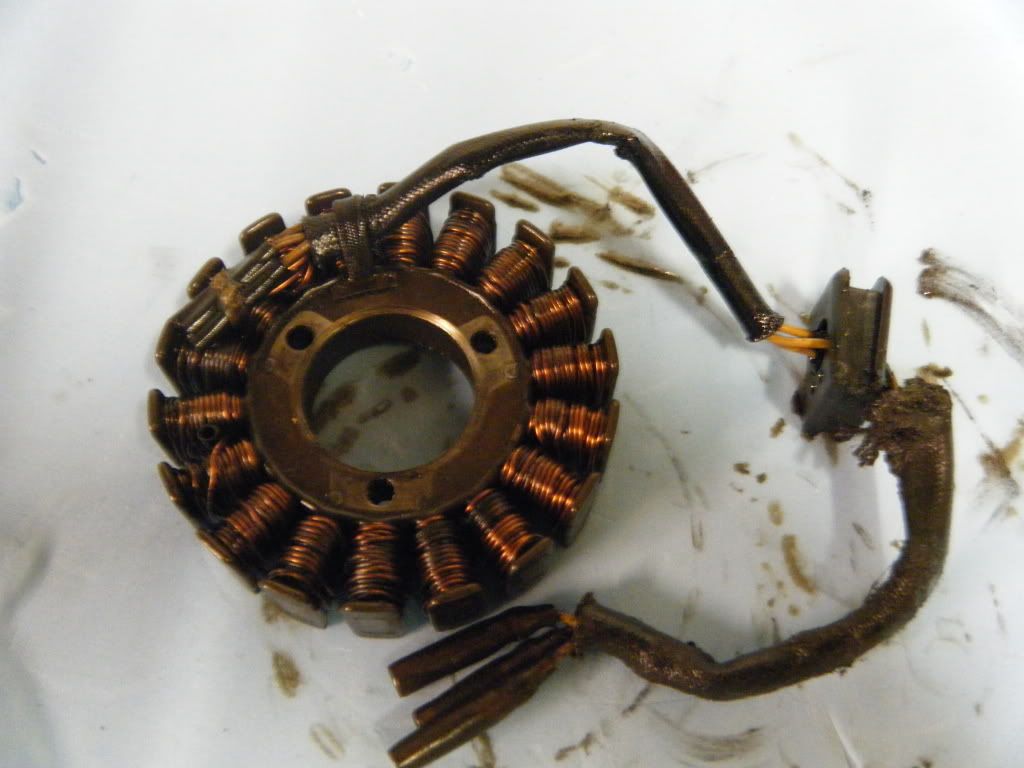
I painted up the casings with Wellseal to refit the alternator and fitted the gasket only to discover that the firkin rotor OR the windings are wrong
I'm not sure which is to blame grr, but they certainly aren't compatible.
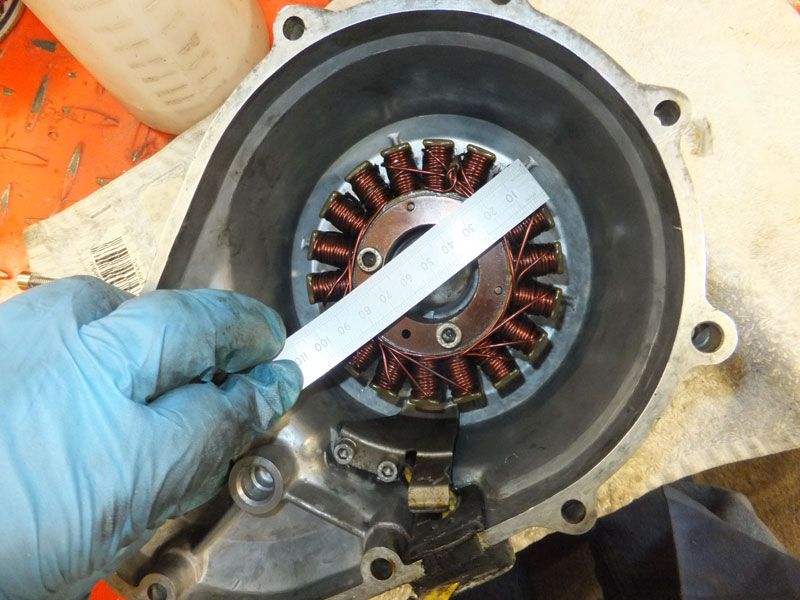

Any ideas?
Here's how I have just left her
I fitted the carb rubber stub mounts; I know that cos here's a pic of me doing the job with my new 1/4" King Dick (yes that's a cue for Jimmock
I did loads of zinc plating; as you can see I had to do the wheel spindles in two bites!
That wasn't very good as I had to take most of it off again as the plating made them too bloody big to fit the various holes grr
A couple of side on shots for Mr Puffin:
I put the discs on the front wheel, having blown the insides of the wheel over with a bit o paint from a rattle can - yes, I masked the inside bit when I painted 'em first time; forgot you could see through the inside of the discs on these wheels
I fitted the front forks which was slightly tricky. With the help of CB I took lots of photos of pumping up the air forks, so we can show how the pump works on the BTB website
I've done lots of machining and polishing of bolts for the screws that hold casings on. Whilst I have been re-plating many of the original flange and numbered bolts, I'm not refitting those poxy philips head screws made of cheese
I painted up the casings with Wellseal to refit the alternator and fitted the gasket only to discover that the firkin rotor OR the windings are wrong
I'm not sure which is to blame grr, but they certainly aren't compatible.
Any ideas?
Here's how I have just left her
Ralph Ferrand
Z1000A1 (1977), Z1300A5 (1983), Z900A4 (1976) GPZ1100 Unitrak (1983)(project), RD250B (1975)(project), ZRX1200R (2005) DT175MX (1981) YZF R6 (1999)
http://www.bikerstoolbox.co.uk
Z1000A1 (1977), Z1300A5 (1983), Z900A4 (1976) GPZ1100 Unitrak (1983)(project), RD250B (1975)(project), ZRX1200R (2005) DT175MX (1981) YZF R6 (1999)
http://www.bikerstoolbox.co.uk
-
RALPHARAMA
- Area Rep.
- Posts: 3407
- Joined: 19th May 2007
- Location: Pensford, Somerset
- Contact:
Any one who wants to see how I got on fitting the barrels, might be interested in watching the video - I shot it with my mate to promote the tools I'm selling on Biker's Toolbox:
http://www.bikerstoolbox.co.uk/acatalog/Installing_Pistons.html
I made a special tool for holding the pistons at TDC and used the first prototype in this video. I then redesigned it and made another prototype which I used fitting the barrels on CB's Zephyr, which was ace. Sadly I don't currently have enough of the filthy lucre to put it into production. I did get some quotes for the CNC machining, but it required too much capital, which I don't have in the large supply I have of ideas
More later
Ralph Ferrand
Z1000A1 (1977), Z1300A5 (1983), Z900A4 (1976) GPZ1100 Unitrak (1983)(project), RD250B (1975)(project), ZRX1200R (2005) DT175MX (1981) YZF R6 (1999)
http://www.bikerstoolbox.co.uk
Z1000A1 (1977), Z1300A5 (1983), Z900A4 (1976) GPZ1100 Unitrak (1983)(project), RD250B (1975)(project), ZRX1200R (2005) DT175MX (1981) YZF R6 (1999)
http://www.bikerstoolbox.co.uk
-
RALPHARAMA
- Area Rep.
- Posts: 3407
- Joined: 19th May 2007
- Location: Pensford, Somerset
- Contact:
Took delivery of some M10 x 1.25 stainless domed nuts. They were a tad rough on the finish:
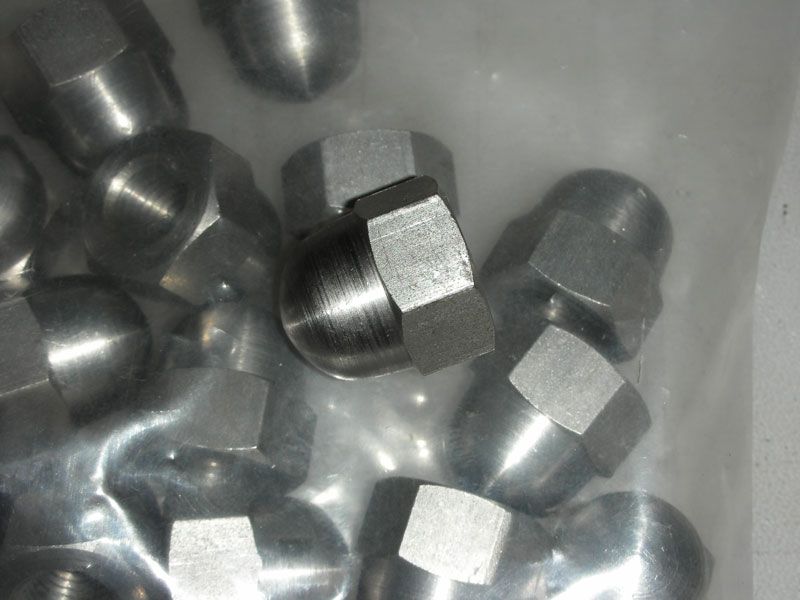
So I Mikey'd a few of 'em
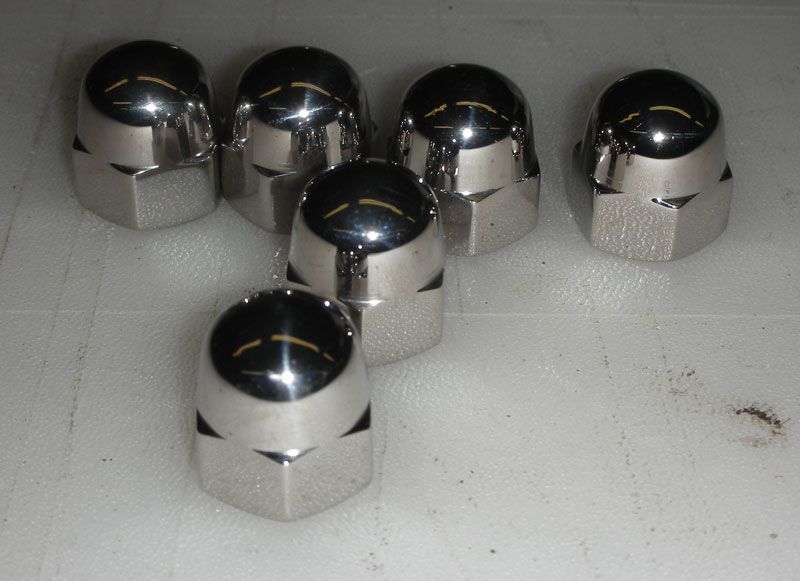
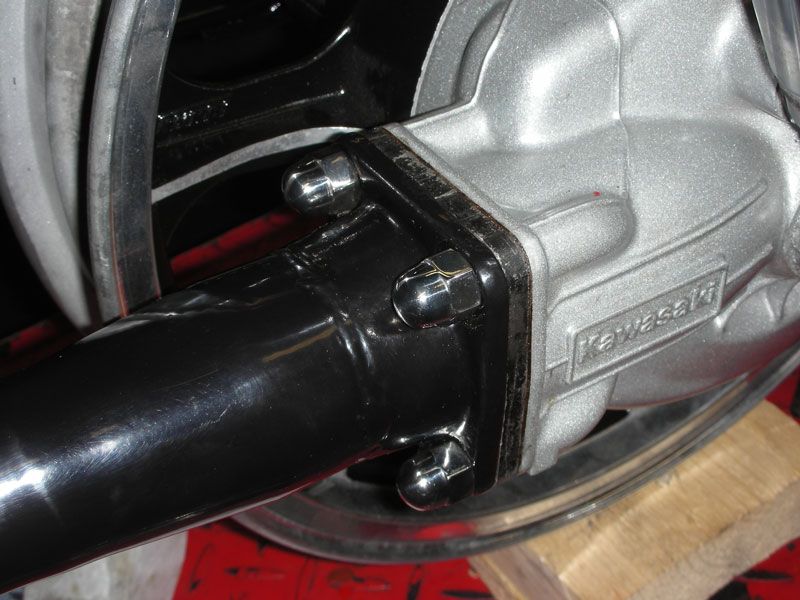
... and then stuffed four of 'em on the rear bevel box - those cad plated, plain nuts really didn't look right.
I am off to see my local dealer of stainless threaded items today to get some more stock for the workshop - I knew that he didn't have any fine thread domes, so I had to pay in excess of thirty beer vouchers for 25 nuts It gave me a cardiac arrest of the wallet It's really worth while shopping around for threaded bling and buying larger quantities as the unit price plummets, and it's nice to have stock
So I Mikey'd a few of 'em
... and then stuffed four of 'em on the rear bevel box - those cad plated, plain nuts really didn't look right.
I am off to see my local dealer of stainless threaded items today to get some more stock for the workshop - I knew that he didn't have any fine thread domes, so I had to pay in excess of thirty beer vouchers for 25 nuts
Ralph Ferrand
Z1000A1 (1977), Z1300A5 (1983), Z900A4 (1976) GPZ1100 Unitrak (1983)(project), RD250B (1975)(project), ZRX1200R (2005) DT175MX (1981) YZF R6 (1999)
http://www.bikerstoolbox.co.uk
Z1000A1 (1977), Z1300A5 (1983), Z900A4 (1976) GPZ1100 Unitrak (1983)(project), RD250B (1975)(project), ZRX1200R (2005) DT175MX (1981) YZF R6 (1999)
http://www.bikerstoolbox.co.uk
-
needaz1100r
- Custard Cream

- Posts: 601
- Joined: 11th Sep 2012
- Location: Reading
[quote="vduk"]Any one who wants to see how I got on fitting the barrels, might be interested in watching the video - I shot it with my mate to promote the tools I'm selling on Biker's Toolbox:
http://www.bikerstoolbox.co.uk/acatalog/Installing_Pistons.html"
Yes thank you very much, I have just spent 10 mins perusing the Biker's Toolbox website and relieved myself of a few of my hard earned pounds and earned myself another evening explaining exactly why I just can't live without the things I bought even though I managed perfectly well before.
Excellent site, is it yours? If so well done, it's a great site.
Cheers
Mark
-
RALPHARAMA
- Area Rep.
- Posts: 3407
- Joined: 19th May 2007
- Location: Pensford, Somerset
- Contact:
FFS This fecking bike will be the death of me !!! It's one forward and two back all the bleedin way!!!
Padders, a veritable gentleman, nay Saint, was kind enough to send me down a winding for this ungrateful pile of ?@*%!!!!! Yes it matched the rotor, but then the winding wouldn't fit the bleeding casing grrr. In desperation I ordered a correct rotor from Electrex World for about nine million pounds I don't have and sure enough it'll fit the crank, though it does have an unnecessary key way on it, but I'm not convinced that it isn't a bit big for the winding; not sure what the clearance should be, but it does seem to have a pretty good air gap. I do wonder what the clearance should be. Praps they have a cunning plan to make folk buy both parts. As these motors have a tendency to shed their magnets, as the original had on this bike, I thought the after market one might be a better bet than a second hand one, which was less than a tenner cheaper on flea bay (DK) I've tried getting them to give me some trade before and they don't seem very forth coming
As though that wasn't enough, I realised that the head lamp is a wrong 'un as well I suspect that the head lamp is off an 1100R cos it's rectangular rather than round. There's also some evidence on the bracket of some unskilled bending I hadn't noticed before I sent it for powder coating Sod's law dictated that there are none to be had on fleabay
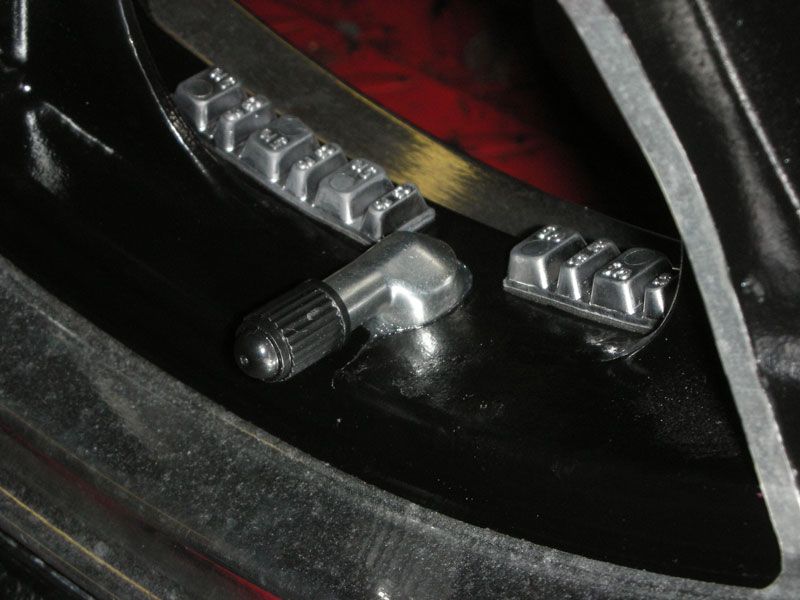
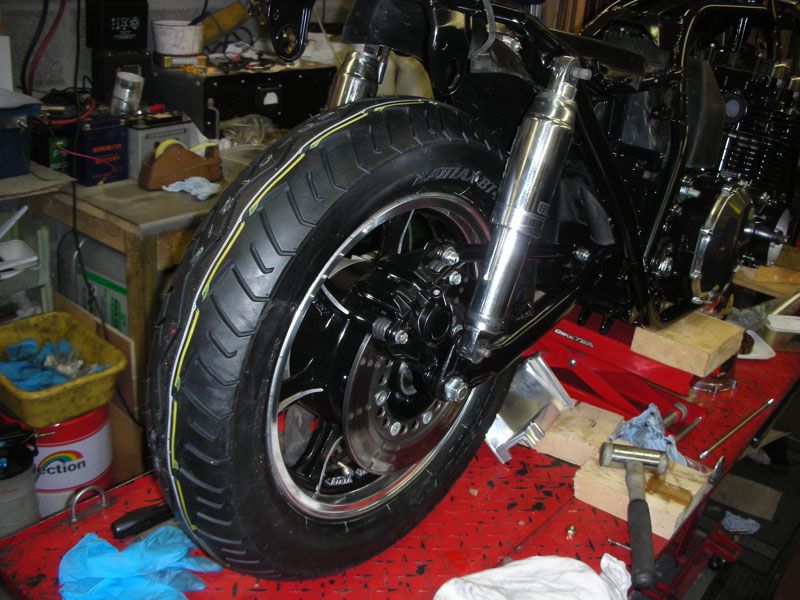
On a more positive note, I have now fitted both tyres and the wheels are in place. I have fitted Triumph angled tyre valves, cos I get so hacked off with trying to get air lines on the standard ones, which as you know is almost impossible. Sadly the hole in the wheels was bigger than it should have been so they're a bit of a sloppy fit. They're staying up, but I do think I ought to do something better.
Had planned to start the paint work this weekend, but I forgot to buy a new set of gauntlets for the bead blast cabinet and the weather forecast is sooooo foul that bearing naked mild steel is a total no no and as for spraying out side ....
Perhaps I'll make a start on the wiring, which looks to be a major challenge !
Padders, a veritable gentleman, nay Saint, was kind enough to send me down a winding for this ungrateful pile of ?@*%!!!!! Yes it matched the rotor, but then the winding wouldn't fit the bleeding casing grrr.
As though that wasn't enough, I realised that the head lamp is a wrong 'un as well
On a more positive note, I have now fitted both tyres and the wheels are in place. I have fitted Triumph angled tyre valves, cos I get so hacked off with trying to get air lines on the standard ones, which as you know is almost impossible. Sadly the hole in the wheels was bigger than it should have been so they're a bit of a sloppy fit. They're staying up, but I do think I ought to do something better.
Had planned to start the paint work this weekend, but I forgot to buy a new set of gauntlets for the bead blast cabinet and the weather forecast is sooooo foul that bearing naked mild steel is a total no no and as for spraying out side ....
Perhaps I'll make a start on the wiring, which looks to be a major challenge !
Ralph Ferrand
Z1000A1 (1977), Z1300A5 (1983), Z900A4 (1976) GPZ1100 Unitrak (1983)(project), RD250B (1975)(project), ZRX1200R (2005) DT175MX (1981) YZF R6 (1999)
http://www.bikerstoolbox.co.uk
Z1000A1 (1977), Z1300A5 (1983), Z900A4 (1976) GPZ1100 Unitrak (1983)(project), RD250B (1975)(project), ZRX1200R (2005) DT175MX (1981) YZF R6 (1999)
http://www.bikerstoolbox.co.uk
-
RALPHARAMA
- Area Rep.
- Posts: 3407
- Joined: 19th May 2007
- Location: Pensford, Somerset
- Contact:
PS
Can anyone tell me where I put the bloody seat base that I spent a huge part of Christmas welding up?
Can anyone tell me where I put the bloody seat base that I spent a huge part of Christmas welding up?
Ralph Ferrand
Z1000A1 (1977), Z1300A5 (1983), Z900A4 (1976) GPZ1100 Unitrak (1983)(project), RD250B (1975)(project), ZRX1200R (2005) DT175MX (1981) YZF R6 (1999)
http://www.bikerstoolbox.co.uk
Z1000A1 (1977), Z1300A5 (1983), Z900A4 (1976) GPZ1100 Unitrak (1983)(project), RD250B (1975)(project), ZRX1200R (2005) DT175MX (1981) YZF R6 (1999)
http://www.bikerstoolbox.co.uk

Who is online
Users browsing this forum: No registered users and 14 guests