Hello Guest User,

Please feel free to have a look around the forum but be aware that as an unregistered guest you can't see all of it and you can't post.

To access these 'Registered Users Only' areas simply register and login.

Wots Cooking

Work in Progress

Moderators: KeithZ1R, chrisu, paul doran, Taffus

Message
Author
User avatar
Ginger Bear
Hardcore
Hardcore
Posts: 6850
Joined: 16th Dec 2008
Location: In the Dark.
Contact:

#91 PostAuthor: Ginger Bear » Tue Aug 28, 2012 10:14 am

Always read these, with the 'tunes' on. :up

Slowly, but surely heading in the right direction..... Excellent!
Image

# 104

Phil Churchett Award Winner 2011 & 2016 :D
Buzzworkz Best Modified Zed 2016

sanderz
Custard Cream
Custard Cream
Posts: 967
Joined: 2nd Mar 2010
Location: Manchester

#92 PostAuthor: sanderz » Tue Aug 28, 2012 7:26 pm

Thanks for the encouragement gents, always greatly appreciated - as are any comments / advice.

Image

Hope to take the sump off soon to drill for the oil pan gate. This is a similar drawing found on the web - if anyone else has put one in, is there anything i should know before i 'go ed'and bolt it up?

Image
Wots up DOHC

sanderz
Custard Cream
Custard Cream
Posts: 967
Joined: 2nd Mar 2010
Location: Manchester

#93 PostAuthor: sanderz » Mon Oct 15, 2012 7:04 pm

No excuses but this may help why(as usual) i havnt done much -

http://www.youtube.com/watch?v=BNoxGGCiFp0

Image

I have actually fitted the Oil pan gate tho' - i know many have put these in but i couldn't find any pics on the forum of what i consider a worthwhile (relatively cheap) mod - think it was £16 from Debbens.

Image

Image

I drilled and tapped the sump for the 6mm bolt, then bonded it in (bolt/gate/nut) with Double bond cream (supplied FOC :wink: ) and have used it before with good results.

http://www.silmid.com/Products/Surface- ... 001KG.aspx
If its good enough for the Aero industry - it'll do for me.

Gate open -

Image

Gate closed -

Image

Gearbox seems ok - unless someone can see anything wrong..... (i might have actually done something right :roll: ) .....dont know where that missing teaspoon ever went but.....well it aint in the sump.

Image

Anyone notices anything let us know! I'll be putting the sump /exhaust back on .....well..... errr soon.

Then i'll be cutting up a little belly pan thats been lying around for too long - but thats another story .........it'll never end, never .....

Image

Might catch some of yer at Stafford

Latoz ..... honestly it'll never end!
Wots up DOHC

sanderz
Custard Cream
Custard Cream
Posts: 967
Joined: 2nd Mar 2010
Location: Manchester

#94 PostAuthor: sanderz » Tue Oct 23, 2012 9:29 pm

Image

Some background required?

http://www.youtube.com/watch?v=gOEkYTMPPiQ

Yeh a little "Tumbleweed" how apt for this project :roll:

After being inspired at the Stafford show thought i'd best .....ahem.. progress this a little (and it is only a little) good to catch up with those who i spoke to at Stafford., putting names to faces and all that :up

Sump cleaned out and refitted so the Low profile filter cover could go on - the oil pan gate bolt is just visible in the pic (between fins)

Image

Image

With that all tightened i could then put the exhaust back on

Image

My main reason for this was for MORE clearance but i must stress the fact that there WAS adequate clearance already between the filter bolt and the exhaust.

Image

No need to ask about the clearance now - plenty :lol:

Going to cut this belly pan up to see how it looks next - little unsure if it'll look right tho' at the mo

Image

It'll be cut to half its present height at least and most of the front will go .....well thats the idea. If it looks ok i'll add these badges to the sides.
Picked them up at Stafford purely for this - then had an idea of glueing some "speed tape" to em and cutting out the excess -

Image

Image

Image

Dont know how it'll all work out - might end up sticking them on my toolbox .......and binning the belly pan :D

Ah well, we'll see.....

Latoz

This installment was brought to you with the help of Cyprus Spirit and a large glass of The Balvenies finest.

Disclaimer - never mix work with pleasure
Image
Wots up DOHC

User avatar
RALPHARAMA
Area Rep.
Area Rep.
Posts: 3407
Joined: 19th May 2007
Location: Pensford, Somerset
Contact:

#95 PostAuthor: RALPHARAMA » Sat Oct 27, 2012 8:14 am

Love the engineering :D I'm rather partial to Balvenie - if you like the double wood you should try Signature :)

I've only just discovered this thread, best I take your inspiration and get my arse down to my own workshop and carry on with the shafter. I've just spent hours reading this fascinating thread on my iPhone in bed .shock:

Cracking project !!!
Ralph Ferrand
Z1000A1 (1977), Z1300A5 (1983), Z900A4 (1976) GPZ1100 Unitrak (1983)(project), RD250B (1975)(project), ZRX1200R (2005) DT175MX (1981) YZF R6 (1999)
http://www.bikerstoolbox.co.uk

sanderz
Custard Cream
Custard Cream
Posts: 967
Joined: 2nd Mar 2010
Location: Manchester

#96 PostAuthor: sanderz » Mon Oct 29, 2012 10:43 pm

Cheers vduk, will look into "Signature" - aquiring a taste for Balvenie these days .....
a little too much maybe, but it has the desired effect .....

Image

As usual a little something to set the mood if one requires -

http://www.youtube.com/watch?v=3PquAv8ACOk

Well, the belly pan got 'the chop', what a mess! Dust mask was a must!

Image

It now looks like this (not finished as some more 'fannying around' to do yet)

Image

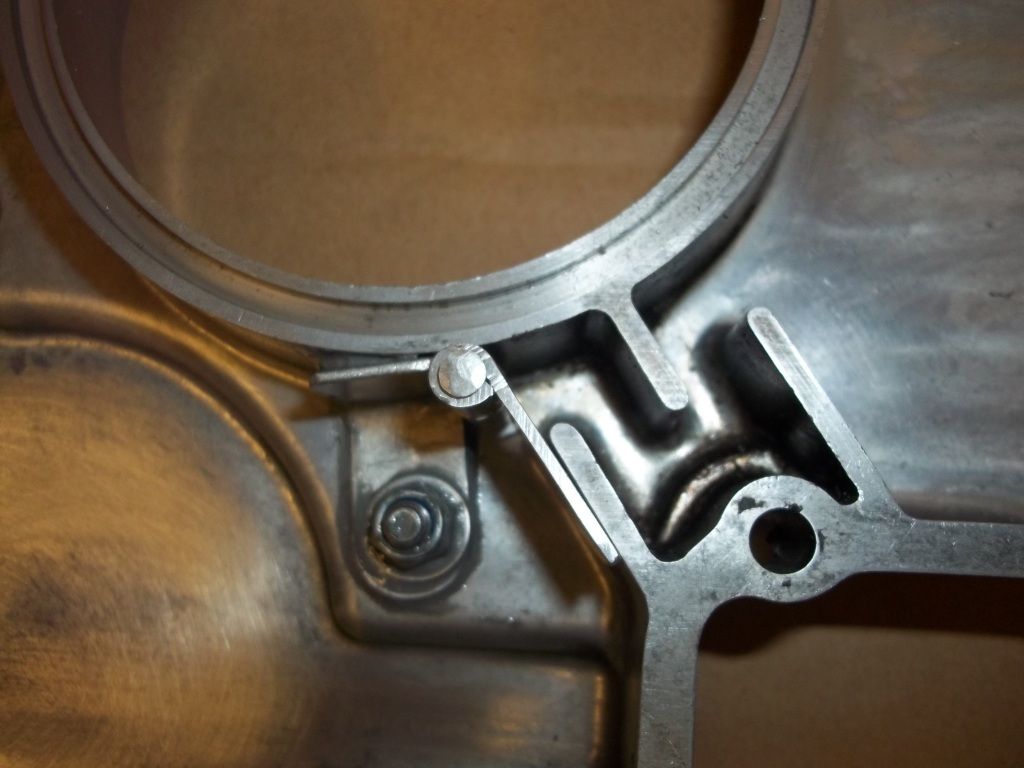
Had look in one of the many tins i squirrel things away in (should mark them up as its either Quality Street tins or Cadburys biscuits :roll: ) and found the assortment of 'P' clips. As luck would have it, 2 just the right size - result!

Image

Dont know if this is a usefull 'tip' but the nut on the inside of the belly pan was a little awkward to reach, (if you have fingers like cows tits) masking tape nut on the spanner (or a little in a socket) holds it in place.

Image

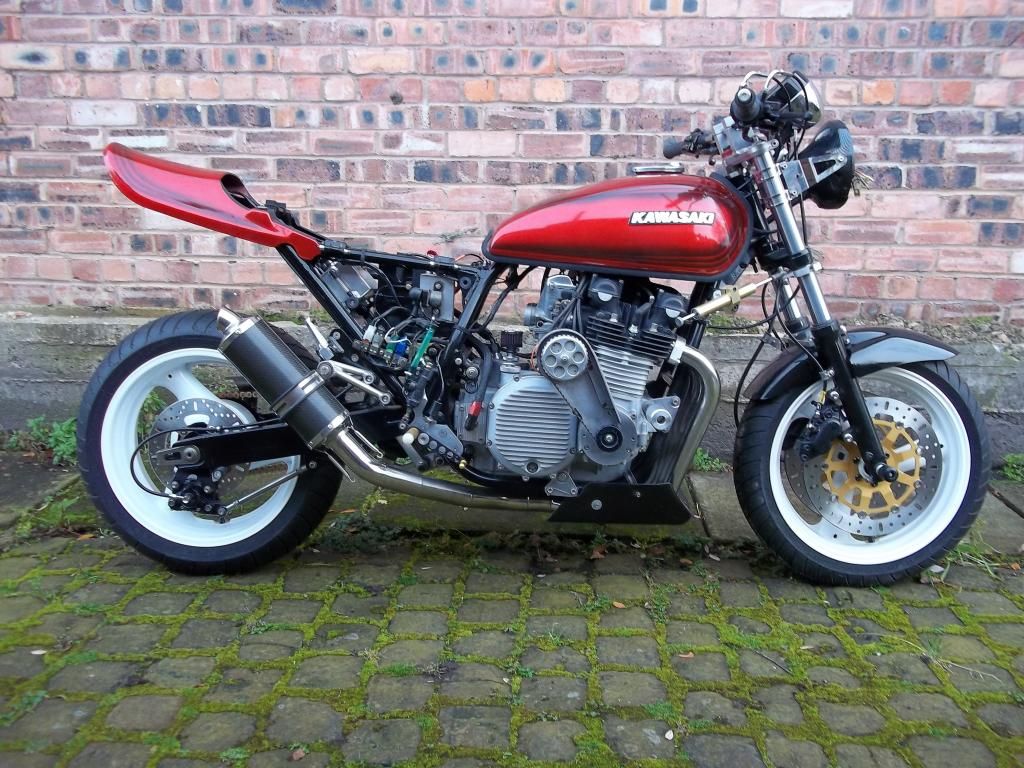
Still a little unsure if this is the "look" i want but if it works out i'll make 2 stainless brackets to fix off the engine mounts underneath the cradle, then use some 3M carbon look all over and fix the 900 DOHC badges along the bottom.

Image

Needs to be straightened up along the frame rails yet but its coming along

Image

This pic is to show that the belly pan still gives the max clearnce underneath (well hopefully :roll: )
Image

I'll keep on chopping / butchering / tinkering / filling and drilling and see what i end up with .......

No doubt the BIN awaits .......
Ah well :wink:

Image
Last edited by sanderz on Tue Oct 30, 2012 8:35 pm, edited 1 time in total.
Wots up DOHC

User avatar
z1bman
Hardcore
Hardcore
Posts: 4227
Joined: 3rd Mar 2010
Location: WORDSLEY WEST MIDLANDS

#97 PostAuthor: z1bman » Mon Oct 29, 2012 11:01 pm

bin the belly pan i think it would disguise all your good work + make it look tacky

User avatar
Pigford
Hardcore
Hardcore
Posts: 13314
Joined: 2nd Jan 2006
Location: North Dorset

#98 PostAuthor: Pigford » Tue Oct 30, 2012 7:39 am

z1bman wrote:bin the belly pan i think it would disguise all your good work + make it look tacky


..................... I'll await the complete picture before deciding - always fancied a belly-pan meself, so be interesting to see how it turns out :wink:
And on the 7th day... Zeds were created!

User avatar
Ginger Bear
Hardcore
Hardcore
Posts: 6850
Joined: 16th Dec 2008
Location: In the Dark.
Contact:

#99 PostAuthor: Ginger Bear » Tue Oct 30, 2012 7:58 am

Sanderz,

I too have had an on/off thing with belly pans. Be good to see a 'full profile' pic. :snap
Image


# 104


Phil Churchett Award Winner 2011 & 2016 :D

Buzzworkz Best Modified Zed 2016

User avatar
RALPHARAMA
Area Rep.
Area Rep.
Posts: 3407
Joined: 19th May 2007
Location: Pensford, Somerset
Contact:

#100 PostAuthor: RALPHARAMA » Tue Oct 30, 2012 8:09 am

...interested by the 'pin pliers' in the top picture. Are you ex-aircraft? We used them at BAe with skin pins when I did my apprenticeship - I still have a pair - I think they must have given them to me :oops: along with a few bags of skin pins. I don't use them often, but they're invaluable when you need them :D

If you like Balvenie you'll love Bowmore - it's an Islay malt. The cheapest one isn't great (Legend I think it's called), but there is an absolute beaut on offer in our local Tesco currently. CB bought me a bottle and it's like mother milk (if you're the spawn of an alchy that is :lol:) I must go and buy another bottle :D
Ralph Ferrand

Z1000A1 (1977), Z1300A5 (1983), Z900A4 (1976) GPZ1100 Unitrak (1983)(project), RD250B (1975)(project), ZRX1200R (2005) DT175MX (1981) YZF R6 (1999)

http://www.bikerstoolbox.co.uk

User avatar
j.b
100Club
100Club
Posts: 326
Joined: 22nd Dec 2009
Location: whitchurch, north shropshire

#101 PostAuthor: j.b » Tue Oct 30, 2012 6:13 pm

looking good mate, steaming along nicely now...

liking the bellypan style :D
straightening the curves and flattening the hills

sanderz
Custard Cream
Custard Cream
Posts: 967
Joined: 2nd Mar 2010
Location: Manchester

#102 PostAuthor: sanderz » Tue Oct 30, 2012 7:45 pm

Appreciate the replys :bow , ive 'mixed' views about the look myself - but as it was donated (one of those aftermarket items for any air cooled 4) and has been lying around for some time, thought i'd see how it goes.

I'll finish cutting / trimming so it sits right (or not :oops: ) then have to take some pics of the bike side on. See how it goes - nothing ventured and all that :skep

Could end up posting pics as a 'with or without' Poll if my heads in tatters!

vduk - yep, ex-aircraft, the pin pliers (sometimes called Clecos) are only used in me shed these days, but come in very handy when pinning up or clamping :wink:
Will have a mooch in Tescos for the 'mother milk' :D
Wots up DOHC

User avatar
Mr Puffin
100Club
100Club
Posts: 284
Joined: 15th Jun 2011
Location: Norway
Contact:

#103 PostAuthor: Mr Puffin » Thu Nov 01, 2012 7:10 pm

I like what you have done to the pan, but i think we would need that full on side view to get the whole perspective :)

sanderz
Custard Cream
Custard Cream
Posts: 967
Joined: 2nd Mar 2010
Location: Manchester

#104 PostAuthor: sanderz » Sun Nov 11, 2012 4:22 pm

Background related tune if one requires -

http://www.youtube.com/watch?v=O6QWEMdKKDY

Well ive cut the pan about a little more - not finished yet as i'll add the 900 badges to the sides, clean it all up and think i'll bond a little offcut of titanium in the lower part. Also the fasteners will probably be changed for black alloy.
So having sacrificed some 'wank time' to get meself in the shed thought i'd dust the mongrel down (thats not a euphemism) and see how its looking.

So the debate i have in my head now is "to belly pan or not?"
As the song says "How do you like me now"


Image

Image

Image

Image

Thats the close up pics, guess a 'side shot' shows more so for those that asked (and for my own head debate :kod )....

Image

Image

Image

Image

Image

Still a few odds an ends to make - bracket for block connecters are one (been on the list a while that one :oops: )

I'll keep chipping away tho'

Take it easy .....now wheres that DVD i was gonna watch......
Image
Wots up DOHC

User avatar
coldsummer
Hardcore
Hardcore
Posts: 3211
Joined: 29th Jun 2009
Location: Berkeley

#105 PostAuthor: coldsummer » Sun Nov 11, 2012 6:16 pm

Sanderz, I've really enjoyed watching this project evolve. Just wanted to say that.

As for the belly pan, I think it would look better if it pointed down slightly at the front but then I know F*** all about F*** all.


Return to “Projects”

Who is online

Users browsing this forum: No registered users and 10 guests