All the best Paul J (being serious for a change)
Hello Guest User,
Please feel free to have a look around the forum but be aware that as an unregistered guest you can't see all of it and you can't post.
To access these 'Registered Users Only' areas simply register and login.
Please feel free to have a look around the forum but be aware that as an unregistered guest you can't see all of it and you can't post.
To access these 'Registered Users Only' areas simply register and login.
Limited Rebuild
Moderators: KeithZ1R, chrisu, paul doran, Taffus
This rebuild is looking good,i have found a couple of point with the Dyna ignition..i dont bother to try and set statically just position midway to get her running and.. strobe to advance marks.also be careful of the low tension connections on the coils they easily short to the tank,frame or iron core of the coil,a good blob of silcon on connections sorts this out,aslo make sure you have good 12v at coils,the wired George Mod is a good mod to carry out while you are at this stage,as you have had her powder coated make sure you have good earths all round a favourite is the handlebar mount which when has powder on it acts as an insulator,i would also fit a combo reg/rect if you have not already(the originals always go sooner or later)and use cheapo mineral or running in oil in that newly built motor,sorry if i am teaching how to suck eggs but all these points are valid and have caught me out at one time or another.
All the best Paul J (being serious for a change)
All the best Paul J (being serious for a change)
PAULJAC47,,,,,"She may not look like much, but she's got it where it counts, kid."
-Han Solo
You can't polish a turd, but you can roll it in glitter
Salad is what real food eats.
Anon
PUM 673
-Han Solo
You can't polish a turd, but you can roll it in glitter
Salad is what real food eats.
Anon
PUM 673
-
Ginger Bear

- Hardcore

- Posts: 6850
- Joined: 16th Dec 2008
- Location: In the Dark.
- Contact:


Thanks guys.
Had some good and bad news from the machine shop.
Bad news, two liners were found to have moved, so they've dropped them all out cleaned out the ceramic media from the ceramic cleaning and re-seated them - plus a skim that's an extra £50 on the bill.
Good news, the valves,seats and guides are good, the machinist is of the opinion it's not been many miles since they've all been replaced.
Not really surprised that I'm about to go over budget, I know I've gone a bit ott with all the bearings, gaskets, cam chain kit, dyna kit, etc, plus I didn't plan on the pistons/rebore - it's only going to get worse too - I've still got the brake seals, rear shocks and top paintwork to go, plus I've had an offer to buy a really nice chrome grab handle - was planning on it being finished by the end of November - think Xmas might be more realistic!
The wife has named it - I'm sure you've guessed - 'The money pit'
Don't look too close Mikey, there's a greasy print or two on the bars already - helps tone down the glare from that super shiney chrome
Collected the head and cylinders and set about assembly, all was going well until some of the new valve stem seals from Z1 Enterprises which were supposed to be an upgrade over genuine turned out to be de-laminating - now I need to order some new genuine ones!
Then I realized the machine shop hadn't drilled and tapped the broken tacho drive mount either - they'd drilled and helicoiled 2 of the inlet rubber mounts instead! - easy mistake to make - not! - so I was off to a bad start.
Turned my attention to fitting the pattern brake lines s/steel banjo bolts and the brake switch.

The manky old rubber switch cover cleaned up a treat - result!
Fitted the re-chromed kickstart, new rubber with a pattern Zpower fitting kit except for the bolt where I used a S/Steel one.

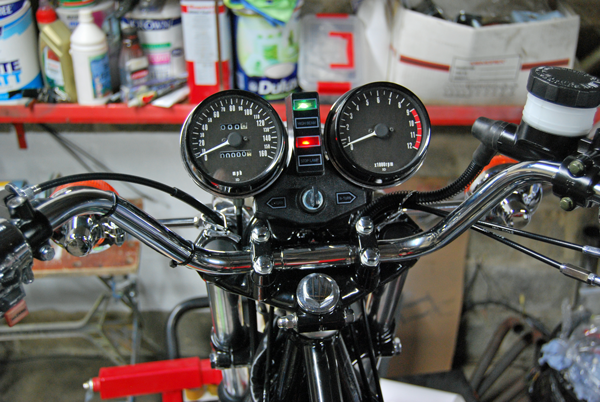
Connected up the bike to a slave battery to test the electrics.
Seeing as the loom is new and everything is connected just as it was - I don't know why I was so apprehensive about turning the key, it turned just like it's meant to and the neutral light and oil pressure light came on - then I realized I'd been holding my breath
lights, Indicators, horn, rear brake light, full power to the coils and a quick prod of the start button and the starter wanted to turn - result!
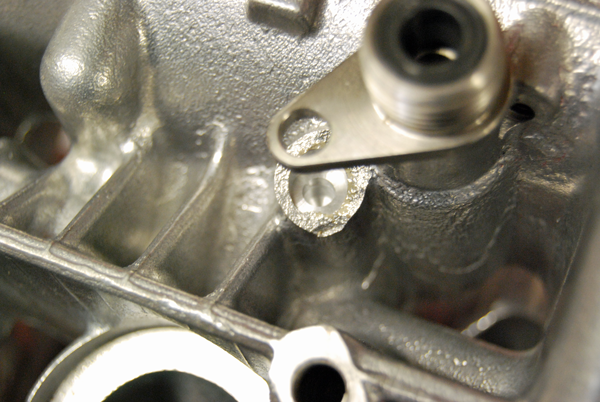
Decided to waste a bit fuel on some two wheel therapy to pluck up the courage to have a go at the broken tacho drive mount myself!
Using the new tacho drive bracket as a guide I drilled into the head as far as I dare!
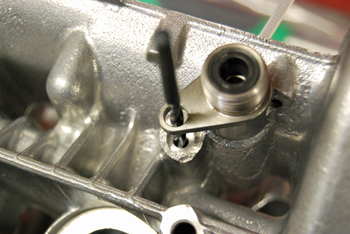
Used a counterbore to square off the face.
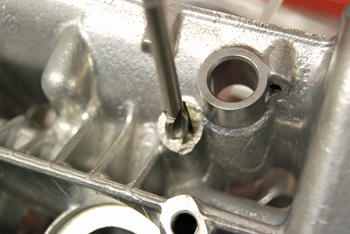
Tap the hole and it's ready for a bolt - result!
Then I realized the machine shop hadn't drilled and tapped the broken tacho drive mount either - they'd drilled and helicoiled 2 of the inlet rubber mounts instead! - easy mistake to make - not! - so I was off to a bad start.
Turned my attention to fitting the pattern brake lines s/steel banjo bolts and the brake switch.
The manky old rubber switch cover cleaned up a treat - result!
Fitted the re-chromed kickstart, new rubber with a pattern Zpower fitting kit except for the bolt where I used a S/Steel one.
Connected up the bike to a slave battery to test the electrics.
Seeing as the loom is new and everything is connected just as it was - I don't know why I was so apprehensive about turning the key, it turned just like it's meant to and the neutral light and oil pressure light came on - then I realized I'd been holding my breath
lights, Indicators, horn, rear brake light, full power to the coils and a quick prod of the start button and the starter wanted to turn - result!
Decided to waste a bit fuel on some two wheel therapy to pluck up the courage to have a go at the broken tacho drive mount myself!
Using the new tacho drive bracket as a guide I drilled into the head as far as I dare!
Used a counterbore to square off the face.
Tap the hole and it's ready for a bolt - result!
Had terrible problems with photobucket last week, couldn’t upload any pics and the originals on my hard drive somehow ended up being corrupted so they’re unfortunately lost for good.
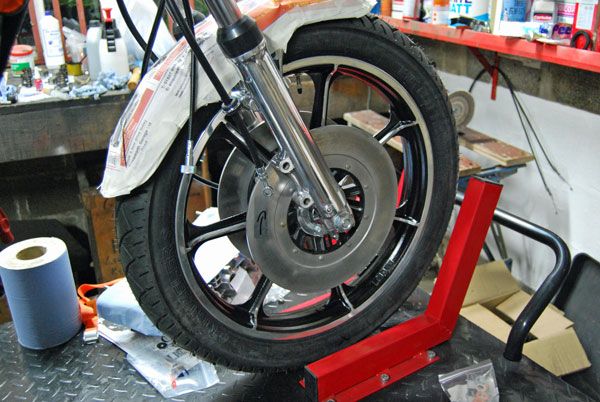
Anyways, made some good progress, made a start with the wheels.
After Mikey’s excellent polishing, I had them painted dark grey in 2pk and some new tyres/tubes fitted.
Discs are originals put through the shot blaster and re-painted, original bolts with new tab washers.
Installed some new genuine bearings and seals, dust covers were good to go again after a bit of a spit ‘n’ polish.
Installed the front wheel using the re-zinc’d axle and at last the front end was sitting on rubber again.
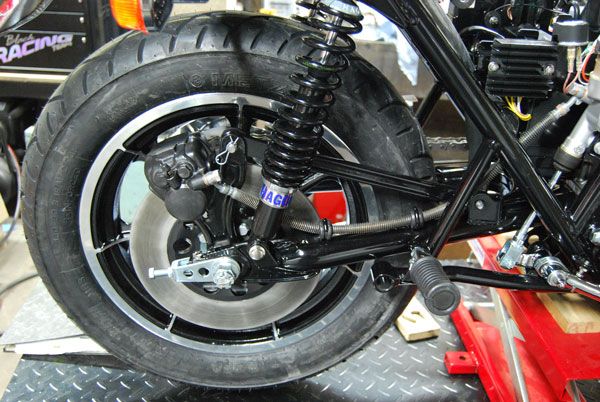
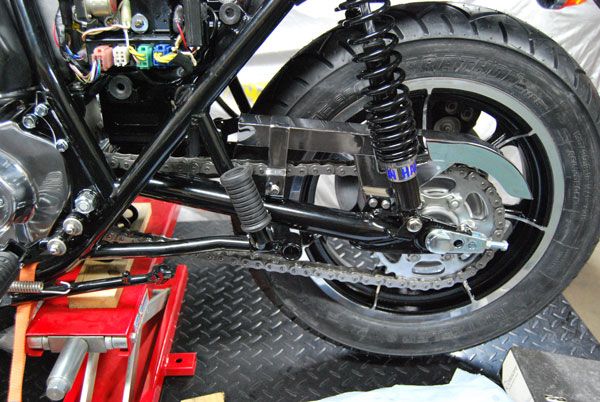
Had a right mare with the swing arm/wheel installation, the darn powder coat was too thick to allow the wheel to slot in, so much fettling later – wheel with re-zinc’d bolt was in followed by a trial fit of the new Hagon shocks.

Things went well with the rear calliper rebuild, shame the pics were lost, but, new piston, seals, pads etc.
It felt great get a good peddle - no leaks.
Re-zinc’d axle and chain adjusters look great.
Front calliper rebuilds went well, new pistons, seals, pads etc.
Took for ever to get any kind of a lever, took nearly 1/2ltr of fluid to get the air out, even so I’m not sure it’s all out – its still a tad spongy – and certainly not as instant as I’d like, but I’ll see how it goes once the pads bed in.
Darn mudguard looks more or less the same both ways round - this is how it was when I got it.
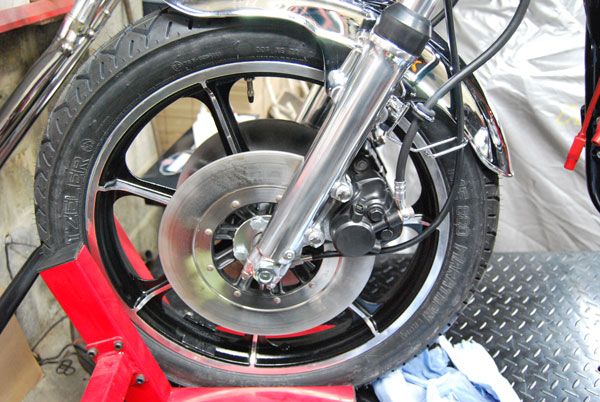
New chain and guard on, wheel in and tight.
Both ends sitting on rubber again before winter is another milestone passed.
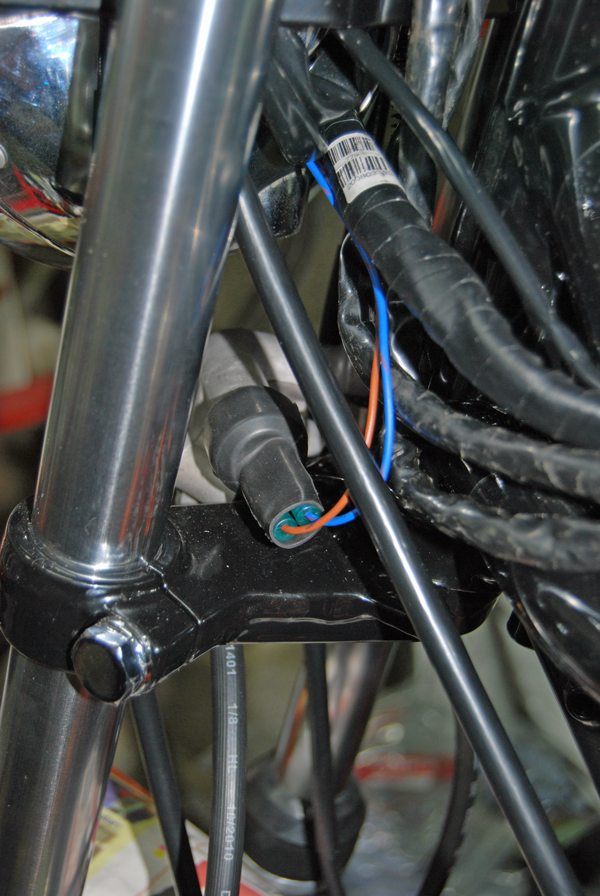
Combined Regulator/Rectifier unit was next on the list to fit, took a bit of giggling and filing to get it to mount to the original holes, pesky flasher relay fouls it on the corner - 90° mount required.
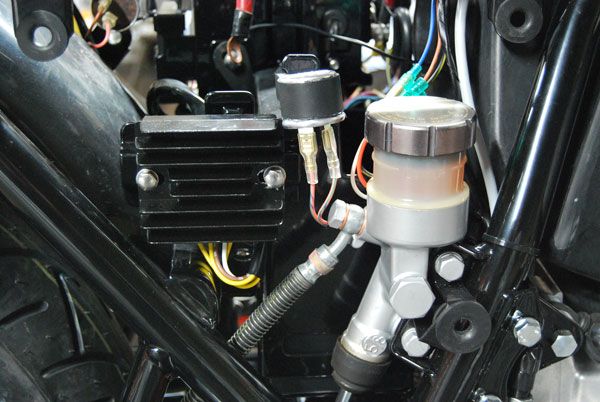
As the unit came with no instructions I’m guessing the green connector goes to the green connector? Black wire to existing earth? And white wire to existing white fused wire?
The new wiseco pistons on the rods, ready for the re-bored cylinders.
It’s great when big bits go on!

Anyways, made some good progress, made a start with the wheels.
After Mikey’s excellent polishing, I had them painted dark grey in 2pk and some new tyres/tubes fitted.
Discs are originals put through the shot blaster and re-painted, original bolts with new tab washers.
Installed some new genuine bearings and seals, dust covers were good to go again after a bit of a spit ‘n’ polish.
Installed the front wheel using the re-zinc’d axle and at last the front end was sitting on rubber again.
Had a right mare with the swing arm/wheel installation, the darn powder coat was too thick to allow the wheel to slot in, so much fettling later – wheel with re-zinc’d bolt was in followed by a trial fit of the new Hagon shocks.
Things went well with the rear calliper rebuild, shame the pics were lost, but, new piston, seals, pads etc.
It felt great get a good peddle - no leaks.
Re-zinc’d axle and chain adjusters look great.
Front calliper rebuilds went well, new pistons, seals, pads etc.
Took for ever to get any kind of a lever, took nearly 1/2ltr of fluid to get the air out, even so I’m not sure it’s all out – its still a tad spongy – and certainly not as instant as I’d like, but I’ll see how it goes once the pads bed in.
Darn mudguard looks more or less the same both ways round - this is how it was when I got it.
New chain and guard on, wheel in and tight.
Both ends sitting on rubber again before winter is another milestone passed.
Combined Regulator/Rectifier unit was next on the list to fit, took a bit of giggling and filing to get it to mount to the original holes, pesky flasher relay fouls it on the corner - 90° mount required.
As the unit came with no instructions I’m guessing the green connector goes to the green connector? Black wire to existing earth? And white wire to existing white fused wire?
The new wiseco pistons on the rods, ready for the re-bored cylinders.
It’s great when big bits go on!
Last edited by Hinckley on Sat Sep 29, 2012 10:20 am, edited 1 time in total.


-
paul doran

- Area Rep.

- Posts: 15910
- Joined: 24th Sep 2004
- Location: near Dublin Ireland

Thanks guys, still picking up some great tips from this site.
Installing the cylinders was easier than I thought, using the angled cylinders method and one ring at a time was easier than the cut up drain pipe trick - which I got wrong... somehow the rings ended up getting stuck to the plastic
Anyhow after copious amounts of assembly lube the jobs a goodun
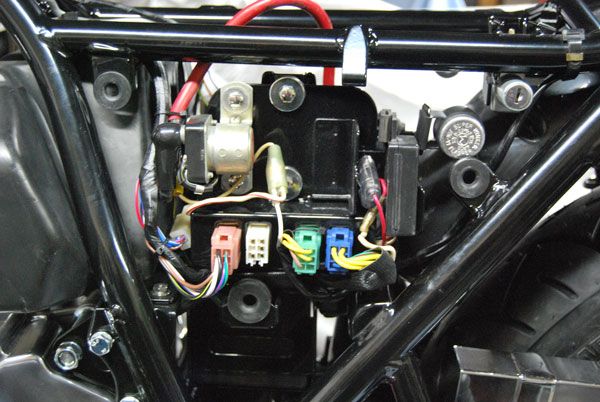
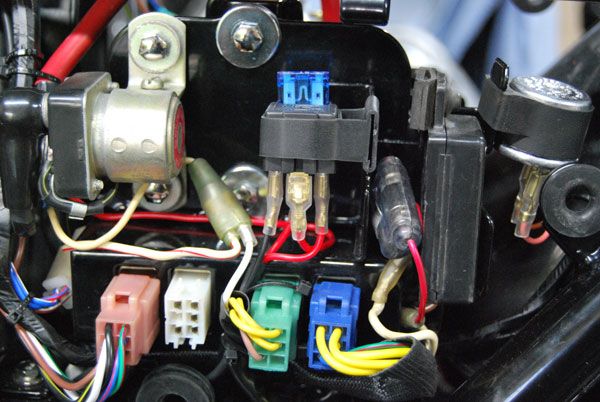
Next came the coil relay mod, not that there was anything wrong with the new wiring loom, but it's a belt and braces - peace of mind thing....
I decided to us a fused relay and an indicator relay angled strap, ended up a neat job.
Whilst waiting for head parts I decided to trial fit the new heavy duty pattern side panels with a pair of new pattern badges... Smart
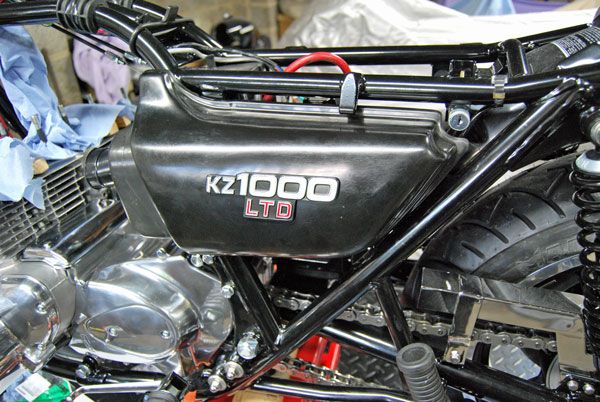
Got to decide on the colour, standard looks like being Midnight Blue, from what I've seen it's more or less black with a purple undertone and the odd occasional silver metalflake
It's not going to be a minter so I'm toying with the Candy Red but also the Blue's nice.... could go Green....
Need to decide soon so the paint can get sent off...
Installing the cylinders was easier than I thought, using the angled cylinders method and one ring at a time was easier than the cut up drain pipe trick - which I got wrong... somehow the rings ended up getting stuck to the plastic
Anyhow after copious amounts of assembly lube the jobs a goodun
Next came the coil relay mod, not that there was anything wrong with the new wiring loom, but it's a belt and braces - peace of mind thing....
I decided to us a fused relay and an indicator relay angled strap, ended up a neat job.
Whilst waiting for head parts I decided to trial fit the new heavy duty pattern side panels with a pair of new pattern badges... Smart
Got to decide on the colour, standard looks like being Midnight Blue, from what I've seen it's more or less black with a purple undertone and the odd occasional silver metalflake
It's not going to be a minter so I'm toying with the Candy Red but also the Blue's nice.... could go Green....
Need to decide soon so the paint can get sent off...
garyd wrote:It's the way I've always done it...always seemed easy enough
I've only ever fitted pistons with band clamps before, and never on an inline 4, after the fiasco of the plastic pipe attempt it was a ten minute job and much easier than I expected, lining the rings up was a synch - guess you can teach and old dog new tricks.....
Made some more progress this week, as usual with this fine quirky beast - one step forward - one step back!
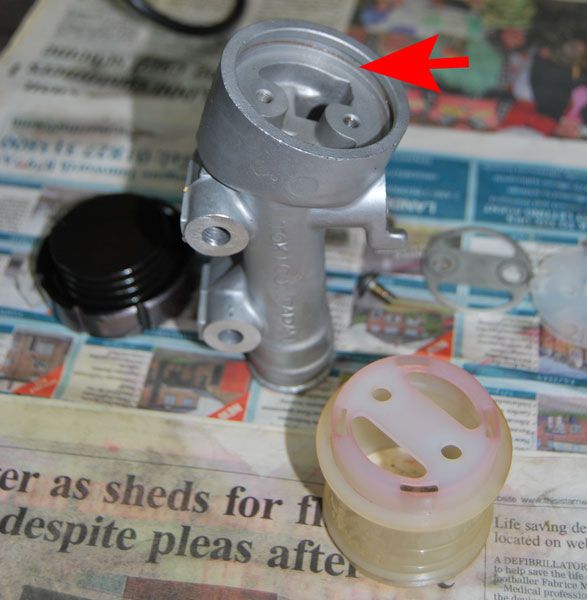
Rear master cylinder threw a spanner in the works!!
Reservoir to master cylinder casting seal failed and started weeping.
Can't seem to find a replacement seal and no idea how to seal it - any ideas?
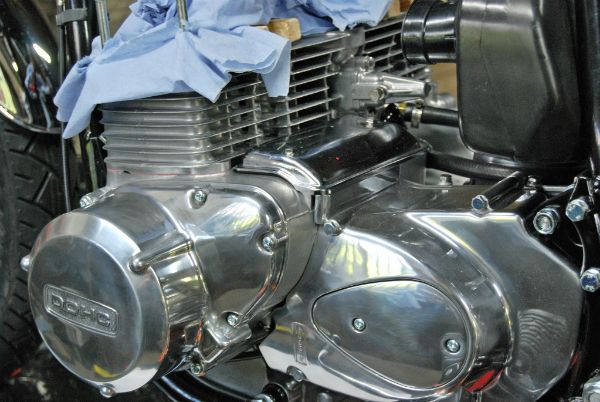
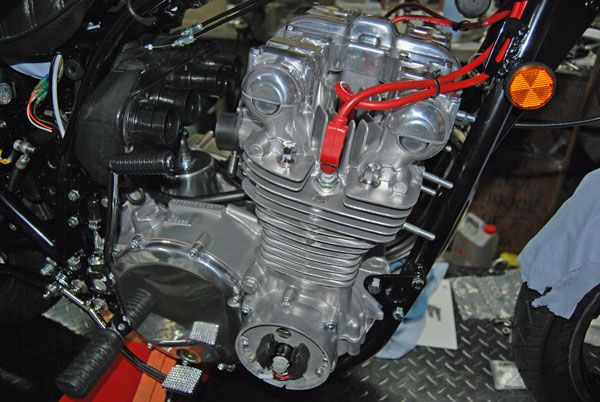
Cylinder head is on - one piece gasket, new plugs, nuts and washers.
Topped off with the polished by Mikey cover, new gasket and bolts.
I'd shimmed the valves with the head on the bench however the valves needed to be re-shimmed after head bolted down - exh no 2 had gone out 0.05mm and Inlt no's 3+4 had gone out 0.10 and 0.05mm respectively
Two of the threads on no 4 cam cap didn't feel good when torquing down - being a dab hand with helicoils - it was soon sorted
Fist prod of the start button - and she turns over like a good un - gentleman we have compression
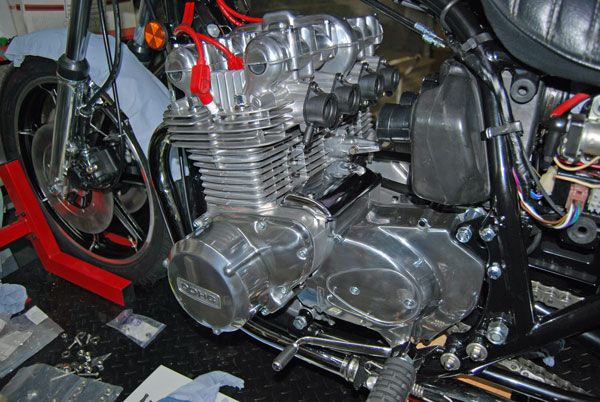
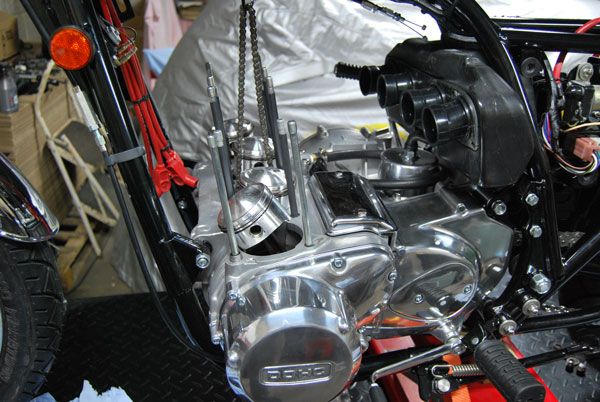
Made a start fitting the zorst - re-chromed collars courtesy of Mikey.
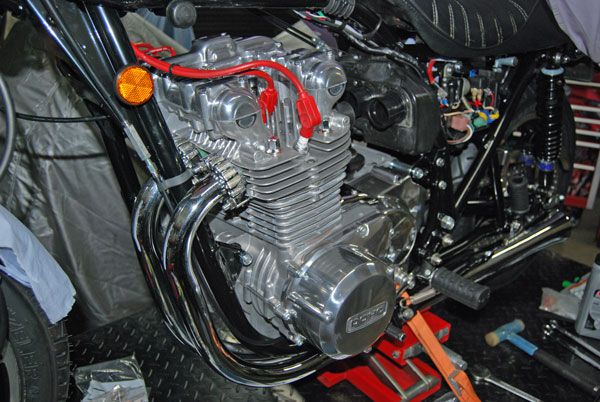
Old plug leads on till she runs - Dyna leads waiting.
Wonder how long the front of the motor will stay this clean
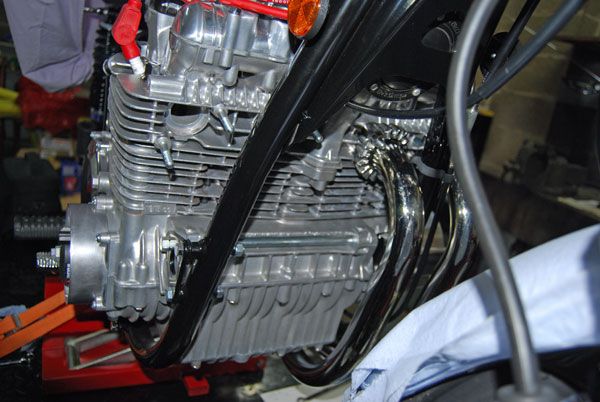
Jardine pipes to start with - then swapping to the VH 4-1.
Rear master cylinder threw a spanner in the works!!
Reservoir to master cylinder casting seal failed and started weeping.
Can't seem to find a replacement seal and no idea how to seal it - any ideas?
Cylinder head is on - one piece gasket, new plugs, nuts and washers.
Topped off with the polished by Mikey cover, new gasket and bolts.
I'd shimmed the valves with the head on the bench however the valves needed to be re-shimmed after head bolted down - exh no 2 had gone out 0.05mm and Inlt no's 3+4 had gone out 0.10 and 0.05mm respectively
Two of the threads on no 4 cam cap didn't feel good when torquing down - being a dab hand with helicoils - it was soon sorted
Fist prod of the start button - and she turns over like a good un - gentleman we have compression
Made a start fitting the zorst - re-chromed collars courtesy of Mikey.
Old plug leads on till she runs - Dyna leads waiting.
Wonder how long the front of the motor will stay this clean
Jardine pipes to start with - then swapping to the VH 4-1.
Who is online
Users browsing this forum: No registered users and 6 guests