Page 1 of 2

Z1000A1 Refresher

Posted: Fri Feb 08, 2013 4:41 pm
Author: Mark Stratton
Owned this Z1000A1 since 1996. I done a full restoration on it in 1999 but due to various reasons it has not been on the road for the last two or so years. Unfortunately the head gasket has developed a leak and due horrendous problem with damp getting into my garage because of inconsiderate asshole next door neighbours (but that’s another story http://z1ownersclub.co.uk/forum/viewtop ... solicitors) the engine now needs to be completely cleaned and polished.

Image
The rivet counters will see that it is wearing A2 livery instead of A1 but I prefer the A2 colour so thats the way it stays. At the moment :wink: Image
As you can see the damp has played hell on the ally so there's going to be plenty of scotchbrite and autosol in action. Luckily I managed to clear the garage of most of my tools etc so they didn't suffer the same fate.
Image
Image

Idea was to fit some cast wheels, 2:4 seat, straight bars, new paint and just a general refresh by replacing as much as possible with polished stainless etc to give it a new lease of life. I had hoped to replace the valve guides, valves as they didn’t get done last time and fit a hydraulic clutch conversion but as usual the bloody family car has just needed £700 spending on it so the money I had put aside is now diminishing quickly and it looks like its going to be the cheapest tart up possible. More than likely this one is going to be an ongoing project but at least it will be on the road.

Date to aim for I suppose is Sunday 28th April Ace Cafe.

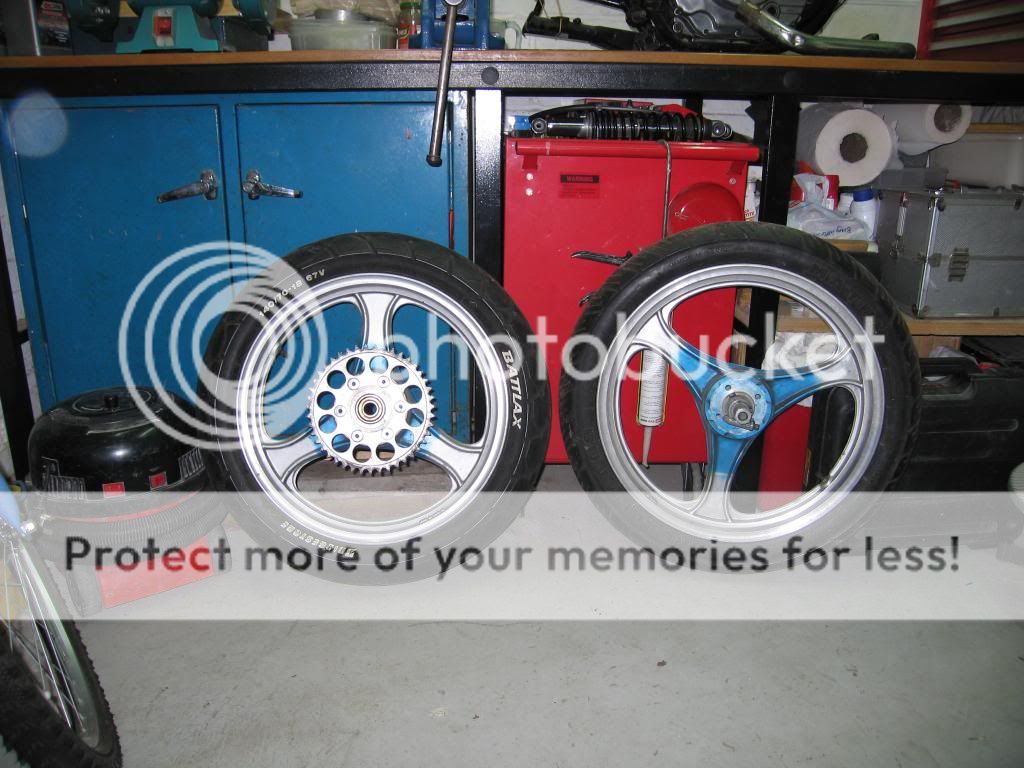
Wheels that I have already bought from another club member, going to get them shot blasted and probably powder coat with polished rims.
Image

Posted: Fri Feb 08, 2013 5:00 pm
Author: Pigford
Those CMA wheels are magnesium (99%) and polishing them is not ideal :??

Looks like a great little project :twisted:

Posted: Fri Feb 08, 2013 5:09 pm
Author: paul doran
that still looks like a very tidy bike
those CMA wheels look brilliant too

Posted: Fri Feb 08, 2013 7:35 pm
Author: zmaxmotorsports
That neighbor would have my foot print permanently tattooed on his ass,but that's just how I handle things! :lol:

Posted: Fri Feb 08, 2013 7:38 pm
Author: zmaxmotorsports
Did the british version of the a2 get different striping than the American version,or is that just the way you had it done? :wink:

Posted: Fri Feb 08, 2013 8:05 pm
Author: KWACKERZ1
Note doubting Mr Piggy, but

All the CMA'S i have come accross have been Aluminium not Magnesium, but its worth checking.

If they are magnesium they need to be chromate (or the modern equivalent) coated to prevent bubbling prior to powder coating.

I use http://tpcs-magnesium-refurbs.co.uk/

top notch guy and can do the full refurb and powder coating on wheels.

Might be worth talking to him re the cma's.

Posted: Fri Feb 08, 2013 9:40 pm
Author: Garry.L
Lovely looking thou', just clean her up and leave her as she is!. :wink:

Posted: Sat Feb 09, 2013 1:34 am
Author: ollie
Garry.L wrote:Lovely looking thou', just clean her up and leave her as she is!. :wink:

totally agree :wink:

Posted: Sat Feb 09, 2013 8:38 am
Author: gordon62
ollie wrote:
Garry.L wrote:Lovely looking thou', just clean her up and leave her as she is!. :wink:

totally agree :wink:


Just get the polish out and keep the cuppa"s coming...... :)

Posted: Sat Feb 09, 2013 9:45 am
Author: Pigford
KWACKERZ1 wrote:Note doubting Mr Piggy, but

All the CMA'S i have come accross have been Aluminium not Magnesium, but its worth checking.

If they are magnesium they need to be chromate (or the modern equivalent) coated to prevent bubbling prior to powder coating.

I use http://tpcs-magnesium-refurbs.co.uk/

top notch guy and can do the full refurb and powder coating on wheels.

Might be worth talking to him re the cma's.


You may well be right .... bit I'm sure the set I had n my 1170 Lawson were magnesium :?:

Posted: Sun Feb 10, 2013 7:47 pm
Author: Mark Stratton
Garry.L wrote:Lovely looking thou', just clean her up and leave her as she is!. :wink:


Garry, might well do at the moment. Just fancy a bit of a change if you know what I mean so easiest way is wheels, seat and bars. Main thing is to put it back onto the road as soon as possible. Anything that I do change will be easily swapped back to standard.

Pigford said;
You may well be right .... bit I'm sure the set I had n my 1170 Lawson were magnesium
Pigford this has been discussed before when the seller wanted to know what they were http://www.z1ownersclub.co.uk/forum/vie ... highlight=

Posted: Sun Feb 10, 2013 9:41 pm
Author: Mark Stratton
zmaxmotorsports wrote:Did the british version of the a2 get different striping than the American version,or is that just the way you had it done? :wink:


This is actually a US import and as far as I'm aware the paint is how it was when it came into the country. I just prefer the colour and the striping. Plan was to go for something "Z1B ish" using the same sort of red that it is now but as I said thats all gone out of the window due to finances.

With regards to my issues with the neighbour I could not do alot as he was a fully paid up member of the "Jimmy Saville Club" so if you went anywhere near him the police were there in a split second. Funny how these type of people get more protection than law abiding citizens.

Posted: Mon Feb 11, 2013 10:49 pm
Author: Mark Stratton
I always like to follow other members projects and have learnt a lot from these. I'm certainly no mechanic but will always have a go at anything so any advise will be gratefully received.

Had a busy weekend so I didn't get much done apart from engine out and top end stripped and checked.
Image

Looks like its been leaking oil into the cylinders 1 & 2, possibly through the stem seals

Image

3 & 4 look okay.

Image

Valves out. It looks as if the inlet valve seals on 1 & 2 are the culprits as there is a good build up of oil around the valve seat.
Image

Although I checked the valves and guides the first time that the engine was apart I can't find the dimensions that I recorded at that time so it's back to measuring it all again

:(
First valve stem diameter and then the stem run-out
Image
Image
Valve guides were next. Only issue I had was my bore gauges only go as low as 8mm.
Image

Picked these up cheap. Not brilliant but good enough to record a decent dimension.
Image

Checked each guide throughout the entire length and measured the gauge with a micrometer.
Image
Image
Don't know if this is the correct method but the manual says that this dimension needs to be checked by "your local dealer", so its the best its going to get seeing as my local dealer went out of business years ago. I'm sure it won't be far short of what a dealer would do however I do stand to be corrected by the experts here who know far better than me.
Image
Inspected the cams and measured the journals and lobes. Got the Plastigauge out to measure the wear on the cam cap bearings. Fantastic stuff and really easy to use.
Image
Image
Image
Pop the cam cap back on and torque down to correct setting.
Image
Remove caps and using the gauge supplied determine what the clearance is on each bearing shell.
Image
Simples

:wink:

If I'm doing wrong let me know.
The following dimensions are valve stem diameter, valve stem run-out, valve guide diameter, cam bearing top & cam bearing bottom. The only one that really concerns me is the inlet 4 valve guide diameter. I may have to go back to this and check it again to make sure that the dimension is correct. As there are no tolerances to go by for the valve guides in the Clymer manual does anyone know if these look okay?
IN 1 - 6.97 - 0.01 - 7.01 - 0.050 - 0.050
IN 2 - 6.97 - 0.01 - 7.01 - 0.050 - 0.050
IN 3 -6.96 - 0.00 - 7.02 - 0.050 - 0.050
IN 4 -6.96 - 0.01 - 7.15 - 0.050 - 0.050
EX 1 -6.96 - 0.00 - 7.01 - 0.050 - 0.050
EX 2 -6.96 - 0.00 - 7.01 - 0.050 - 0.038
EX 3 -6.965 - 0.00 - 7.01 - 0.063 - 0.050
EX 4 -6.96 - 0.01 - 7.01 - 0.063 - 0.050

Cam
IN 24.47 -
IN 24.47 -
IN 1 - 36.29
IN 2 - 36.29
IN 3 - 36.30
IN 4 - 36.28
EX 24.47 -
EX 24.47 -
EX 1 - 35.79
EX 2 - 35.79
EX 3 - 35.79
EX 4 - 35.77
Cams all seem to be within tolerance and no signs of wear.
Run-out on head and barrels was a bit hit and miss as I don't possess a decent 18 inch straight edge. I borrowed our calibrated test square from work but it is only 14 inches long so I couldn't be sure on this one. Is there anyone in the Southampton area who has one that I could borrow?
The edge does rock on the cam chain tunnel in the centre and creates a gap large enough for a 0.051 feeler blade to pass under when checked at one end. The two individual sides of the head are completely flat so it is just the issue with the centre. Can I get away with this amount of warp/run-out or does it need to be skimmed?
Image

HEAD 0.051 -
CYLINDER 0.00 -

Wiesco 1075 fitted. Bores seem okay as well to these dimensions.
1 72.01 - 71.97
2 71.98 - 71.99
3 71.98- 71.97
4 71.98 - 72.00

Posted: Wed Feb 13, 2013 2:33 pm
Author: ollie
excellent images mark ,there should be quite a few zed owners down your way who can give you good advice .Or ring debbens at ringwood ,they are always helpful . :wink:

Posted: Thu Feb 14, 2013 1:58 pm
Author: Mark Stratton
I must admit ollie the initial idea was just to take the head to Debbens and let them change valve guides, put new valves in it, skim, heli-coil spark plug threads etc and generally sort it all out but cash flow not allowing now means that I've got to try and complete it for as little as possible. I may take a trip to Debbens just to get his advise on the warp and if it needs a skim. Good excuse to sample some Ringwood Brewery beers whilst I'm in the area as well.