
Thanks guys.
The linseed oil trick works in a similar way to the hot air gun, the hot oil draws into the surface of 'some types' of plastic.
Does need re-applying every so often even when it works well.
Tried the hot air gun on a Vauxhall Nova many years ago, didn't last though, started looking streaky in no time.
I did read somewhere about a bumper trim dye that appeared to be the best thing since Sliced bread - it's so good I can't seem to find it now!
Going to experiment on the back of the box to see which works best.
I'll post the results.
Hello Guest User,
Please feel free to have a look around the forum but be aware that as an unregistered guest you can't see all of it and you can't post.
To access these 'Registered Users Only' areas simply register and login.
Please feel free to have a look around the forum but be aware that as an unregistered guest you can't see all of it and you can't post.
To access these 'Registered Users Only' areas simply register and login.
Project Z900 A4 - Restoration - Pic Heavy
Moderators: KeithZ1R, chrisu, paul doran, Taffus
December week 2 update
A busy week of stocktaking at work didn't leave much Zed time.
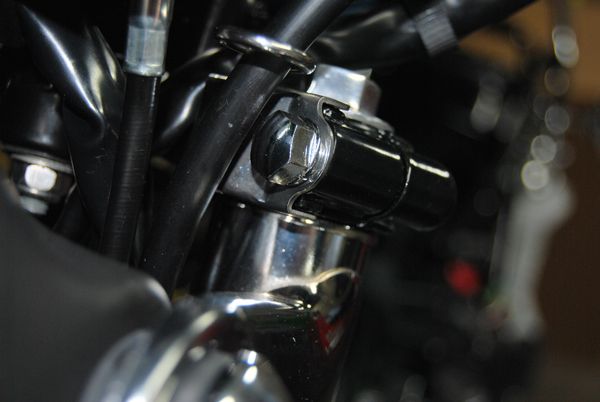
Received the new top yoke bolt from Z1 Enterprises so got that fitted, the lower yoke bolts and engine bolt kit arrived from Saisei and will be fitted next weekend.
Originals are being put away for re-chroming at a later date.
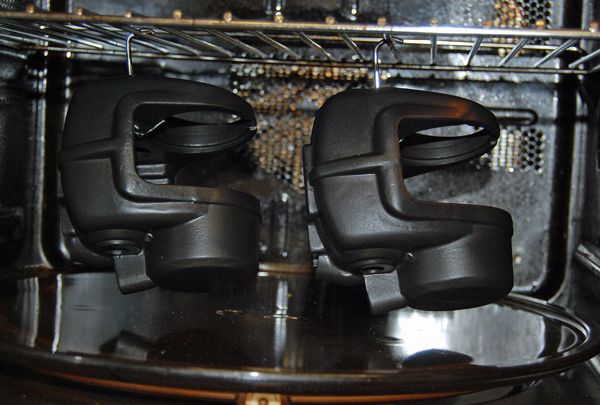
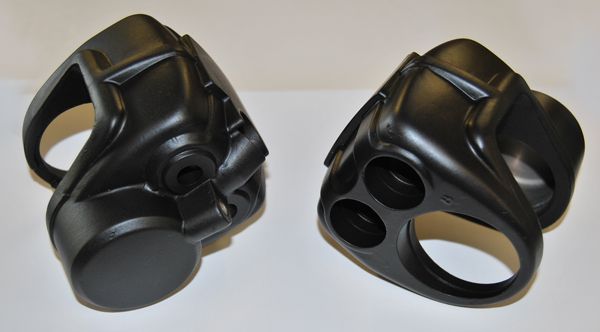
Tried the hot Linsead oil trick on the airbox - worked well.

Tried the hot air gun on the airbox - worked not so well!
The plastic reacted badly, gentle heat made no difference, a more aggressive heat made the box instantly distort - not all of which could be corrected after frantic re-shaping - the rest I had not f**ked was treated to hot Linsead oil!
Lesson learned!
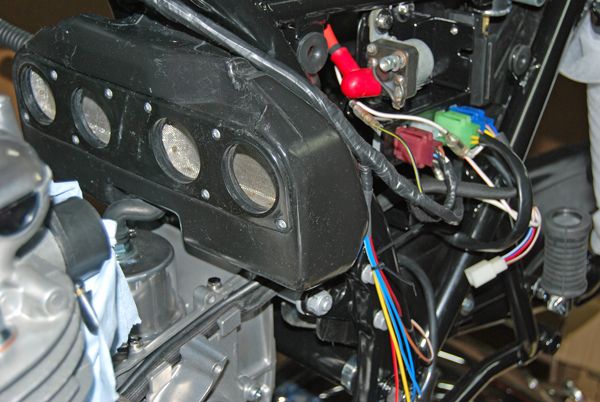
In the week I received the last of the electrical stuff from Z1 Enterprises.
It was time to tackle the last of the loom mods.
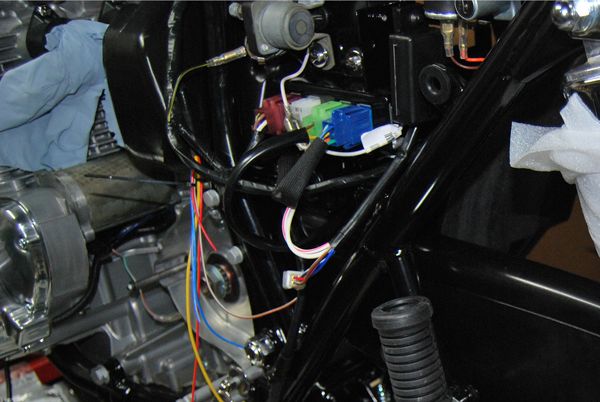
Despite numerous interruptions in play - mods are finished.
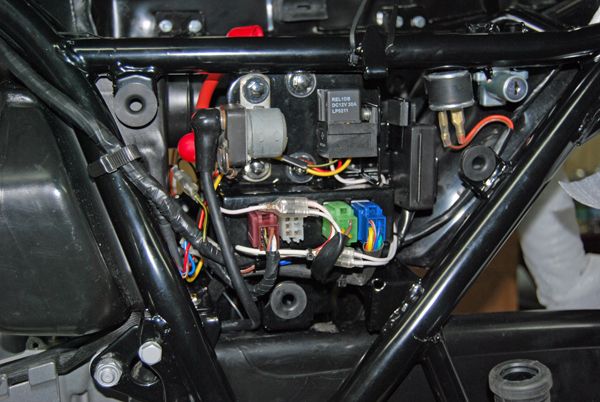
George mod has been hard wired and the relay sits neatly in the elec panel - fused power has been taken from the battery via the fuse box, battery negative was added to the loom during build - the original coil feed from the stop switch feeds the trigger on the relay - live feed to the coils was again built into the loom during build.
Extra security has been tried and tested.
Good to go.
The stainless steel cable tidies looked a tad drab, I used some autosol and a buffing wheel on the bench grinder to polish them up a bit.
Much better.
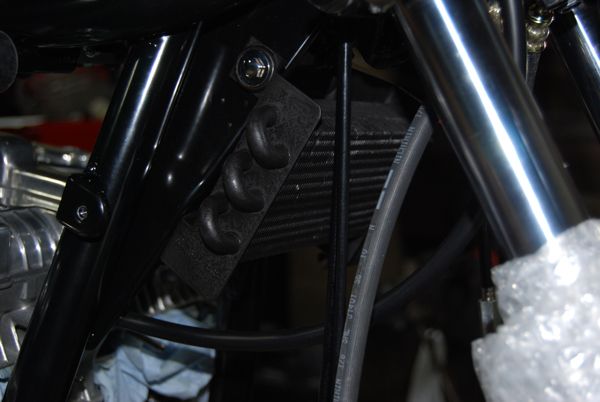
I'm a bit disappointed with the finish on the oil cooler - the galve wouldn't come off in the blaster without damaging the core.
Etch primer reacted and pickled - ordinary primer reacted in the same way.
After trying most of my paint arsenal - the only thing I found that would stick to it was an ancient can of Simoniz engine enamel - go figure!
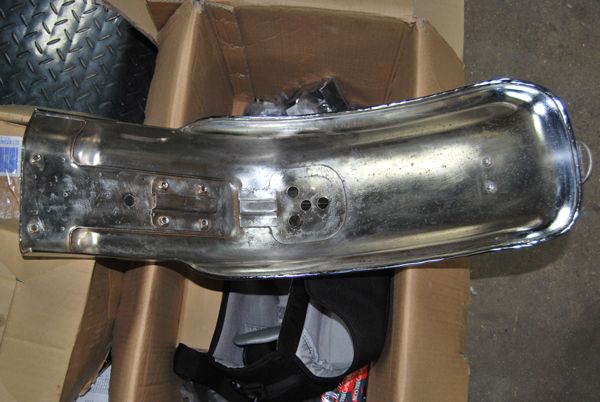
Rear mudguard was pretty rusty inside so I nailed it to the bench (not literally) and attacked it with various sorts of wire brush, it's hard to get into the nooks and crannies - heavy masking and a spell in the blaster me thinks...
Getting the tyres organised this week.
Such fun
A busy week of stocktaking at work didn't leave much Zed time.
Received the new top yoke bolt from Z1 Enterprises so got that fitted, the lower yoke bolts and engine bolt kit arrived from Saisei and will be fitted next weekend.
Originals are being put away for re-chroming at a later date.
Tried the hot Linsead oil trick on the airbox - worked well.
Tried the hot air gun on the airbox - worked not so well!
The plastic reacted badly, gentle heat made no difference, a more aggressive heat made the box instantly distort - not all of which could be corrected after frantic re-shaping - the rest I had not f**ked was treated to hot Linsead oil!
Lesson learned!
In the week I received the last of the electrical stuff from Z1 Enterprises.
It was time to tackle the last of the loom mods.
Despite numerous interruptions in play - mods are finished.
George mod has been hard wired and the relay sits neatly in the elec panel - fused power has been taken from the battery via the fuse box, battery negative was added to the loom during build - the original coil feed from the stop switch feeds the trigger on the relay - live feed to the coils was again built into the loom during build.
Extra security has been tried and tested.
Good to go.
The stainless steel cable tidies looked a tad drab, I used some autosol and a buffing wheel on the bench grinder to polish them up a bit.
Much better.
I'm a bit disappointed with the finish on the oil cooler - the galve wouldn't come off in the blaster without damaging the core.
Etch primer reacted and pickled - ordinary primer reacted in the same way.
After trying most of my paint arsenal - the only thing I found that would stick to it was an ancient can of Simoniz engine enamel - go figure!
Rear mudguard was pretty rusty inside so I nailed it to the bench (not literally) and attacked it with various sorts of wire brush, it's hard to get into the nooks and crannies - heavy masking and a spell in the blaster me thinks...
Getting the tyres organised this week.
Such fun

Are you going to zinc spray the underside of the rear mudguard?
~Jay.
~Jay.
Non standard Z900 - purchased from HIGGSPEED - http://www.higgspeed.com/ -
http://www.z1ownersclub.co.uk/forum/vie ... 6a7d5e816c
http://www.z1ownersclub.co.uk/forum/vie ... 6a7d5e816c
Hinckley wrote:It'll get a coat of rust treatment first Jay, then a coat of Zinc, then stone chip - ugly to look at I know - but practical.
You know what Tommy Cooper would say, "If it's ugly to look at,
don't look at it!"
~Jay.
Non standard Z900 - purchased from HIGGSPEED - http://www.higgspeed.com/ -
http://www.z1ownersclub.co.uk/forum/vie ... 6a7d5e816c
http://www.z1ownersclub.co.uk/forum/vie ... 6a7d5e816c
December week 3 update.
At the start of week 3 things are looking good, lack of time has slowed progress, lack of parts and lack of parts coming back from chroming even more so.
Didn't manage to get round to tyres or getting the wheels checked either
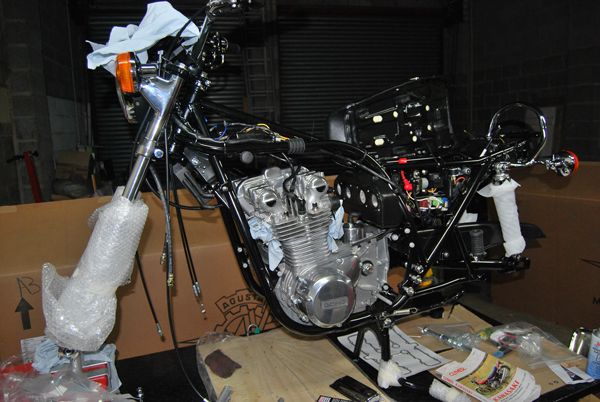
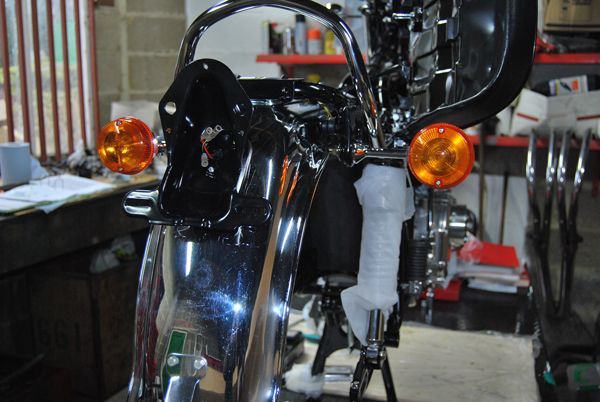
It was bloody freezing in the garage in the week but I still managed to get the mudguard on, stainless bolts and washers.
Had a few issues with the mounting rubbers - the part numbers on the parts list are American - they didn't fit!
Used the ones listed for the Z1 - fitted a treat!
The stone chip wouldn't stick to the zinc so Its gone on without it.
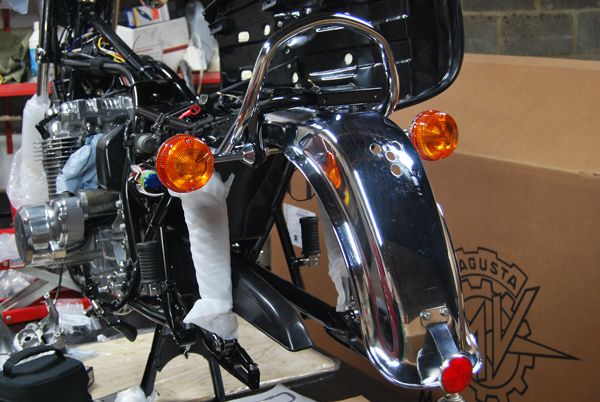
Scored a Lamp Holder on flea bay - a coat of paint and it was on - rear pattern wiring loom in - pattern indicators now with genuine shafts (flea bay again) got hooked up.
Was too much to resist hooking up a slave battery and turning on!
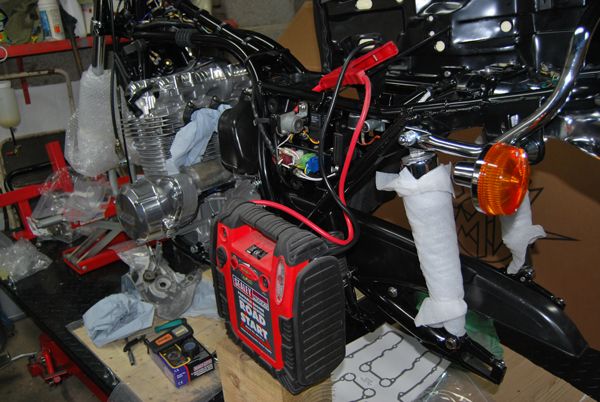
All went well - no issues - coil relay worked as expected - starter motor span the motor over strongly.
The Ltd needs some TLC over the winter break, the ape valve stem seals have failed - got to make time to fit some genuine seals.
Haven't even started on the carbs yet!
Nights are now drawing out - twelve weeks and the riding season will be upon us before we know it
At the start of week 3 things are looking good, lack of time has slowed progress, lack of parts and lack of parts coming back from chroming even more so.
Didn't manage to get round to tyres or getting the wheels checked either
It was bloody freezing in the garage in the week but I still managed to get the mudguard on, stainless bolts and washers.
Had a few issues with the mounting rubbers - the part numbers on the parts list are American - they didn't fit!
Used the ones listed for the Z1 - fitted a treat!
The stone chip wouldn't stick to the zinc so Its gone on without it.
Scored a Lamp Holder on flea bay - a coat of paint and it was on - rear pattern wiring loom in - pattern indicators now with genuine shafts (flea bay again) got hooked up.
Was too much to resist hooking up a slave battery and turning on!
All went well - no issues - coil relay worked as expected - starter motor span the motor over strongly.
The Ltd needs some TLC over the winter break, the ape valve stem seals have failed - got to make time to fit some genuine seals.
Haven't even started on the carbs yet!
Nights are now drawing out - twelve weeks and the riding season will be upon us before we know it


December update week 4
530 Chain + sprockets arrived from Dave, made a start on fitting.
I measured the inside edge of the front sprocket with the supplied 1.5mm spacer to the case - it measured the same as the standard 630 sprocket.
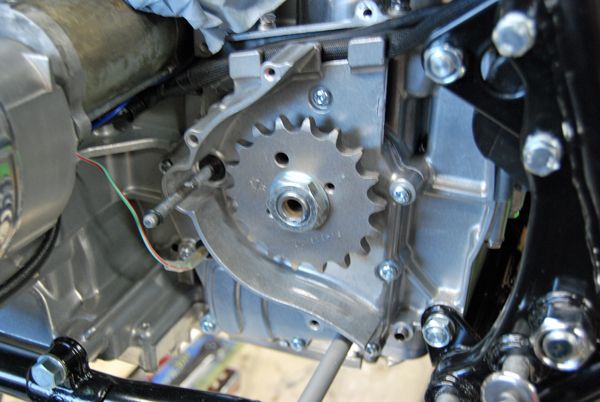
Shame the sprocket cover won't be seen, Mikeys zinc plating looks the business!
Stainless bolts replace the corroded standard cross head screws.
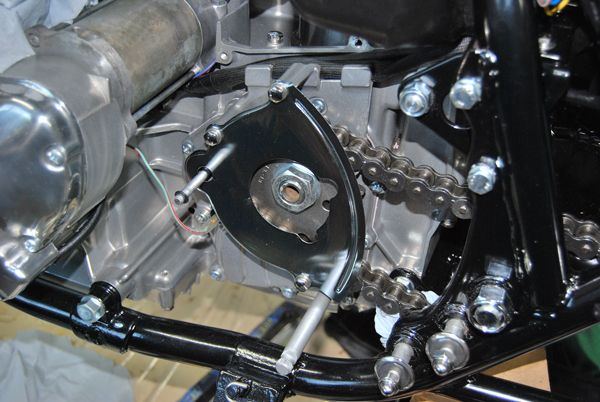
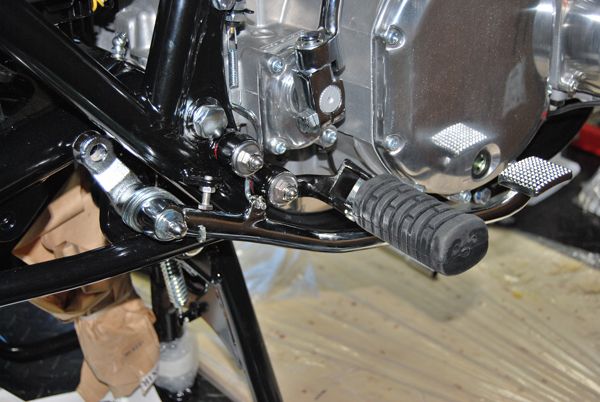
Cover on - clutch adjusted - Doremi engine bolt set fitted.
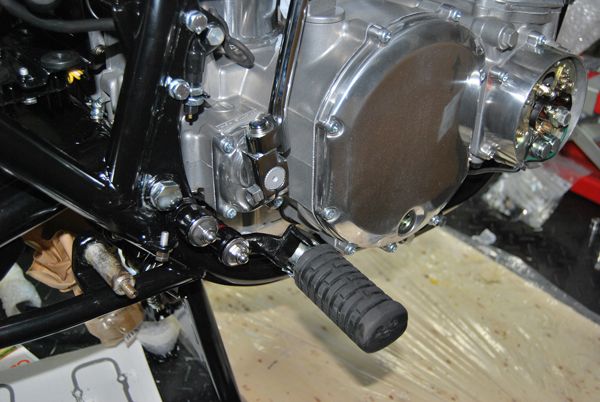
Temp fitted the pattern footrests, polished the stainless PMC footrest nuts and washers on the buffing wheel with autosol.
Polished the stainless side stand spring and bolt - looks better.
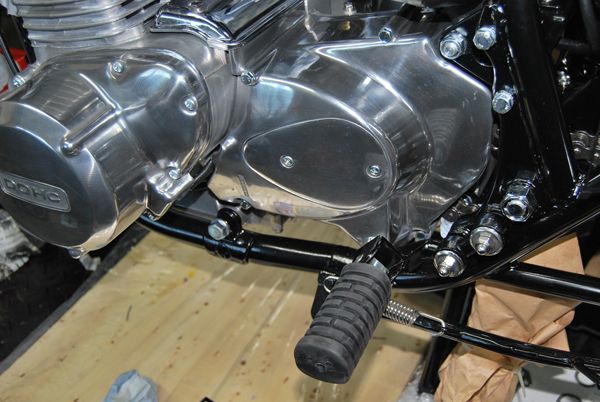
Test fitted the other side - can't wait for the brake pedal to come back from chroming.
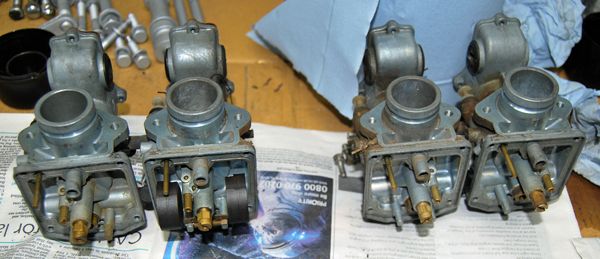
Made a start stripping the carbs - full of stale fuel residue!
Choke shaft has seen better days, managed to score a new one from CMS.
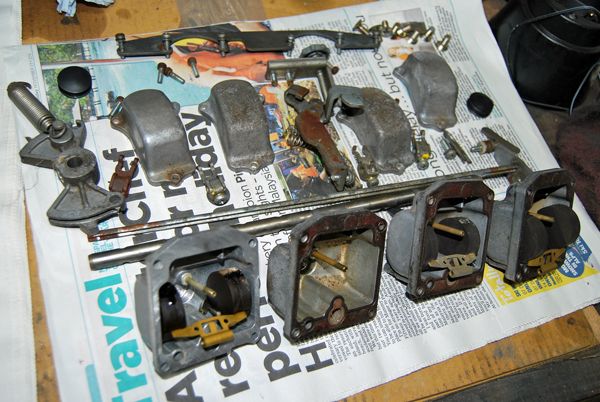
No 2 float shaft had seized - otherwize all else looks good.
Slides, needles, needle jets and choke plungers look good.
Going to make a soda blaster to do the carbs, not going to get them ceramic cleaned after last time!
Such Fun
530 Chain + sprockets arrived from Dave, made a start on fitting.
I measured the inside edge of the front sprocket with the supplied 1.5mm spacer to the case - it measured the same as the standard 630 sprocket.
Shame the sprocket cover won't be seen, Mikeys zinc plating looks the business!
Stainless bolts replace the corroded standard cross head screws.
Cover on - clutch adjusted - Doremi engine bolt set fitted.
Temp fitted the pattern footrests, polished the stainless PMC footrest nuts and washers on the buffing wheel with autosol.
Polished the stainless side stand spring and bolt - looks better.
Test fitted the other side - can't wait for the brake pedal to come back from chroming.
Made a start stripping the carbs - full of stale fuel residue!
Choke shaft has seen better days, managed to score a new one from CMS.
No 2 float shaft had seized - otherwize all else looks good.
Slides, needles, needle jets and choke plungers look good.
Going to make a soda blaster to do the carbs, not going to get them ceramic cleaned after last time!
Such Fun
Hinckley wrote:December update week 4
530 Chain + sprockets arrived from Dave, made a start on fitting.
I measured the inside edge of the front sprocket with the supplied 1.5mm spacer to the case - it measured the same as the standard 630 sprocket.
Not one to gloat but .......
Bike looks amazing ... a real credit to you
January update week 2
I got nothing done during the week - Sat & Sun saw progress.
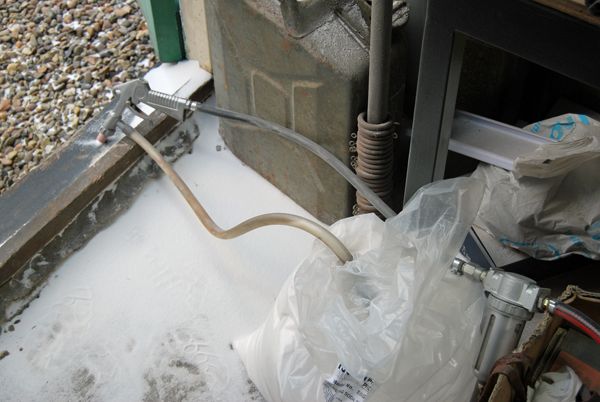
I decided not to send the carbs away for cleaning - instead I converted my blast cabinet gun for use with soda.
A 25kg bag of soda cost £38 plus Vat - not cheap but as it turns out - it goes a long way.
Just a tad messy though! most of the soda blew back on me and into the garage! longer air hose is on the list!
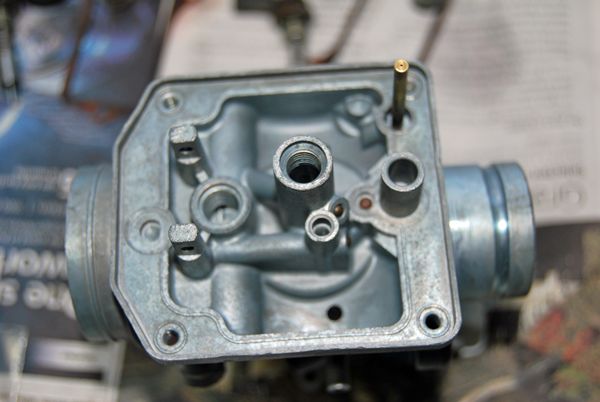
As the ultrasonic cleaners not arrived yet - I boiled the carbs in water for 20 mins, then rodded them out using bottle brushes, pipe cleaners and lock wire - the boiling removed lots of rubbish from the galleries, using carb cleaner and blowing them through with a blow gun removed more.
After soda blasting which took around 10 mins each I boiled them again, primarily to get any media out, good job too as more gunge was removed, again rodding them out, using carb cleaner and blowing through with the blow gun removed more.
Not a bad result.
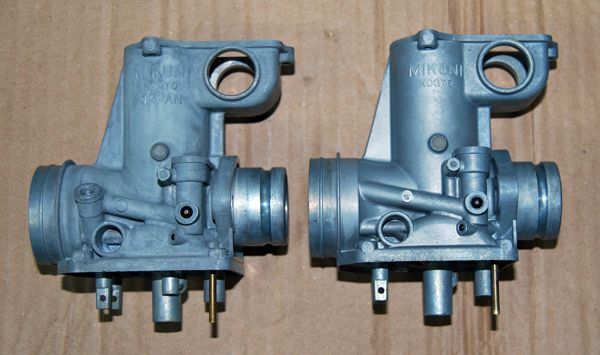
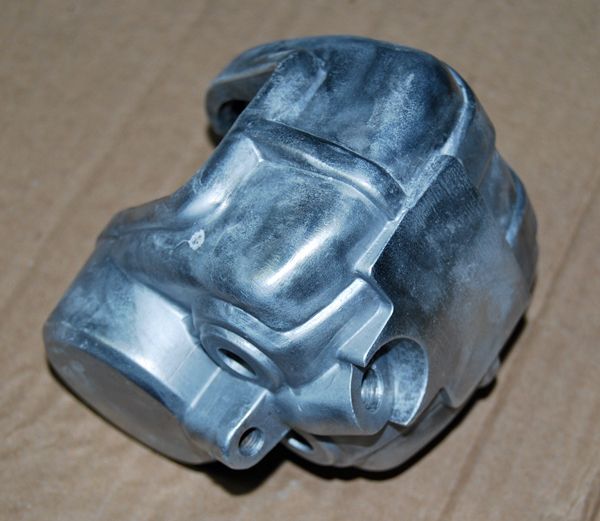
The soda removed all the fuel scale with ease, I had to use a wire brush to remove the gasket residue as the soda wouldn't touch it.
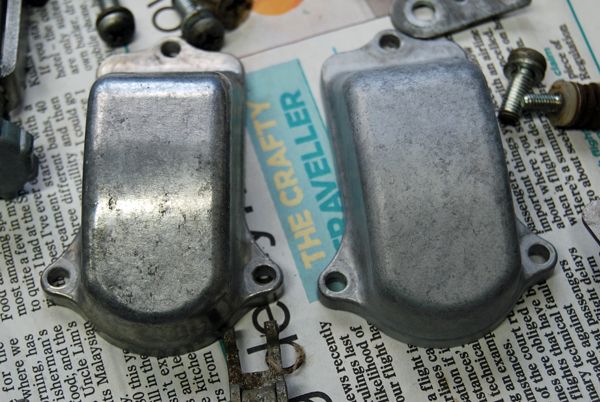
The soda did not do so well on the carb tops, these were always going to Mikey with the bottoms for polishing but I gave them a go anyway.
Swapped a wiring harness for a set of working brake calipers - thanks Jay.
The one remaining original mine came with had a piston that was rusted solid - the casting broke trying to remove it.
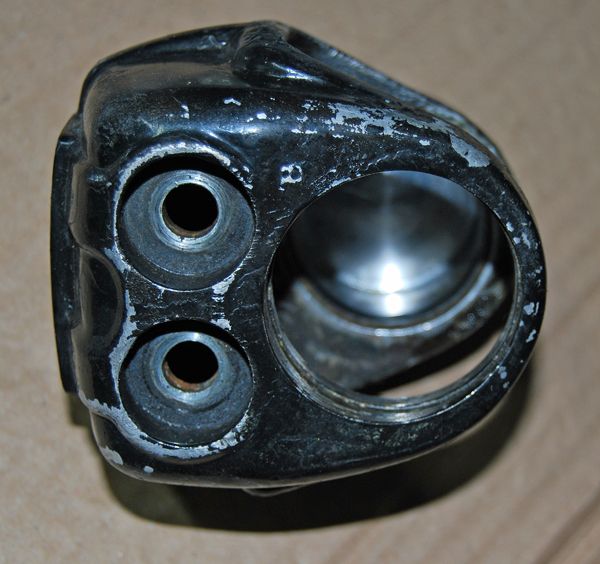
After stripping them down I had tried to get the paint off with a wire wheel - they had been painted with many layers of different types of paint, the paint had reacted with each other and was as shown peeling off in places, even so the wire wheel only removed the loose flaky stuff, the paint that was still attached wouldn't budge.
I was toying with the Idea of using paint stripper - but as I'd only used just over half the bag of soda on the carbs - and as the soda was still set up - I decided to give it a try on the calipers.
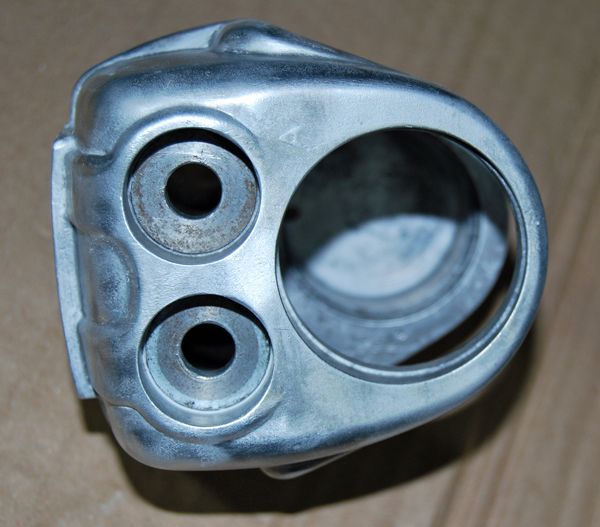
It did use up the rest of the bag of soda but this way was so much easier - It took some time and made allot of mess - but it got the rest of paint off.

The soda cleaned the crystallised brake fluid from the inside and left a smooth surface, the soda doesn't remove any material or leave shards of media behind like the glass media.
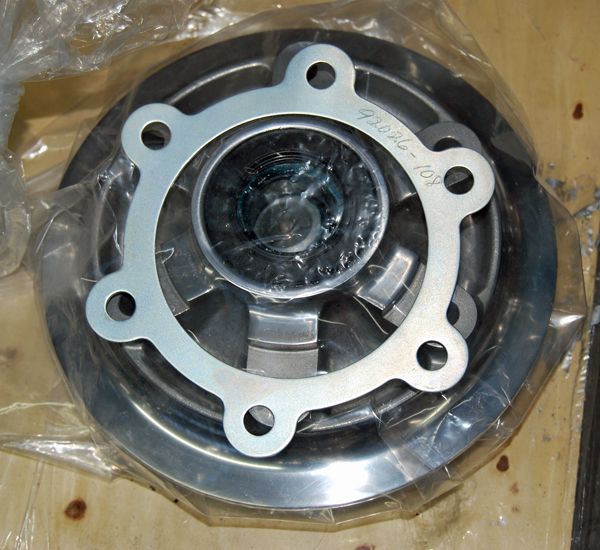
I've read many times fitting the 92026-108 spacer is not necessary.
I'd measured the front sprocket when I fitted the 530 conversion, with the spacer provided by Dave this was the same inner measurement as the 630 OE.
The 530 sprocket has the same inner measurement as the 630 OE one as they are bolted flush to the carrier in the same way.
With the rear assembled and torqued up I put a straight edge along the sprocket faces, using shim steel I found to make the chain run 100% parallel a 1.5mm spacer is required.
While it would probably be fine without the spacer - and I could have used washers - I found the correct spacer in the USA at sensible money.
I've ordered the rest of the carb parts so it's now a waiting game.
Onwards and upwards
I got nothing done during the week - Sat & Sun saw progress.
I decided not to send the carbs away for cleaning - instead I converted my blast cabinet gun for use with soda.
A 25kg bag of soda cost £38 plus Vat - not cheap but as it turns out - it goes a long way.
Just a tad messy though! most of the soda blew back on me and into the garage! longer air hose is on the list!
As the ultrasonic cleaners not arrived yet - I boiled the carbs in water for 20 mins, then rodded them out using bottle brushes, pipe cleaners and lock wire - the boiling removed lots of rubbish from the galleries, using carb cleaner and blowing them through with a blow gun removed more.
After soda blasting which took around 10 mins each I boiled them again, primarily to get any media out, good job too as more gunge was removed, again rodding them out, using carb cleaner and blowing through with the blow gun removed more.
Not a bad result.
The soda removed all the fuel scale with ease, I had to use a wire brush to remove the gasket residue as the soda wouldn't touch it.
The soda did not do so well on the carb tops, these were always going to Mikey with the bottoms for polishing but I gave them a go anyway.
Swapped a wiring harness for a set of working brake calipers - thanks Jay.
The one remaining original mine came with had a piston that was rusted solid - the casting broke trying to remove it.
After stripping them down I had tried to get the paint off with a wire wheel - they had been painted with many layers of different types of paint, the paint had reacted with each other and was as shown peeling off in places, even so the wire wheel only removed the loose flaky stuff, the paint that was still attached wouldn't budge.
I was toying with the Idea of using paint stripper - but as I'd only used just over half the bag of soda on the carbs - and as the soda was still set up - I decided to give it a try on the calipers.
It did use up the rest of the bag of soda but this way was so much easier - It took some time and made allot of mess - but it got the rest of paint off.
The soda cleaned the crystallised brake fluid from the inside and left a smooth surface, the soda doesn't remove any material or leave shards of media behind like the glass media.
I've read many times fitting the 92026-108 spacer is not necessary.
I'd measured the front sprocket when I fitted the 530 conversion, with the spacer provided by Dave this was the same inner measurement as the 630 OE.
The 530 sprocket has the same inner measurement as the 630 OE one as they are bolted flush to the carrier in the same way.
With the rear assembled and torqued up I put a straight edge along the sprocket faces, using shim steel I found to make the chain run 100% parallel a 1.5mm spacer is required.
While it would probably be fine without the spacer - and I could have used washers - I found the correct spacer in the USA at sensible money.
I've ordered the rest of the carb parts so it's now a waiting game.
Onwards and upwards
January week 3 update.
Made some gentle progress, ordered a temporary replacement rear brake lever last week, so I put it on and set it up - I'm still waiting for the chroming to come back...... 6 weeks and counting.....
Not happy with the fit of the genuine replacement washer, right part number wrong size - centre hole had way too much clearance, stainless replacement added to the to order list.
ZP lever, PMC brake light kit, Polished stainless dome nut, spring washer, lever return limiting set nut and bolt.
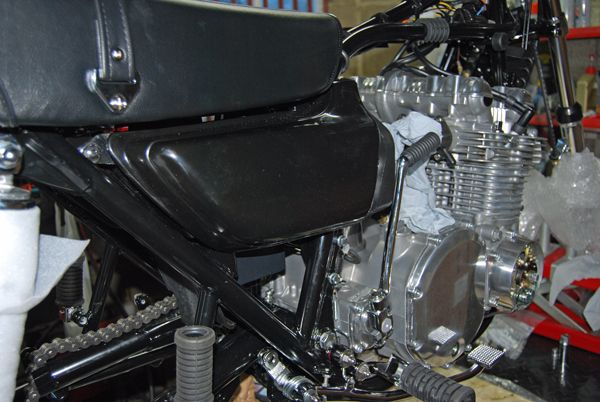
ZP Pattern side panels had their first trial fit, no dramas, ready to drill for ZP pattern badges and paint - another item ticked off the list.
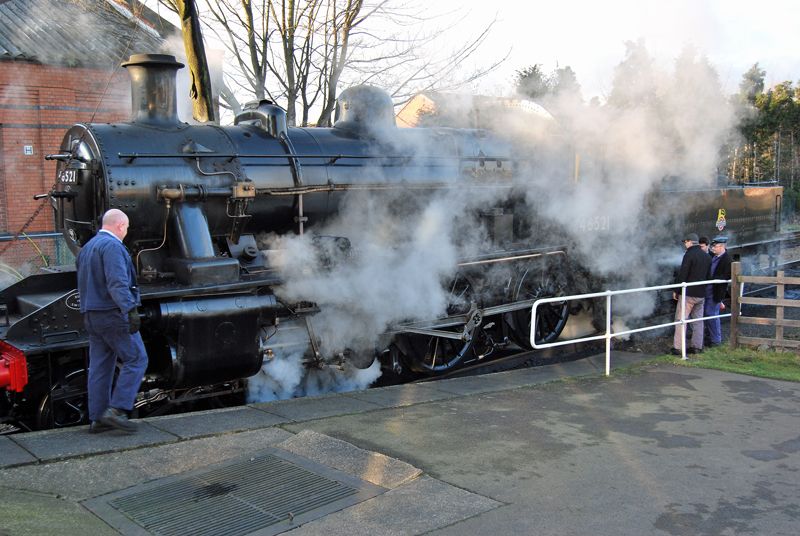
With a reasonable weather outlook for the weekend I took a break from freezing me nadgers off in the garage to visit the Great Central Railway at Leicester/Loughborough and play trains.
Old skool engineering at its best - I'd love to get my hands dirty playing with live steam - same idea bigger spanners...
Back in the garage with the heaters on full I tried painting the calipers - bad idea - the paint wouldn't spray right - gave up and took them to work - which as well as warm also has a convenient oven microwave
Warmed to 50°C then three coats of Simoniz Motorcycle Heat Dispersant satin black 1/2hr apart and in they go...
Hour and a half at 200°C later and were good to go.
Such fun
Made some gentle progress, ordered a temporary replacement rear brake lever last week, so I put it on and set it up - I'm still waiting for the chroming to come back...... 6 weeks and counting.....
Not happy with the fit of the genuine replacement washer, right part number wrong size - centre hole had way too much clearance, stainless replacement added to the to order list.
ZP lever, PMC brake light kit, Polished stainless dome nut, spring washer, lever return limiting set nut and bolt.
ZP Pattern side panels had their first trial fit, no dramas, ready to drill for ZP pattern badges and paint - another item ticked off the list.
With a reasonable weather outlook for the weekend I took a break from freezing me nadgers off in the garage to visit the Great Central Railway at Leicester/Loughborough and play trains.
Old skool engineering at its best - I'd love to get my hands dirty playing with live steam - same idea bigger spanners...
Back in the garage with the heaters on full I tried painting the calipers - bad idea - the paint wouldn't spray right - gave up and took them to work - which as well as warm also has a convenient oven microwave
Warmed to 50°C then three coats of Simoniz Motorcycle Heat Dispersant satin black 1/2hr apart and in they go...
Hour and a half at 200°C later and were good to go.
Such fun
Feb week 1 update.
Way too cold to play in the garage - Saturday saw the new pattern rear light going on - and that was it.
Chroming came back un chromed! - no explanation - #&%%# useless #%%^&&6~! going to give Castle Chroming a try.
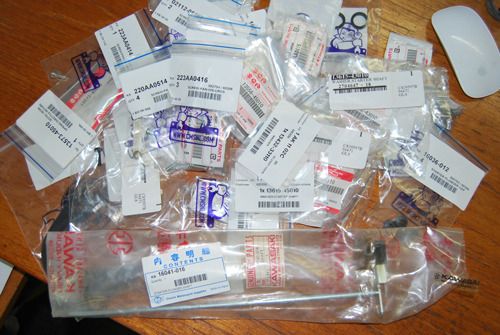
Plenty of spares arrived from CMS and Cradley K for the Carb build.
Should keep me busy in the warm of the house for a few days....
Reckon I scored one of the last NOS choke bars available
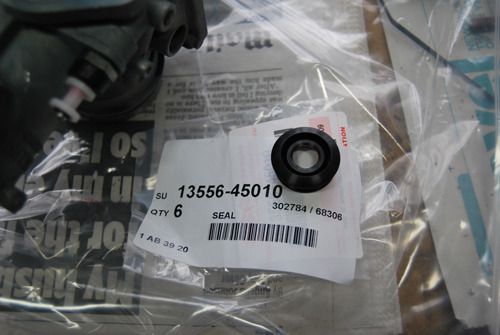
The Carb Grommets #92071-102 I had were worn out and age cracked - and not available from Kawasaki.
Although I found them available in pattern form in Oz, something I remembered from the past was nagging me..
My next door neigbour has a Suzuk1 GS100E with the same Mikuni Carbs.
Looking on CMS web site at the Suzuk1 parts list I found them still available #13556-45010 - they are identical.
The return spring was very rusty, after cleaning I could have Zinc plated the original but again the Suzuk1 item was identical - and new!
Kawasaki #16040-020 - Suzuki #13573-45010.
(Kawasaki # item has become available again on CMS's web site since I ordered the Suzuk1 one)
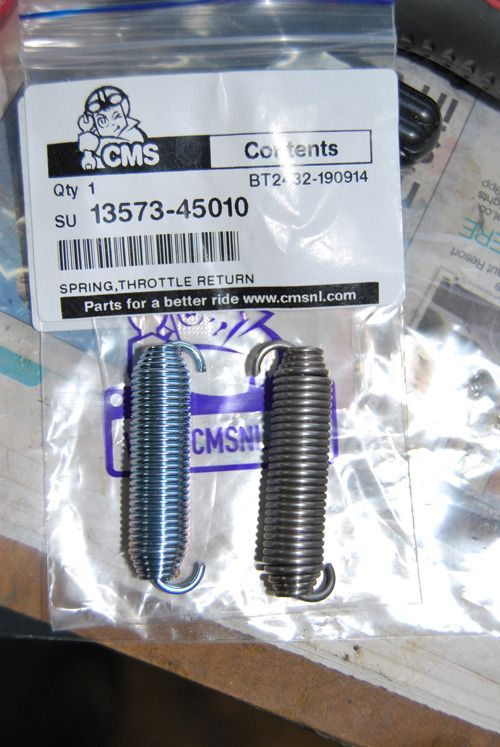
It seems as the Suzuk1 GS100E uses the same Mikuni carbs - some parts cross with the A4.
A couple of other identical parts I found of use...
Kawasaki #16046-007 Pan head screws for the choke plunger levers Suzuk1 #13605-31210.
Kawasaki #16040-009 Choke bar locking screw spring Suzuk1 #13426-43010.
Another useful site for NOS parts is www.nwvintagecycleparts.com not cheap on postage - and none of the obvious parts every one looks for - but, its somewhere else worth a try - quick to ship too.
Carb tops and bottoms off to Mikey for polishing, and a few brackets n bits and bobs for Zinc plating.....
Getting there - slowly
Way too cold to play in the garage - Saturday saw the new pattern rear light going on - and that was it.
Chroming came back un chromed! - no explanation - #&%%# useless #%%^&&6~! going to give Castle Chroming a try.
Plenty of spares arrived from CMS and Cradley K for the Carb build.
Should keep me busy in the warm of the house for a few days....
Reckon I scored one of the last NOS choke bars available
The Carb Grommets #92071-102 I had were worn out and age cracked - and not available from Kawasaki.
Although I found them available in pattern form in Oz, something I remembered from the past was nagging me..
My next door neigbour has a Suzuk1 GS100E with the same Mikuni Carbs.
Looking on CMS web site at the Suzuk1 parts list I found them still available #13556-45010 - they are identical.
The return spring was very rusty, after cleaning I could have Zinc plated the original but again the Suzuk1 item was identical - and new!
Kawasaki #16040-020 - Suzuki #13573-45010.
(Kawasaki # item has become available again on CMS's web site since I ordered the Suzuk1 one)
It seems as the Suzuk1 GS100E uses the same Mikuni carbs - some parts cross with the A4.
A couple of other identical parts I found of use...
Kawasaki #16046-007 Pan head screws for the choke plunger levers Suzuk1 #13605-31210.
Kawasaki #16040-009 Choke bar locking screw spring Suzuk1 #13426-43010.
Another useful site for NOS parts is www.nwvintagecycleparts.com not cheap on postage - and none of the obvious parts every one looks for - but, its somewhere else worth a try - quick to ship too.
Carb tops and bottoms off to Mikey for polishing, and a few brackets n bits and bobs for Zinc plating.....
Getting there - slowly
February week 2.5 update.
A rather large expensive box has arrived.
Chroming has yet again been sent off - fingers crossed it gets done this time.
Carbs are partially assembled, can't wait to get the polishing back from Mikey.
With the sun shining I bounded into the garage full of enthusiasm - only to find the warmer temperatures have definitely not yet arrived inside!!
Although it was warmer outside than in - I managed the cold long enough to fit the front NOS mudguard - I tried it both ways round - I think it's upside down now - I can't make up my mind if it looks better this way or the other
Back in the warm world - another small parcel arrived from Dave (sushi) with some interesting contents...
The dust shield retainers were both missing on the brake calipers I got from Jay.
The old rusty one I got out of my original remaining caliper would have gone again - but that meant I still needed another - and they are not listed on the parts list as a spare - bum!
After a bit of searching I found PMC listed replacement items for the Z1 - but they did not say if they would fit the A4.
After a bit of measuring between me and Dave - they measured up pretty similar - so I gave them a try.
Identical! PMC 81-3155 (sold in singles)
And fit a treat - Stainless steel pistons were well priced from Wemoto and also fit well.
Pattern seals from ZP would have done but I wasn't overly happy with them.
The piston seals were a touch on the thick side, this made things very tight when trying to fit the pistons - back to genuine - which of course fit perfectly.
The dust seals got grip on the new retainers but pulled off easily - genuine seals as expected fitted perfectly and did not.
Lesson learned - again..
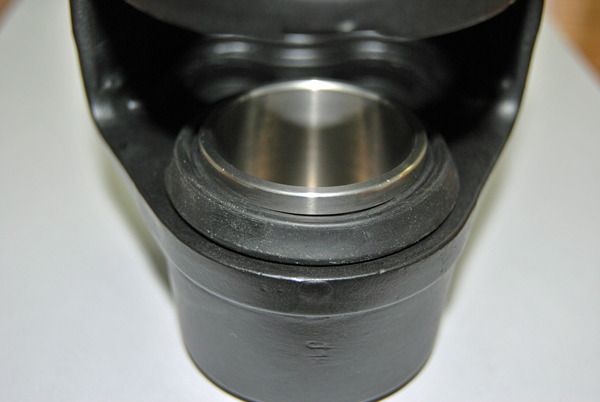
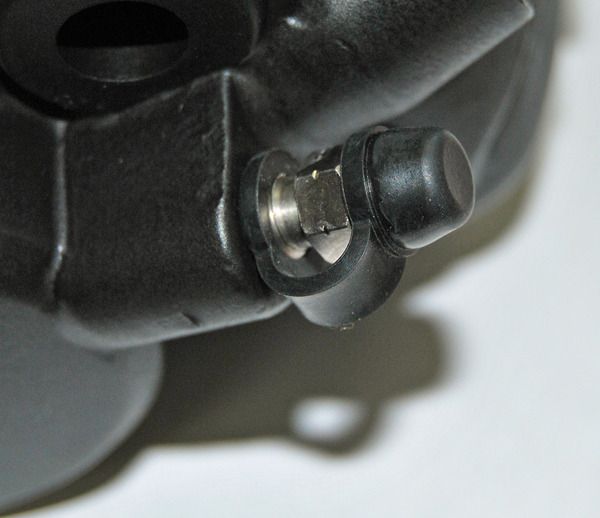
While I was on the Wemoto site - I picked up a couple of their stainless steel bleed nipples - quality product and well priced.
New dust covers and the jobs a good un.
Got to start thinking about getting the paintwork done.
Getting there
A rather large expensive box has arrived.
Chroming has yet again been sent off - fingers crossed it gets done this time.
Carbs are partially assembled, can't wait to get the polishing back from Mikey.
With the sun shining I bounded into the garage full of enthusiasm - only to find the warmer temperatures have definitely not yet arrived inside!!
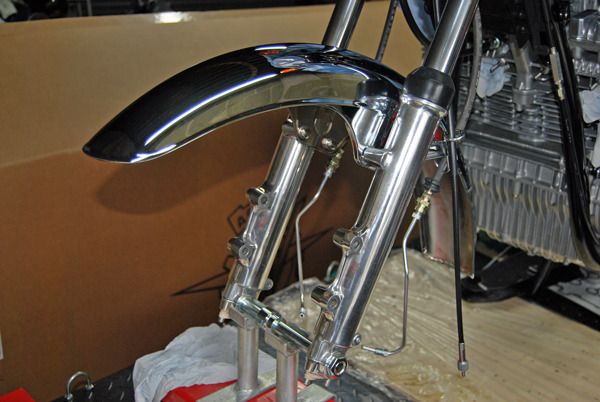
Although it was warmer outside than in - I managed the cold long enough to fit the front NOS mudguard - I tried it both ways round - I think it's upside down now - I can't make up my mind if it looks better this way or the other
Back in the warm world - another small parcel arrived from Dave (sushi) with some interesting contents...
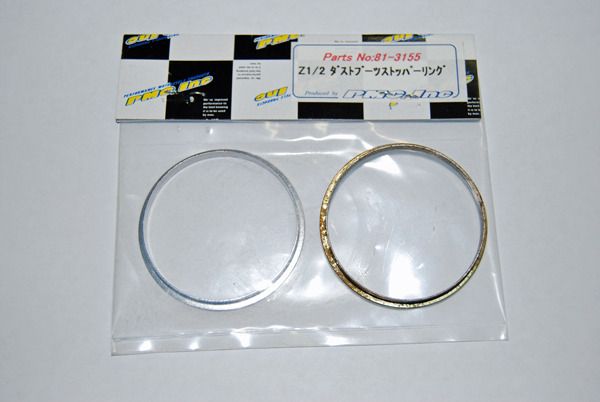
The dust shield retainers were both missing on the brake calipers I got from Jay.
The old rusty one I got out of my original remaining caliper would have gone again - but that meant I still needed another - and they are not listed on the parts list as a spare - bum!
After a bit of searching I found PMC listed replacement items for the Z1 - but they did not say if they would fit the A4.
After a bit of measuring between me and Dave - they measured up pretty similar - so I gave them a try.
Identical! PMC 81-3155 (sold in singles)
And fit a treat - Stainless steel pistons were well priced from Wemoto and also fit well.
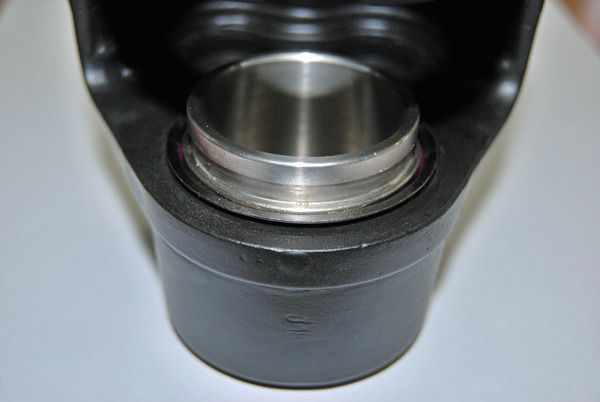
Pattern seals from ZP would have done but I wasn't overly happy with them.
The piston seals were a touch on the thick side, this made things very tight when trying to fit the pistons - back to genuine - which of course fit perfectly.
The dust seals got grip on the new retainers but pulled off easily - genuine seals as expected fitted perfectly and did not.
Lesson learned - again..
While I was on the Wemoto site - I picked up a couple of their stainless steel bleed nipples - quality product and well priced.
New dust covers and the jobs a good un.
Got to start thinking about getting the paintwork done.
Getting there
Hinckley wrote:
Although it was warmer outside than in - I managed the cold long enough to fit the front NOS mudguard - I tried it both ways round - I think it's upside down now - I can't make up my mind if it looks better this way or the other
I think the mudguard looks perfect Alex.
~Jay.
Non standard Z900 - purchased from HIGGSPEED - http://www.higgspeed.com/ -
http://www.z1ownersclub.co.uk/forum/vie ... 6a7d5e816c
http://www.z1ownersclub.co.uk/forum/vie ... 6a7d5e816c
Who is online
Users browsing this forum: No registered users and 6 guests