Hello Guest User,

Please feel free to have a look around the forum but be aware that as an unregistered guest you can't see all of it and you can't post.

To access these 'Registered Users Only' areas simply register and login.

Project Z900 A4 - Restoration - Pic Heavy

Work in Progress

Moderators: KeithZ1R, chrisu, paul doran, Taffus

Message
Author
User avatar
Hinckley
100Club
100Club
Posts: 263
Joined: 21st Jun 2012
Location: UK

#121 PostAuthor: Hinckley » Wed May 27, 2015 9:24 am

Richard Q wrote::clap :clap

Nice one, best some miles on it now then :D

Thanks guys - although there is a sizeable itch to see what it rides like :twisted:
I have to finish the temporary tank first - mot it - register it...........

Such Fun :D

Aztec Warrior
100Club
100Club
Posts: 448
Joined: 19th Oct 2014

#122 PostAuthor: Aztec Warrior » Wed May 27, 2015 10:24 am

Nice one. That should ride a treat on the open road, as your build qc must be far superior than the factory ever was.
It has been 3 hours well spent reading every word here this morning when I should of been fettling my own bikes, but I've gleaned so many useful tips and pointers from your posting. For anyone else here, you have virtually covered, comprehensively, a full rebuild of a Zed. (I cant actually think of anything you've not included). Well done again.
All you need now is the missus to hold the camcorder and get something up on YouTube! :beam

User avatar
Hinckley
100Club
100Club
Posts: 263
Joined: 21st Jun 2012
Location: UK

#123 PostAuthor: Hinckley » Fri May 29, 2015 1:14 pm

Thanks AW - Be nice to think I'ts close to factory standard.
Glad you read the project through though - if it helps others - it makes it worth while.
I've spent many hours reading the bloggs, I usually find what I'm looking for (despite getting side tracked) but there is just so much information to assimilate :shock:
I'd like to do a vid, but the thought of the wife with a camcorder Image Moving on.....

May week 4 update.

So - now she runs - it's time to finish the temporary tank.

Balancing the tank on the old Ltd rear tyre which was itself perched on the vice turned out to be a really bad idea, much work was duly ruined when it fell off.

So cunning plan 'B' came into action, this time the tank would be perched on an old Ltd front tyre (such brilliance) which in turn would be perched over a copper rawhide mallet (fall off that yer bastard). The mallet was then clamped in the vice - Humph!

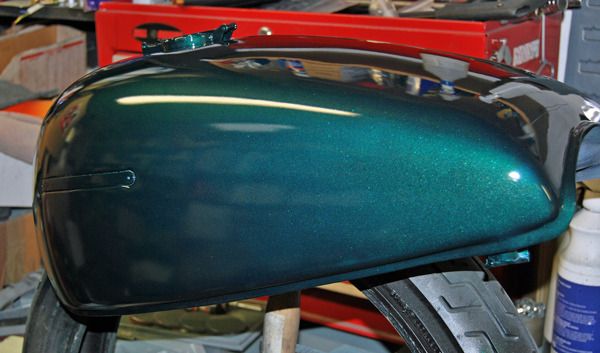
After removing the new dents and scratches - it got three coats of rattle can topcoat (rover green again) and two of clearcoat - we are now good to go.

We don't mention the run(s), nor the dents I didn't fill - Oh - and the bit I caught my jumper on, or the finger print :oops
I really should just stick to mechanicals :idiot

Image

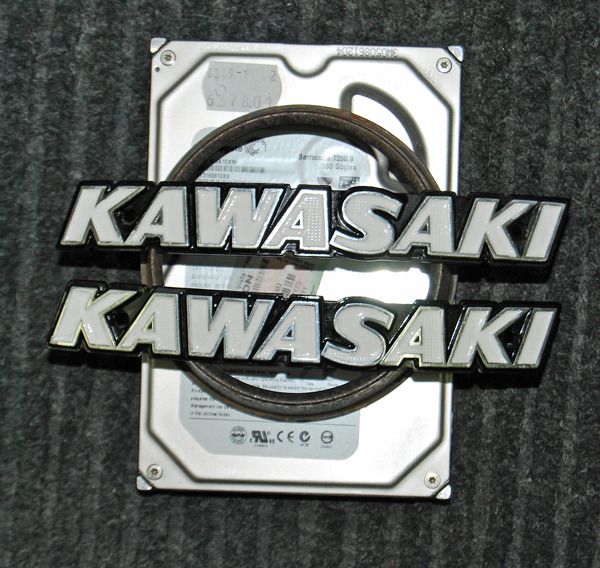
Gave the original tank badges a couple of coats of Humbrol Enamel Airfix paint - thanks son :ws

Image

So Close :bng

User avatar
Hinckley
100Club
100Club
Posts: 263
Joined: 21st Jun 2012
Location: UK

#124 PostAuthor: Hinckley » Mon Jun 01, 2015 11:32 am

June week 1 update.

As may ended and with the build end being just around the corner I was hoping to put a few gentle miles under her belt, a van was borrowed, permissions to ride round an old airfield granted.
Just one or two last jobs on the check list - a thorough check over and fit the temporary tank and fuel tap.

Sunday morning saw dark clouds with wind and rain lashing at the garage, this was not a good sign.
But - it enabled me to take my time, nice weather was forecast for the afternoon.
In time honoured fashion - nothing really went to plan.

There had been a trial fit of the temporary tank when I got it, this had gone smoothly with no issues.
With a bit of tweaking the new ZP pattern fuel tap wss fitted to the tank.

I worked through my check list, first job was to re-torque the head bolts, the engine had been up to temperature a couple of times so out with the torque wrench and on we go.
I loosened up the inside nearside front first - YUK that thread doesn't feel right!
So I whipped the nut off to find no lubricant on the thread - bone dry!! Mmmmm? must have forgot that one - lubricant added - re- torqued - right onto the next one - the same? I was sure I lubed them! as it turned out none of them were lubed - I then spent the next few hours checking nigh on every screw, nut and bolt - job done!

So next it was time to fit the tank and hoses - no issues, I put about 5 litres of fuel in and checked for leaks - none found I went for lunch.

Came back from lunch and discovered a drip from the tap, although not masses it was a drip every 10 seconds or so.
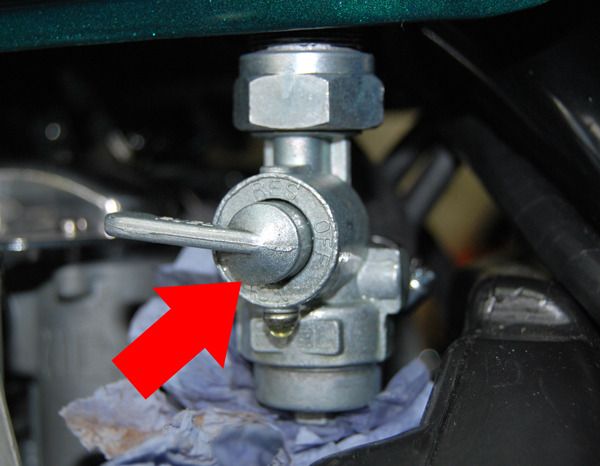
Expecting the tap to tank seal to be the culprit I was surprised to see the leak coming from round the tap lever!

Image

Drained the fuel and removed the tap, I had noticed on installation the tap lever was stiff to operate, a good seal or so I thought, now it was behaving very very loose.
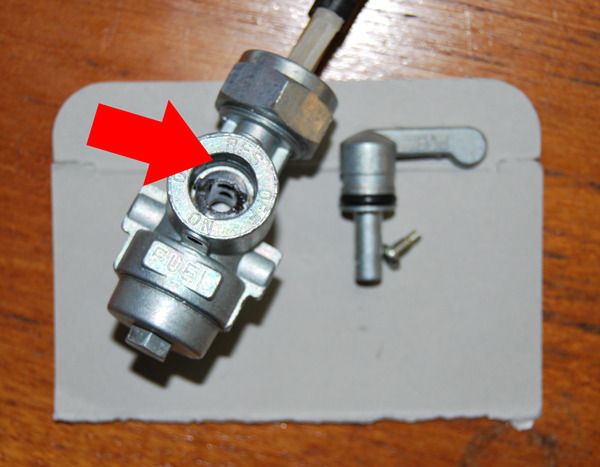
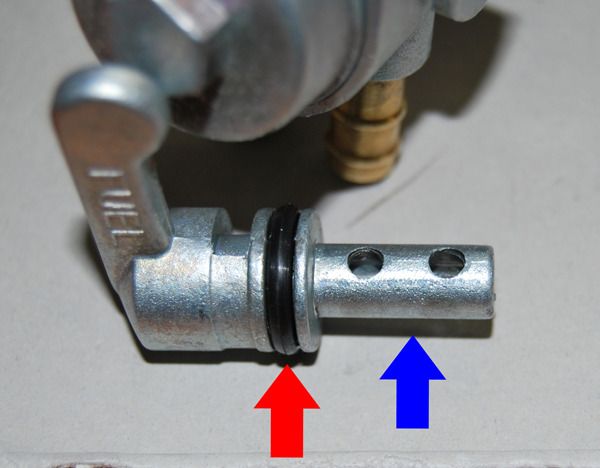
The seal visually looked Ok, but the seat wasn't exactly round or smooth!

Image

The internal design of the pattern tap differs greatly from the genuine article - although it is not to the same quality standard the design should still function in a similar manner.

The seal arrowed red is good enough, however with the seal 'seat' not correctly finished - it stands no chance of sealing.
To add to this the 'valve' arrowed blue looks fine in the pic - but it is not exactly round, it looks like finishing has been done with a hand file instead of the expected machined finish!
When preparing to remove the tap I found it did not shut off the fuel completely - when the hoses were removed it dripped fuel continuously from the outlets!

Image

After speaking to a few suppliers it would appear this is a VERY common problem with pattern fuel taps from a particular manufacturer in China, and has been so for quite some time.
From what I understand the pattern fuel tap I have(although not marked) is from the same 'Flung-Shit'(correction needed!) manufacturer in China.
I am told these particular pattern fuel taps are all that are available at the moment - It seems PMC had problems with theirs and are not producing any at this time.

Just for one brief minute - one minute - she was good to go :(

Image

Such is life :)

wilsonsjw11
Hardcore
Hardcore
Posts: 1317
Joined: 18th Jul 2008
Location: West Sussex/Central London

#125 PostAuthor: wilsonsjw11 » Mon Jun 01, 2015 12:39 pm

Look round for a genuine Kawasaki unit there are some still about but will cost£££.
The pattern items are shite.
Regards
Steve

User avatar
steve bowdler
Area Rep.
Area Rep.
Posts: 1793
Joined: 20th Apr 2005
Location: swansea s.wales

#126 PostAuthor: steve bowdler » Mon Jun 01, 2015 2:06 pm

It seems Pingel are the best choice at present but unfortunately not when going for the original look

http://www.debben.co.uk/Pingel.html

:(

User avatar
Hinckley
100Club
100Club
Posts: 263
Joined: 21st Jun 2012
Location: UK

#127 PostAuthor: Hinckley » Mon Jun 01, 2015 2:37 pm

Look round for a genuine Kawasaki unit there are some still about but will cost£££.
The pattern items are shite.
Regards
Steve

Have found a replacement in the states, I'm reluctant to push the button on it as the guy that has it - is a gloating arse!

It seems Pingel are the best choice at present but unfortunately not when going for the original look

Pingel wouldn't be so bad if they wern't so darned ugly!
Had one before that leaked and I couldn't get it apart, looks as though the new ones are not serviceable items, unless someone knows different.

Aztec Warrior
100Club
100Club
Posts: 448
Joined: 19th Oct 2014

#128 PostAuthor: Aztec Warrior » Tue Jun 02, 2015 5:30 pm

[quote="Hinckley"][quote]Look round for a genuine Kawasaki unit there are some still about but will cost£££.
The pattern items are shite.

Pingel is top quality for sure. Looks OK on my ST. All I've noted is the amount of fuel that flows. Alarmingly quick!
Like your shed. Very nice set up, but as you say, a trifle chilly for a good six months here. :!:

User avatar
Hinckley
100Club
100Club
Posts: 263
Joined: 21st Jun 2012
Location: UK

#129 PostAuthor: Hinckley » Mon Jun 08, 2015 11:16 am

Like your shed. Very nice set up, but as you say, a trifle chilly for a good six months here.

Came with the house - a touch useful - very cold in the winter - way too big to heat.

June week 1.5 update - D day :D

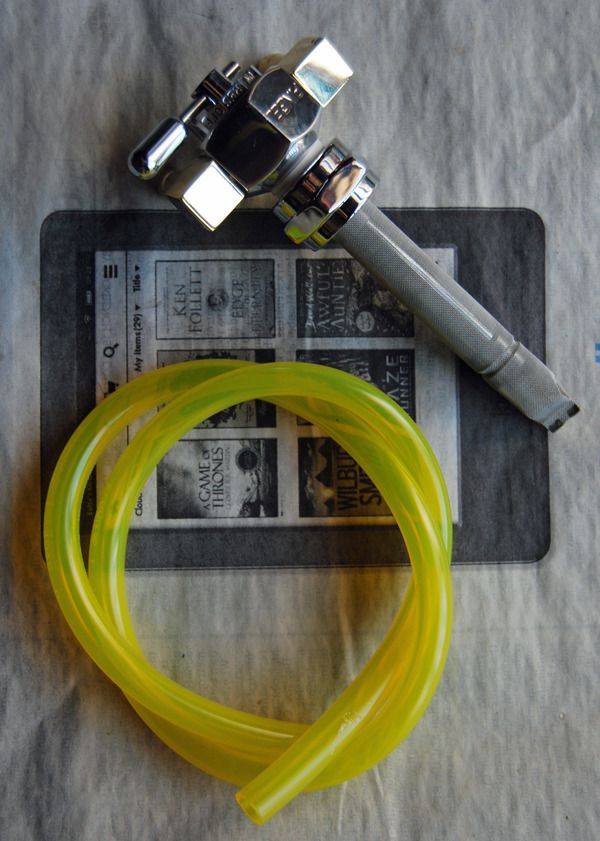
So after much deliberation on fuel taps - the obvious arrived from messers Debben.

Mr smarmy git from the bay - stick your tap up your arse!
(sorry for that - but sometimes these things just need to be said!)
Image

#3211D - Twin outlet tap £70
#A2001C - M22 tap adaptor £18
#TYGON - Fuel hose yellow £7

I didn't end up using the hose as it looked hideous, it would look ok with some cotton overbraid - but I don't have any - the hose I had stretched over - just!

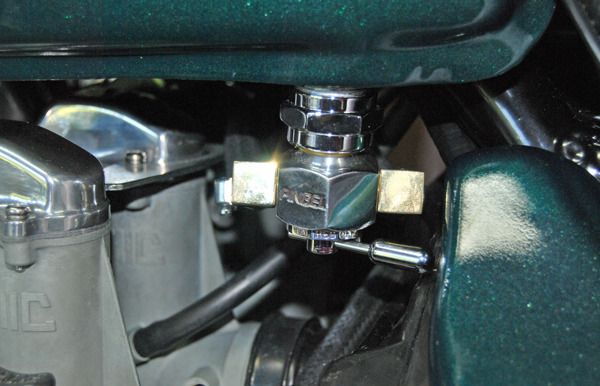
The threads were treated to some PTFE tape and the adaptor gently screwed down, nipped up with my trusty 1" service wrench and we are good to go!
Image

Closer....

A gallon of fuel went in - and stayed in - no leaks this time Image

To be on the safe side I drained the fuel bowls again and flushed em through. yet again more black bits and blackish jelly blobs emerged - but less than last time - with clean fuel flowing I pressed on.

Closer....

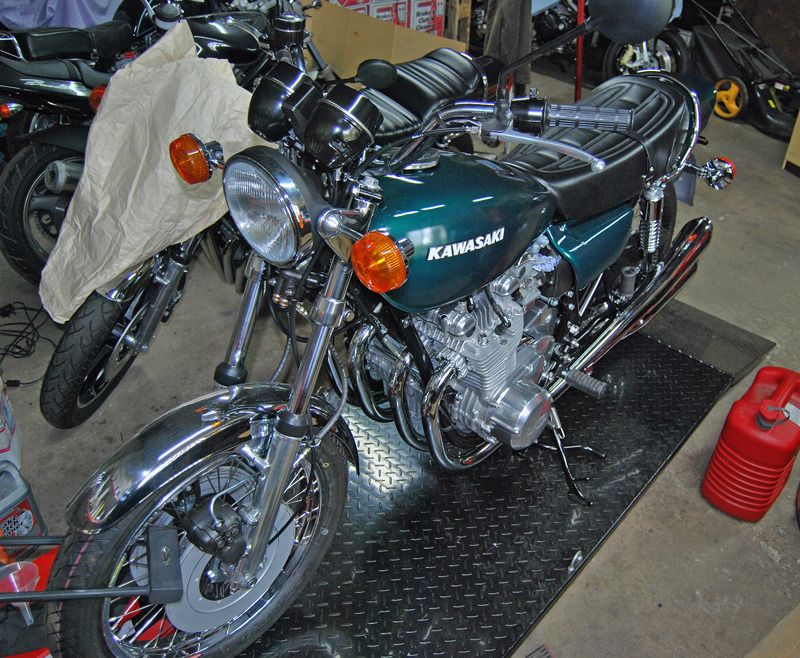
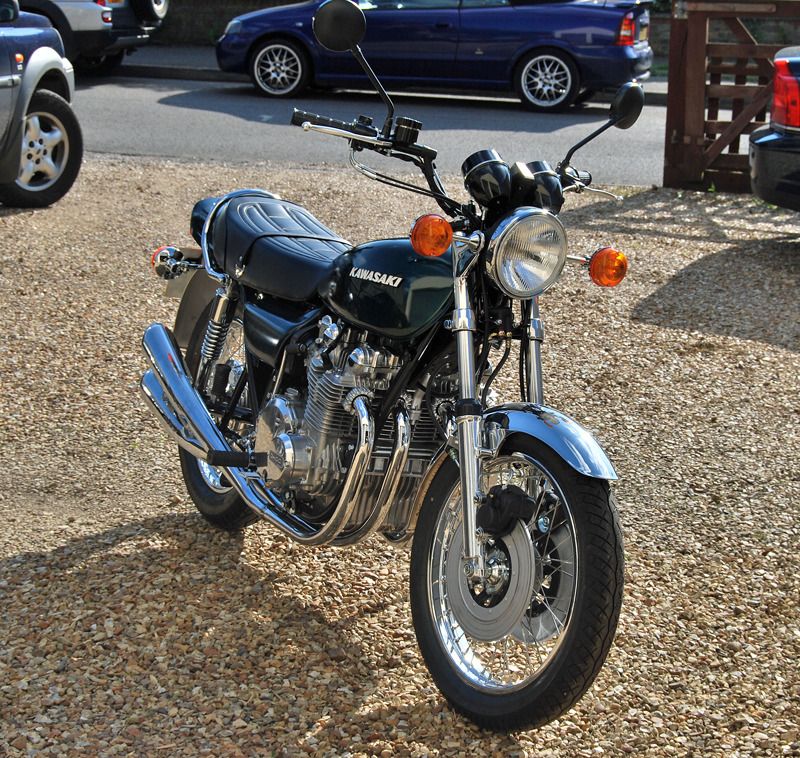
Wheeled her out the garage for the first time.
I had an audience so was a bit nervous - I neednt have worried - First Prod - Brrrrrr, rumm, barrrr, rumm, barrrr, rumm - rummm, barrr - brrrr - perfect!
Image

Ready....

Went to load her in the van and - the clutch was stuck fast - bugger!
another ten mins of adjusting and general buggering around trying to dig up the drive with the rear bridgstone and the clutch was free - yay - in the van she goes...

So - First Ride Report.

Unloaded and warmed her up......

Sun shining - Fuel on - Ign on - Start - into 1st gear - and off we go Image

1st, 2nd, 3rd, 4th, 5th - nice and so smooth - no issues.
Round the twisty bits - over the bumps - on the brakes - purrrfecctt!

The first thing I noticed was how smooth it is, steering is light and very positive, suspension is nice and firm - but not too firm.
It flows naturally into the corners with just a hint of understeer - but that's being really picky.
The riding position is very upright but not uncomfortably so, the wide bars take me back to bikes of old, pootling around it felt more like an old flat-tracker - just waiting for me to get its tail out!
The gearbox is super silky smooth, positive selection with plenty of lever feel.
Final drive ratio is great - just what I wanted, I'd calculated the ratio for using the 530 set up and wanted a touch taller gearing.
Going with the 1 tooth less rear than the standard set up for the 530 kit brings the rev's down a few hundred rpm for cruising but is still responsive enough if required, first is still pretty low - so I could easily go down 1 tooth more on the rear if I want (or up one on the front and two/three on the rear if clearance becomes an issue).
The motor is extremely silky and so so smooth, still a touch tight but I was surprised how much low down grunt it's got, to be honest I was expecting less.
The fuelling seems spot on - ticks over perfectly at 900rpm, pulls cleanly from the bottom with no hesitation whatsoever - power is linear and progressive.
I didn't rev it hard at all on the test ride - so the top end is something to discover on another day :D

The first ride was unfortunately cut short as a ticking sound had started to appear on acceleration, four miles into the ride.
With the bike stationary it sounded like cam chain lash or a loose shim or two, will pull the cover for an inspection at the weekend.

With the bike back on the ramp I gave it the usual once over.
Save for a bit of wet-staining from the cam cover gasket she had No oil leaks and after a quick go around with the torque wrench - No loose bolts either - result!

The motor was too hot to do much, so I sat with a tea and made a few notes of things to do.
1 - adjust clutch lever, as the plates started to bed the lever play got bigger, I adjusted the lever adjuster a couple of times but I'll adjust it gearbox end as I know the cable will stretch as it beds in.
2 - pull the forks up a touch in the triple clamps, just to quicken the steering a bit - although the steering is very neutral and doesn't need adjusting - most of my bikes are a bit quicker to turn in so it suits me to make the change.
3 - bleed the front brakes again, just a touch on the soggy side, the lever was just a bit too far back to the bars.
4 - pull the nearside front calliper, although on the test run I didn't pull very hard on the brake lever - it had not wiped the paint off the disc completely - the offside had - so I'm going to pull it and check it slides freely, if it has stuck that would also explain the slightly more soggy than normal (for bedding brakes) feel.
5 - pull the cam cover and have a look around, re-tension the cam chain.
6 - adjust the rear brake lever, the more I used it the more it went out of adjustment, as it started to bed-in the feel was getting better and better, not snatchy but with firm pressure it had already started to be effective - something I'm devoid of with my tuono - shite rear brake on that.

I really don't know exactly what I expected - but I was very pleasantly surprised.

As I type a parcel has just arrived from the states - thanks Jeff :D

Such fun :D

User avatar
KWACKERZ1
Hardcore
Hardcore
Posts: 1729
Joined: 1st Sep 2007
Location: Leicestershire

#130 PostAuthor: KWACKERZ1 » Mon Jun 08, 2015 1:39 pm

Brilliant worth all the work, it looks nice Good job well done.

Aztec Warrior
100Club
100Club
Posts: 448
Joined: 19th Oct 2014

#131 PostAuthor: Aztec Warrior » Mon Jun 08, 2015 9:46 pm

Nice one. You have been very thorough, and the hard work and hours look like they have paid dividends. I like your testing facilities too. Certainly beats a ride around the block hoping for the best...!

User avatar
Pigford
Hardcore
Hardcore
Posts: 13314
Joined: 2nd Jan 2006
Location: North Dorset

#132 PostAuthor: Pigford » Tue Jun 09, 2015 12:45 pm

What a cracking looking Zed - well done there lad :wink:

Image
And on the 7th day... Zeds were created!

User avatar
Hinckley
100Club
100Club
Posts: 263
Joined: 21st Jun 2012
Location: UK

#133 PostAuthor: Hinckley » Mon Jun 15, 2015 9:21 am

Cheers glad you like it.

June week 2 update.

Worked through the check list on Saturday.
Clutch was adjusted.
Forks were slid 2mm through the triple clamps.
Front brakes bled, caliper pulled and no faults found, adjusted lever.
Rear brake adjusted.

Went to start for a clutch check - and no start!
The odd pop and fart - Mmmmm!
Drained the float bowls and very dark fuel came out with lots more black jelly blobs and what looks like very fine black sand! WTF!

Pulled the tank and after a dam good shake and drain - I found the source of the black jelly blobs - but no fine black stuff - just a few rust flakes!
I stripped and cleaned the pingel tap, carb hoses off, float bowls off, pulled the jets and blew them through.
I noticed the fuel hose had expanded a little, and black bits were coming off on my fingers - that's the source of the black bits then!
Filters and the horrid debben yellow fuel hose were installed.
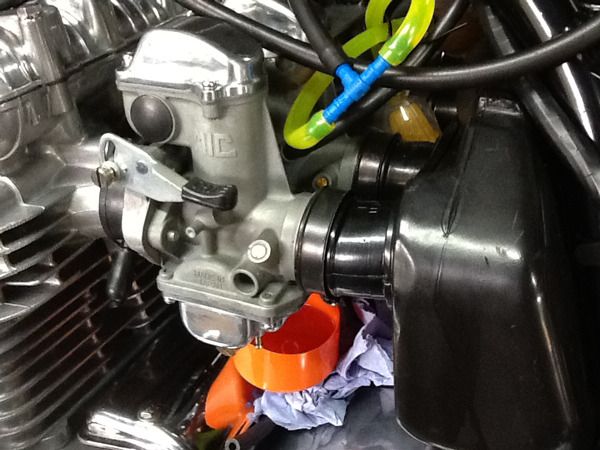
I rigged it up to the remote fuel tank and flushed the carbs through - just to be on the safe side, a cut down aerosol lid makes for a good catch tank! I found a cold chisel was a good fit for the drain screws to stop from getting the screwdriver marks on them.

Image

With the carbs cleaned again I pulled the cam-cover to investigate the ticking sound I got at the end of the first test ride.
I worked through the shims and adjusted the cam chain.
All inlets had closed up to less than 0.06mm clearance.
I think the source of the noise was partly the cam chain slack but also No 3 exhaust which was at 0.20mm and the main culprit No 4 which was out at 0.22mm??
These two had a clearance of 0.11mm earlier in the build, I think the cam lube of which I used alot was affecting the shimming.
Very strange - anyway - re-shimmed back to the new old tolerances 0.10-0.15mm. Save for No4 exhaust which is at 0.17 using a 305 shim, I'm sure it will hammer in over time although it's not ideal.

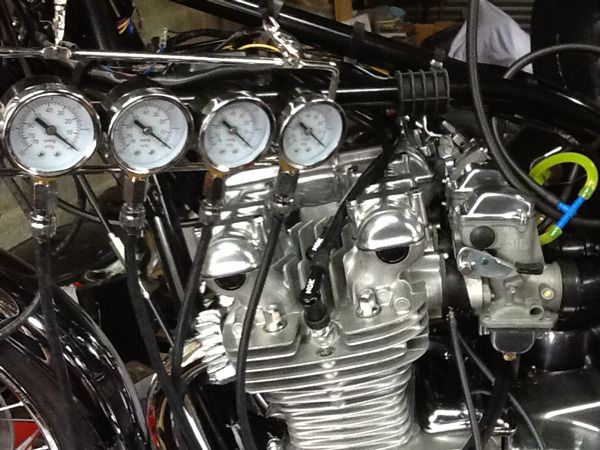
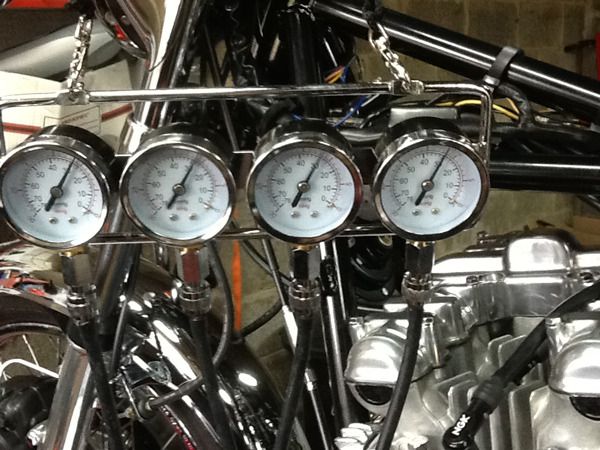
Cam cover back on I hooked up the carb balancer for a quick check.

Image

Motor fired up first prod and was noticeably much noisier with the larger shim gaps.
Warmed up and after setting the Idle the vacuum on No2 was higher than the rest, a quick adjustment made the throttle hang - bugger!
Re-set No2 and adjusted the other three up to match - job done.

Image

Sunday afternoon saw another trip round the airfield, managed 18 miles this time!
Motor was good and strong, there was more noise than before but a little less on acceleration this time.
Clutch continued to bed-in - more adjustment but no grabbing or juddering.
After a couple of hard stops the brakes are bedding in nicely.
I started to notice an off idle hesitation and a vibration so stopped to investigate the cause - the debben fuel line to 3-4 carbs had kinked with the heat of the motor - typical!
The motor was getting a bit hot and the cam cover gasket leaking like a sieve - so I called it a day.

Such fun :D

User avatar
ADRIAN H
Hardcore
Hardcore
Posts: 4174
Joined: 21st Mar 2009
Location: The Brunswick, Charminster. Bmth

#134 PostAuthor: ADRIAN H » Tue Jun 30, 2015 8:44 pm

Hinckley wrote:Filters and the horrid debben yellow fuel hose were installed.


Do nt know why you say Horrid debben yellow fuel hose. Tis good stuff, and you hardly notice it. :D :D

As Piggy said "Cracking bike". :D :D :D
👀 👀 👀
email - adrianhorsfield@live.co.uk

User avatar
Hinckley
100Club
100Club
Posts: 263
Joined: 21st Jun 2012
Location: UK

#135 PostAuthor: Hinckley » Wed Jul 01, 2015 10:48 am

Do nt know why you say Horrid debben yellow fuel hose. Tis good stuff, and you hardly notice it. Very Happy Very Happy

PS Nice looking bike, glad it is nearly sorted.

The quality of the hose is not an issue, I've used debbens for allsorts over the years - they always supply tip top stuff - but seen or not the hose is a horrid yellow colour!
Tygon make other colours - I don't know why they don't keep them - probably a racing thing.

Thanks for the compliment - It's getting there.

June week 4 update.

On the subject of fuel hose - for now the debben tygon yellow hose has been replaced with marine fuel hose.
The short length of hose debben supplied turned out to be not long enough to cope with the bulky fuel filters I'm using.
The tight turns necessary caused kinking when warm as the tygon hose has no wall strength.
It wont run fuel filters when the new tank goes on - but it will be using the genuine tap currently fitted to the Ltd, and (if I can find some) black tygon hose - if not marine hose.

The leaking cam cover gasket that was sold to me as 'genuine' by Cradley Kawasaki has been changed for one from supplied by Dave @ Sushi.
I was suspicious about the 'genuine' gasket as the one I got from CMS was a 'pinky' colour, this dark grey one seemed very rough around the edges and very thin by comparison.

I have a spare original CMS supplied 'pinky' coloured 'genuine' gasket.
This gasket is made from a different material and much much thicker with a much sharper cut - I'm keeping it back as a get out of jail card.

The gasket supplied by Dave is not quite as thick as the 'pinky' coloured 'genuine' one but it seems good quality and has some elasticity.

I have only ran the bike for a few mins but no leaks so far :stfu


The MOT is booked!
I spoke to the tester about the headlight from Z Power and after showing him a pic was told 'That beam pattern is for driving on the other side mate!' - oh good....

I'm going to use the original sealed beam one for the MOT - The dip beam pattern from this is more or less straight - I'll take a bit of black sticky tape just in case.


Ever closer :D


Return to “Projects”

Who is online

Users browsing this forum: No registered users and 8 guests