Hello Guest User,
Please feel free to have a look around the forum but be aware that as an unregistered guest you can't see all of it and you can't post.
To access these 'Registered Users Only' areas simply register and login.
Please feel free to have a look around the forum but be aware that as an unregistered guest you can't see all of it and you can't post.
To access these 'Registered Users Only' areas simply register and login.
Z800 Cafe Chopper Fighter thing...
Moderators: KeithZ1R, chrisu, paul doran, Taffus
-
neilbarrett
- Hardcore

- Posts: 1353
- Joined: 25th Feb 2008
-
Royalratch
- 100Club

- Posts: 366
- Joined: 3rd Jul 2009
- Location: London

-
Royalratch
- 100Club
- Posts: 366
- Joined: 3rd Jul 2009
- Location: London
-
Royalratch
- 100Club
- Posts: 366
- Joined: 3rd Jul 2009
- Location: London
Hi all.
Just checking in to say bike is on track for a Spring MOT. I've basically had to stop whilst waiting for some parts for a last minute tweak to the electrical system which I wanted to do. It requires a custom battery box - instead of modding the stock one which is not ideal.
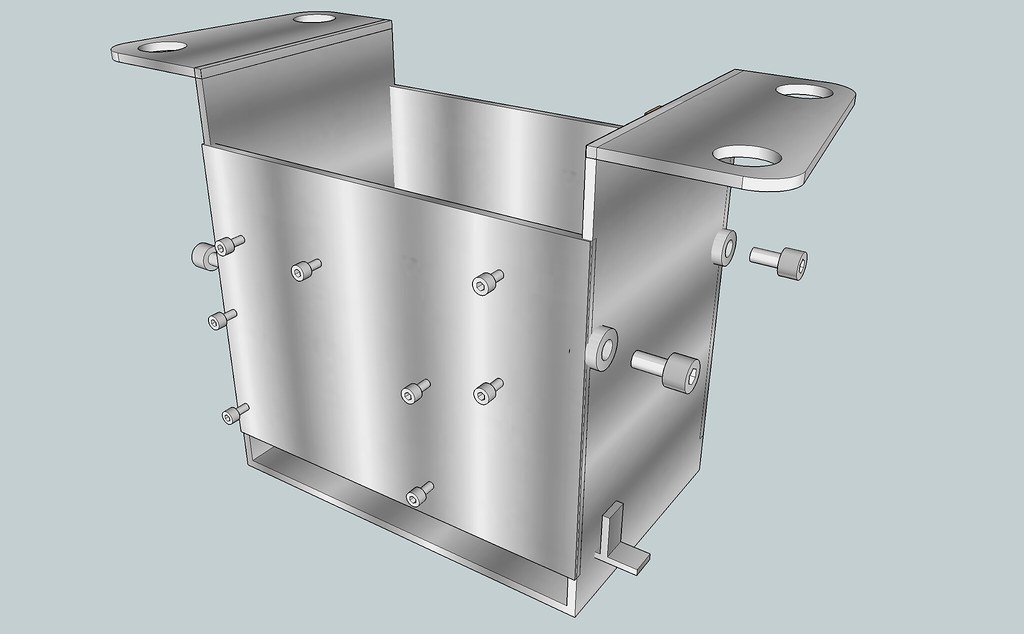
Also, I thought this is something I could make myself. The battery box needs to hold the Reg/Rec, The Motogadget M-Unit, Starter Relay and some other trick bits. I wanted to the entire unit to be tidy and self-contained.
So first a bit of CAD.
Then a cheap sheet steel folder and some strips of 1.2mm Stainless cut to size and folded up.
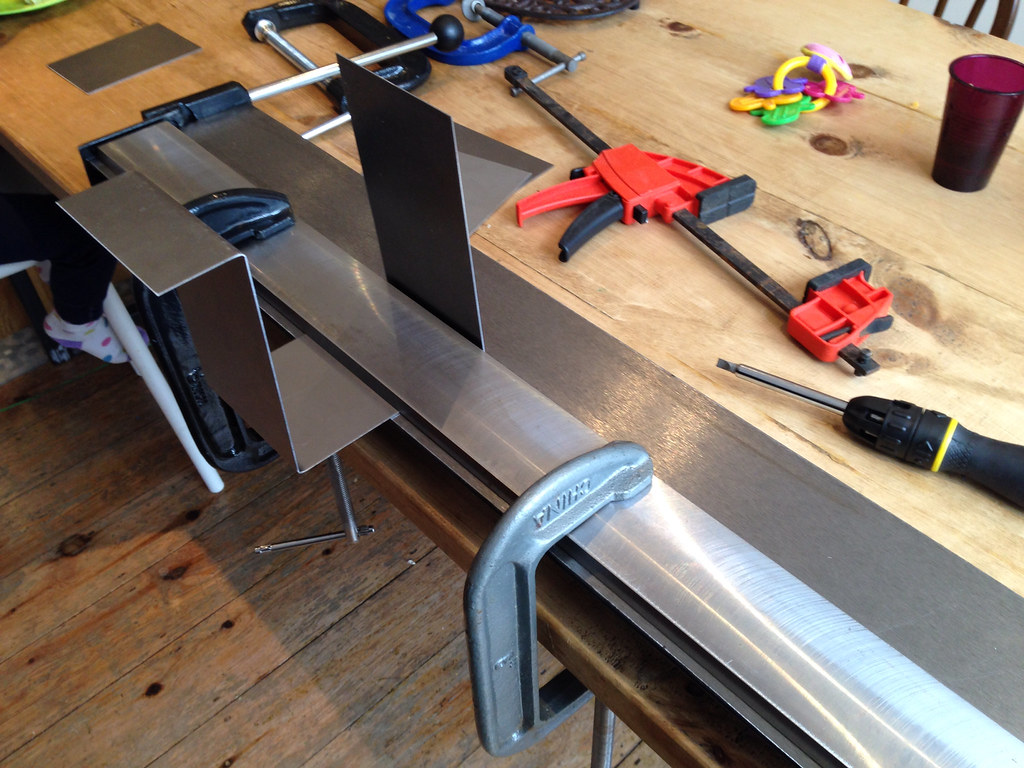
Welding nerds always go on about the fit up!

Getting there.

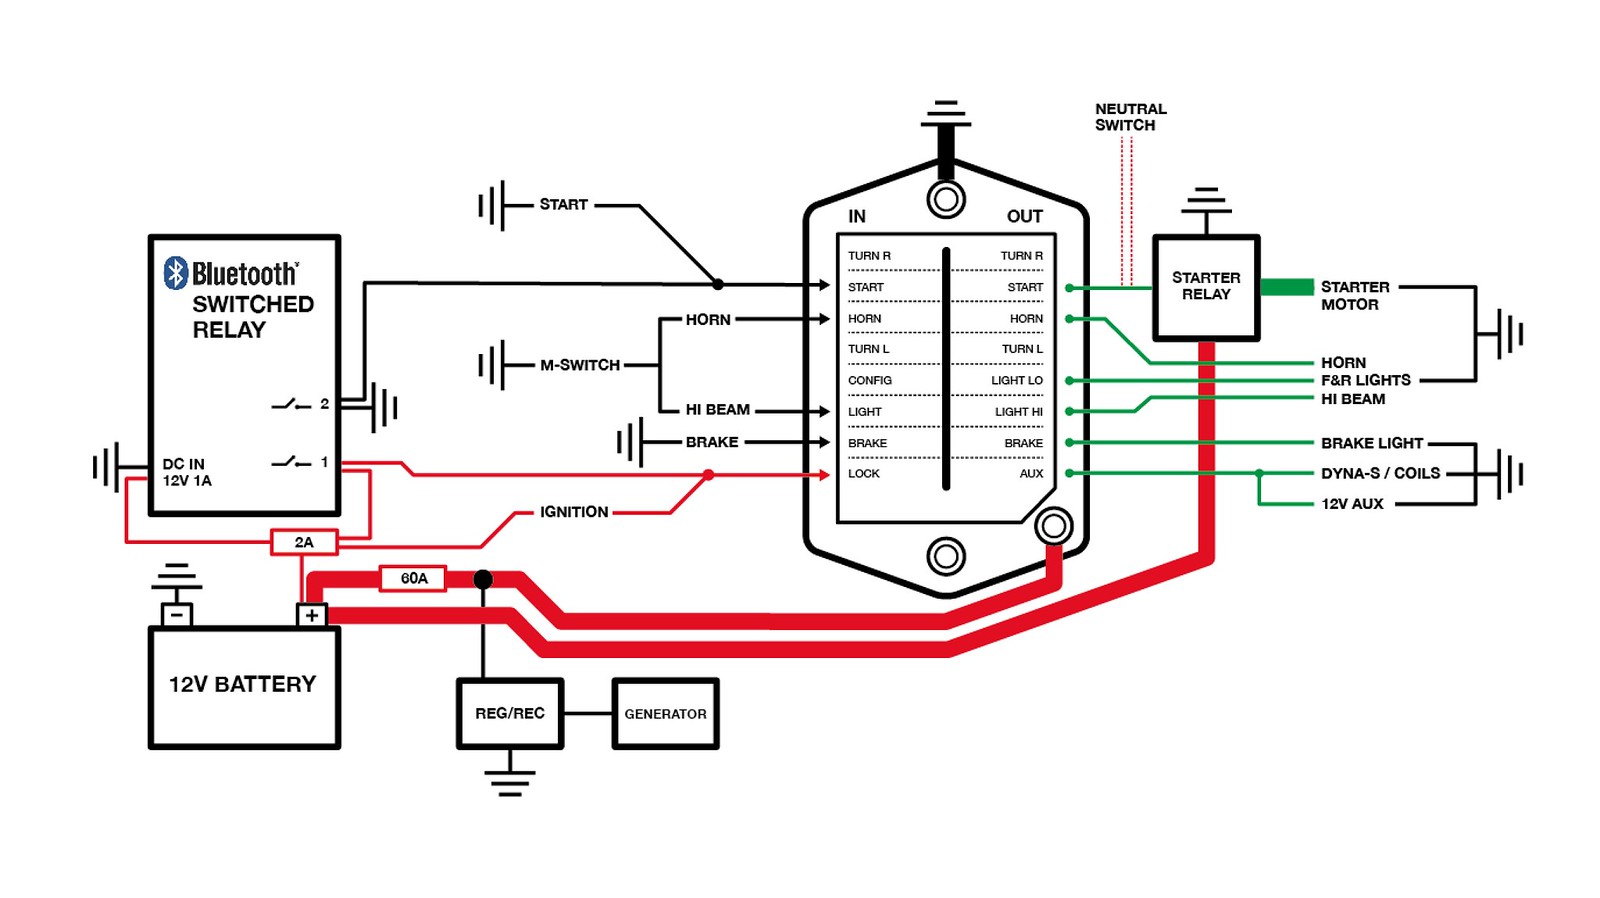
This new and final loom diagram shows what I want to do. I basically will fit a Bluetooth BLE switchable relay to trigger ignition and then the starter relay - all from my smart phone. Its a bit of fun but also means I can run completely invisible and minimal starter controls.
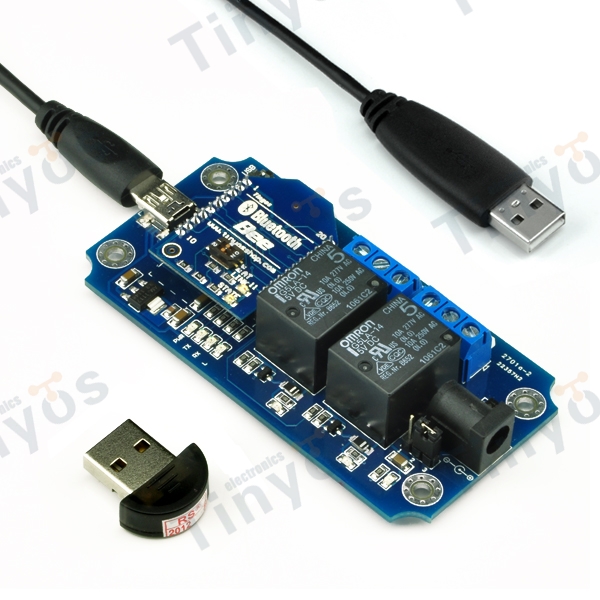
And here is the kit that allows it - a hi-tech smartphone controlled motorcycle remote ignition and start for the grand price of £25!
Here it is all mocked up on the CAD model. It shows the Reg/Rec on the left, 12V to 5V
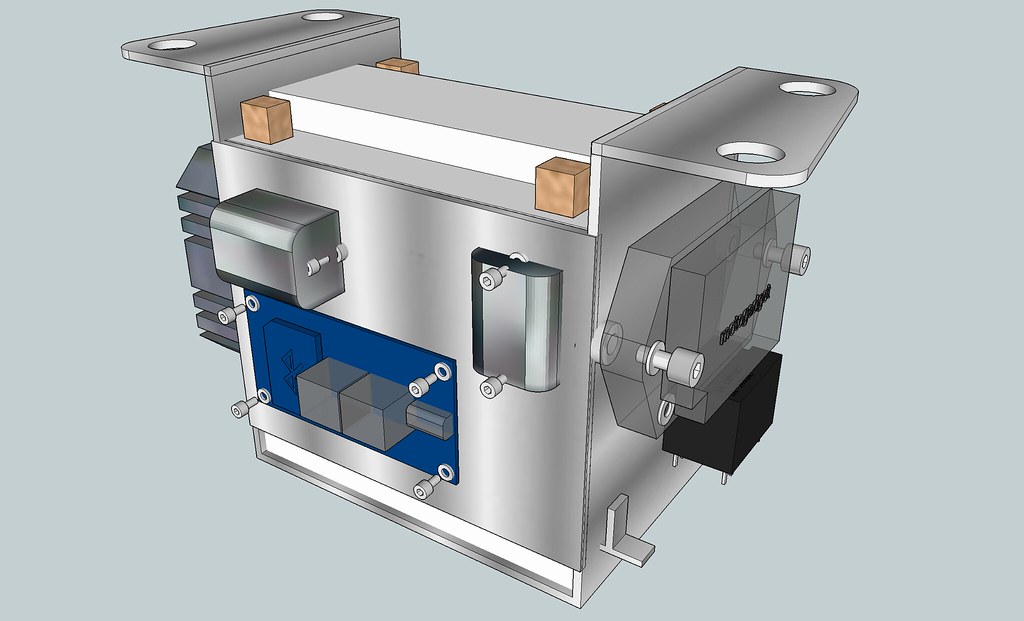
And where I'm at now.

Also using one of these JMT Lithium Ion batteries. Its slimmer than the stock, much much lighter and has 4 terminals which is handy.

So now just need to get it welded up and bolt the rest of the componentry and run some wire then back to Debbens for a Carb tune and fire up.
Just checking in to say bike is on track for a Spring MOT. I've basically had to stop whilst waiting for some parts for a last minute tweak to the electrical system which I wanted to do. It requires a custom battery box - instead of modding the stock one which is not ideal.
Also, I thought this is something I could make myself. The battery box needs to hold the Reg/Rec, The Motogadget M-Unit, Starter Relay and some other trick bits. I wanted to the entire unit to be tidy and self-contained.
So first a bit of CAD.
Then a cheap sheet steel folder and some strips of 1.2mm Stainless cut to size and folded up.
Welding nerds always go on about the fit up!
Getting there.
This new and final loom diagram shows what I want to do. I basically will fit a Bluetooth BLE switchable relay to trigger ignition and then the starter relay - all from my smart phone. Its a bit of fun but also means I can run completely invisible and minimal starter controls.
And here is the kit that allows it - a hi-tech smartphone controlled motorcycle remote ignition and start for the grand price of £25!
Here it is all mocked up on the CAD model. It shows the Reg/Rec on the left, 12V to 5V
And where I'm at now.
Also using one of these JMT Lithium Ion batteries. Its slimmer than the stock, much much lighter and has 4 terminals which is handy.
So now just need to get it welded up and bolt the rest of the componentry and run some wire then back to Debbens for a Carb tune and fire up.

nice.
Leave enough room for some padding around the battery- and I rubber mounted by box too.
I also made a fancy "hold down bar" to clamp the battery in place, with the addition of a couple of fabric straps that went down under the battery- this meant that when the clamp was released it doubled as a handle to lift the battery out of the box.
Really helps reduce hassle.
z650/1400 bonneville hybrid.
Couple of questions, how are you going to "contain" your blue tooth unit?
I notice it is entirely unprotected (with not even varnish) so it will be very sensitive to moisture and road dirt- needs to go under a cover or inside a box.
Box may be useful as it will allow you to install either connectors onto said box or you can fit grommets to act as strain relief for the cables (vibration will work harden the copper cable as it enters the connector and it will eventually break).
I guess the box will need to be plastic otherwise you will loose signal to the receiver.
When I wired my bike, I found the physical positioning of components was really dictated by the neatness and ease of the loom, bend rads of the loom and access to connections rather than convenience of mounting the unit.
z650/1400 bonneville hybrid.
-
Royalratch
- 100Club
- Posts: 366
- Joined: 3rd Jul 2009
- Location: London
Yo.
The logic board will be protected - I will probably make a rubber bag cut to fit then seal it with rubber weld or glue to keep it dry and clean. Because the Li-Ion battery is so much thinner, theres space for it to sit inside the battery box too which is ideal - but may affect the signal. The whole battery box will also be sealed in a black canvas bag with a cutout for the Reg Rec to keep it clean as I foolishly didn't allow for a rear wheel guard and now can't add bosses or tabs to frame to fit one. Maybe there's a way...
I had to go with component layout first as its a lot to cram onto the box - don't know how they did it originally as the stock box is very flimsy.
Varnish - is this something that can be down retrospectively?


"Varnish - is this something that can be down retrospectively?"
Yes, although you will have to mask the connectors so it does not cover them. Some like the SCC3 need to be baked on too.
Check the info first as this will prevent later surprises.
The point about varnish is that it helps to prevent problems due to condensation and later corrosion. Either that or put into a sealed box where no damp air can get in.
z650/1400 bonneville hybrid.
-
Royalratch
- 100Club
- Posts: 366
- Joined: 3rd Jul 2009
- Location: London
-
Royalratch
- 100Club
- Posts: 366
- Joined: 3rd Jul 2009
- Location: London
Got some measurements to help select the right shock length as I want to order some new ones, possibly built to spec.
Here is the bike sat dead flat under its own weight - the changes from stock Z650 are 17" wheels, 06 ZX6R USD forks and pretty regular tyre profiles. The rear 'shock' plank length here is 300mm.

There are no Ohlins options for a Z650 and certainly not for a modified one - only for stock Z900/Z1/Z1000 and some 750s / 500s.
So, the Ohlins S36P KA140 is 350mm eye to eye. That's 50mm too long so allowing 25mm static sag (under bikes own weight) means it'll be jacked up 25mm at the rear. Can I dial that out by adding preload? Or is it too much?
Is a custom built set worth the bother?
Cheers all!
Here is the bike sat dead flat under its own weight - the changes from stock Z650 are 17" wheels, 06 ZX6R USD forks and pretty regular tyre profiles. The rear 'shock' plank length here is 300mm.
There are no Ohlins options for a Z650 and certainly not for a modified one - only for stock Z900/Z1/Z1000 and some 750s / 500s.
So, the Ohlins S36P KA140 is 350mm eye to eye. That's 50mm too long so allowing 25mm static sag (under bikes own weight) means it'll be jacked up 25mm at the rear. Can I dial that out by adding preload? Or is it too much?
Is a custom built set worth the bother?
Cheers all!

-
Royalratch
- 100Club
- Posts: 366
- Joined: 3rd Jul 2009
- Location: London
I had a similar problem with my build and ended up using Ohlins designed for a CB1300. They were the shortest available off the shelf shocks. My concern was to get the chain run as straight as possible, i.e. front sprocket, swingarm pivot and rear axle all in a straight line when seen from the side. I bought the Ohlins from Harris and they were very helpful with getting the length right. I'll dig out the length and post it but I think it was 320mm or so. The Z900 and CB1300 are a similar weight so the spring rate was OK.
Who is online
Users browsing this forum: No registered users and 15 guests