Page 1 of 2
Best instant 'metal' to use ??
Posted: Tue Sep 30, 2008 10:09 am
Author: Big Fluff
Guys.
Before I bought the Saxon, some 'tata' decided to fit too long a screw in one of the cam retaining caps and 'popped' off the under part of the casting on the head.
I fitted a helicoil in there along with a slightly shorter screw. I also used chemical metal to block the hole and form it into a reasonable shape. Howevere, it's still leaking and the oil blows back through the head around 3&4 plugs and looks a bloody mess.
I need to have another go, but wondered what the best method is.? However, I don't want to take the head off to weld it unless it's my last resort.
This time I will remove the cam cap retaining screw and give the whole area a 'serious' cleaning before attempting to plug it with whatever you guys reckon is best....

I've tried Areldite but that just drips like a big piece of stringy snot

Posted: Tue Sep 30, 2008 11:04 am
Author: 02GF74
Can't say I know whereabouts on the engine you mean but as it is somewhere on an air cooled engine, it is gonna get quite hot - which accounts why the araldite is melting.
Altnough not used it myself, heard good things about this stuff (linky is picture)

JB Weld Adhesive is a premium product that has the tensile strength of 4000psi. This enables you to make permanent repairs, and save time and money. It is guaranteed to withstand temperatures of 300°C, which make it an ideal product for working in and around engines. JB Weld Adhesive will not shrink or crack, while it dries. Once dry it can be treated like metal, drilled, tapped, machined, polished or painted.
should be better than the araldite I would think.
Re: Best instant 'metal' to use ??
Posted: Tue Sep 30, 2008 12:03 pm
Author: PJones
Big Fluff wrote:Guys.
Before I bought the Saxon, some 'tata' decided to fit too long a screw in one of the cam retaining caps and 'popped' off the under part of the casting on the head.
I fitted a helicoil in there along with a slightly shorter screw. I also used chemical metal to block the hole and form it into a reasonable shape. Howevere, it's still leaking and the oil blows back through the head around 3&4 plugs and looks a bloody mess.
I need to have another go, but wondered what the best method is.? However, I don't want to take the head off to weld it unless it's my last resort.
This time I will remove the cam cap retaining screw and give the whole area a 'serious' cleaning before attempting to plug it with whatever you guys reckon is best....
I've tried Areldite but that just drips like a big piece of stringy snot
Hi Big Fluff,
I have used that JB Weld - its superb, I could not get one of the phillips head screws out - that hold the carb manfold to the head, I hit the screw with a chisel and broke a piece off (T**T), I used the JB weld and a G Clamp to hold it in place - no problems.
Cheers
PJ
Posted: Tue Sep 30, 2008 12:08 pm
Author: Big Fluff
Thanks for that.
However, when I said that Araldite drips, that's as I'm attempting to apply it to the underside of the cylinder head as gravity is against me. Short of turning the bike upside down, it's very difficult to apply a 'runny' liquid.
I see that JB Weld do a kneadable 'stick' type and might try that. I have already tried the kneadable type but despite that it sets as hard as nails, it doesn't seem to adhere to the alloy that well, which is my main problem.
I suppose I could try applying a little Araldite first, then kneadable putty after that to get the shape I need.


Posted: Tue Sep 30, 2008 1:33 pm
Author: mikey
At the end of the day the only real fix is to take the head and have it repaired properly, when ever ive had a problem like this ive never been able to repair it properly using any number of chemical metals and ive always ended up removing the damaged item for repair, pain in the ass, yes, but at least its a permanent repair.
Posted: Wed Oct 01, 2008 3:34 am
Author: kenif
Not sure if you can buy it in the UK but I,ve used this stuff called Devcon ,2 part epoxy repair putty,its slow curing(2hours) so you can have a bit of a play with it,good industrial suppliers should stock it.
Posted: Wed Oct 01, 2008 5:44 pm
Author: Big Fluff
This is what i'm trying to repair.... a bit tricky really
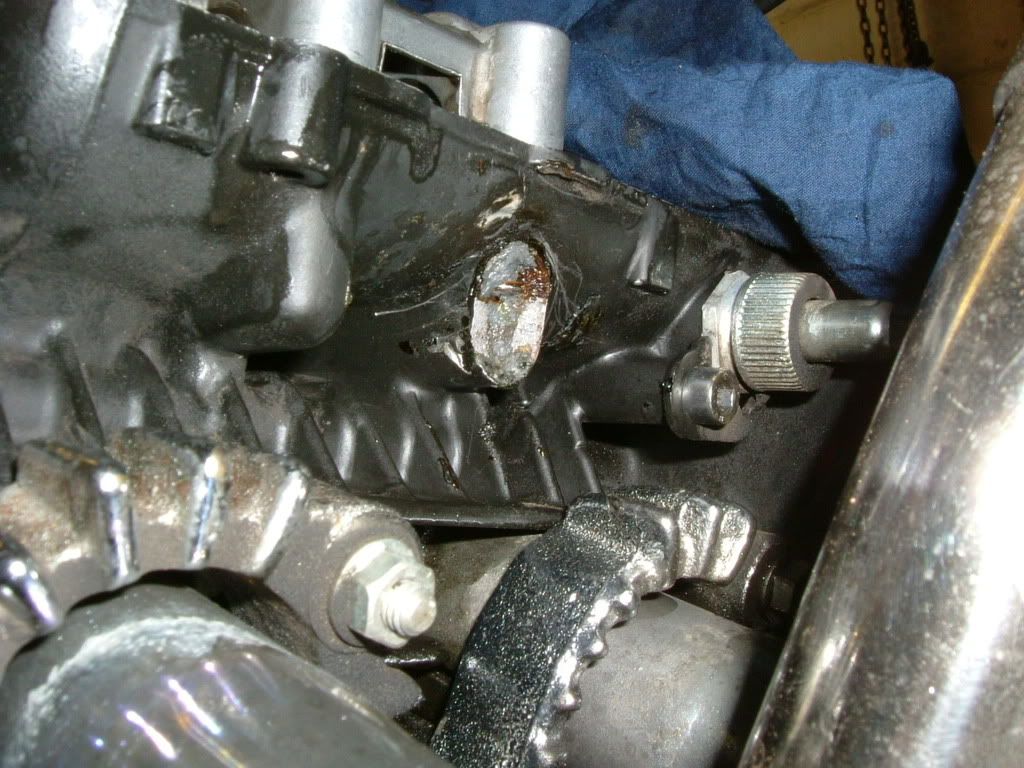
jb weld
Posted: Wed Oct 01, 2008 7:39 pm
Author: ninjajen900

Think you will need to support the jb weld with a plastocine glove .
Posted: Wed Oct 01, 2008 7:56 pm
Author: Jon
Best stuff Ive ever used bud. Needs metal to be clinically clean to work best tho.
 http://epoxyputty.com/putty.htm
Posted: Wed Oct 01, 2008 10:10 pm
Author: RALPHARAMA
Devcon is the Mutt's private parts, but is expensive and needs to be mixed carefully. I have used it to great effect in the past.
Some knobster assaulted the sliders on my front forks and tried unsuccessfully to repair them with a mixture of failed methods. The damage was traditional - where the mudguard bolts onto the sliders. Luckily I have a very accurate chemical balance, left by a past drug pushing bedsit tenant at my fathers rented out house, which is perfect for measuring the two parts prior to mixing. The secret to a successful repair of this type, is to support the repair mechanically as a dentist does with a repair to a tooth. Drill the surrounding metal with a fine drill and make little stainless pegs (I use tig filler wire). It goes without saying that everything around the repair must be absolutely free from any form of oil or grease. Devcon is fabulous stuff, and is a genuine industrial product, but it needs to be used carefully. You can even cut threads in it. Devon have a large range, but you want the Aluminium Putty. You cannot use it up-side-down without some form of support whilst curing though, but it is the best product of this type on the market.
Just google for suppliers, but you need to expect to pay at least fifty quid for the smallest quantity (1/2 kilo). Well worth it in my opinion - have a look at what I did with in on CB's Z650 crank casing - under projects.
Posted: Thu Oct 02, 2008 7:55 am
Author: Steve S
Tricky one this,if you can clean the area up properly/degreased etc. you may be able to use some tape or thin plastic to create the rough shape of the casting then syringe the adhesive in,let it set /remove the tape apply any more where necessary and then shape and paint to finish.

tricky but do-able with the right ingredients. Only thing you do have to watch though is sticking the bolt in also.
Good luck
Posted: Thu Oct 02, 2008 8:33 am
Author: Thezedsintheshed
Why use chemical metal in the first place?
Any decent welder should be able to sort that out with the engine in situ in the frame without much of a problem .
Put a stainless bolt in the cam cap , have the area absolutly clinically clean and degreased and them spot the area arount the bolt with an ally mig set up.
Short bursts of weld should build the damaged area up enough to dress the damaged area back with a dremmel drill to blend it in with the rest of the head.
Posted: Thu Oct 02, 2008 9:42 am
Author: Big Fluff
Thanks for all the suggestions guys, though the Devcon is a tad expensive
Although you can't tell, access is very limited with the engine in situ so argon arc welding isn't an option at this moment in time.
What I propose to do is to make a mould for the outside shape by smearing another lug with vaseline and using JB weld 'putty' to replicate the shape. Once that has set I will remove the cam retaining cap and
clinically clean all the area.
I will then coat the inside of the 'mould' with vaseline and tape in position on the head. Then, with JB weld 'resin', fill the void through the top (screw hole) until it's about 10mm from the top (this will allow room for the cam cap bush). Hopefully when set, I'll be able to remove the mould and it'll look presentable. I can then drill and tap the JB weld resin, and fit a shallow helicoil so repeated future screw removal puts less load on the threads.
Lets hope this works...

Posted: Thu Oct 02, 2008 12:08 pm
Author: Dark Skies
I agree with Thezedsintheshed. Why bodge it when it can easily be welded in situ in about fifteen minutes? A mig gun should fit right in there.
Posted: Thu Oct 02, 2008 12:23 pm
Author: kz900B1