Hello Guest User,

Please feel free to have a look around the forum but be aware that as an unregistered guest you can't see all of it and you can't post.

To access these 'Registered Users Only' areas simply register and login.

Building my bike workshop

Talk about all your non-Zed or even Kawasaki bikes here.

Moderators: KeithZ1R, chrisu, paul doran, Taffus

Message
Author
User avatar
j.wilson
100Club
100Club
Posts: 229
Joined: 23rd Jul 2011
Location: wimborne

#46 PostAuthor: j.wilson » Thu Mar 29, 2012 8:48 am

Useful tool??

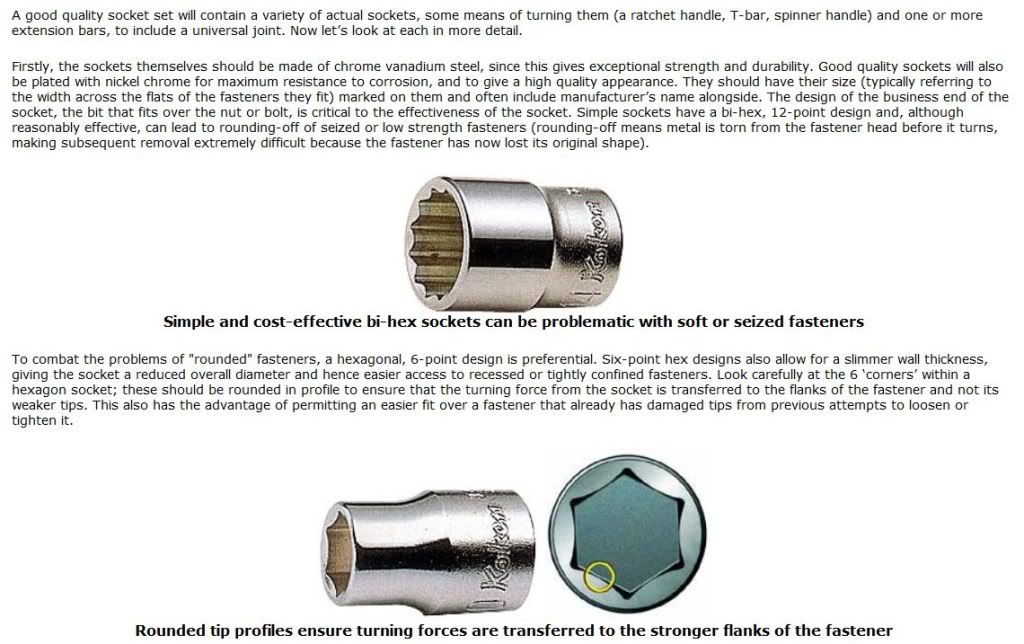
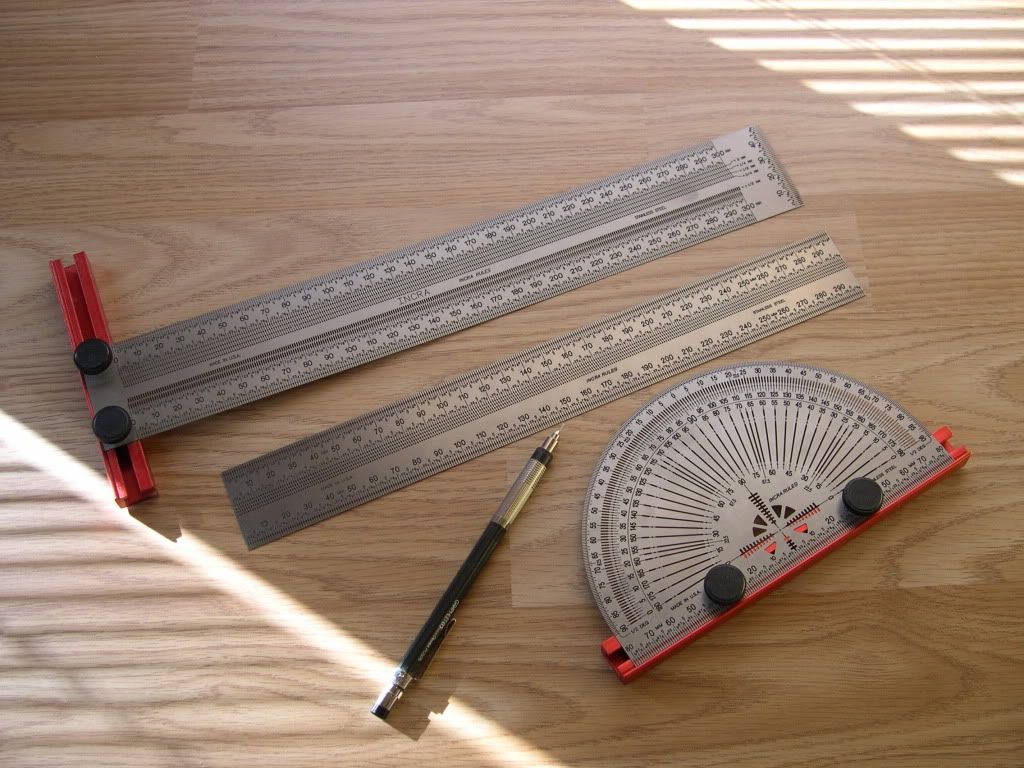
I got a set of these Incra rules. I find them very useful- perhaps you will too.

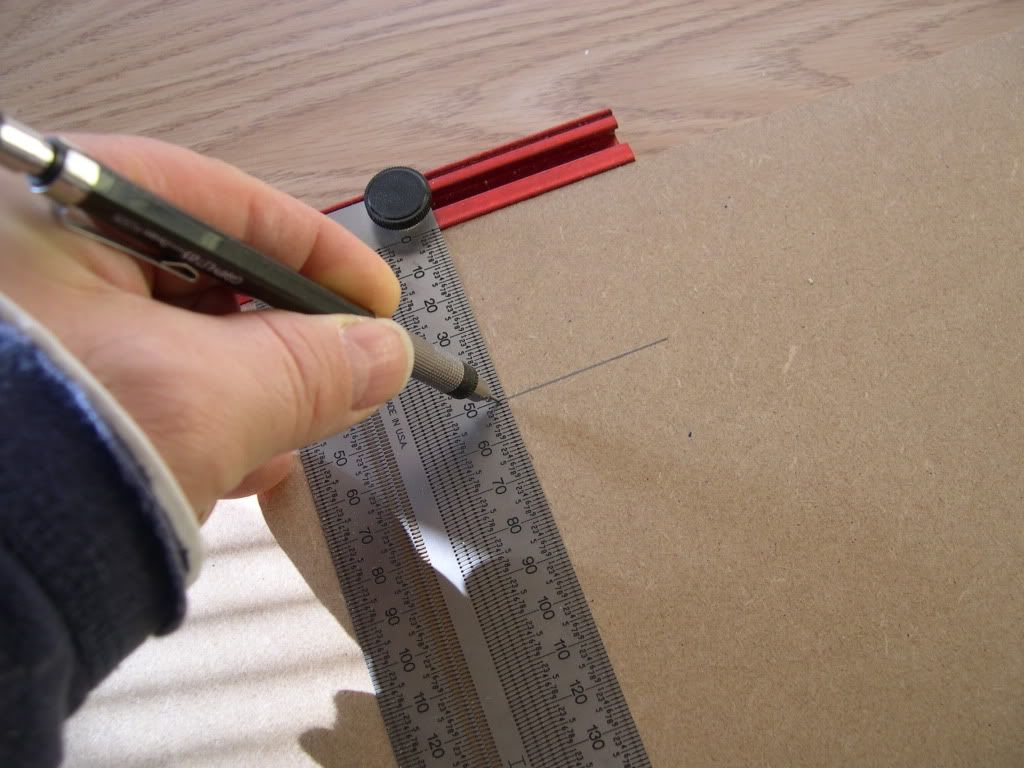
They are a set of thin stainless rules- they are etched with the measurements but they are also etched right thru at each incrament- thus you can poke your pencil thru these holes to make your mark.

You have to use a 0.5mm pencil.

They make marking out very easy and accurate.

Image


On the rear its easy to see all the holes

Image

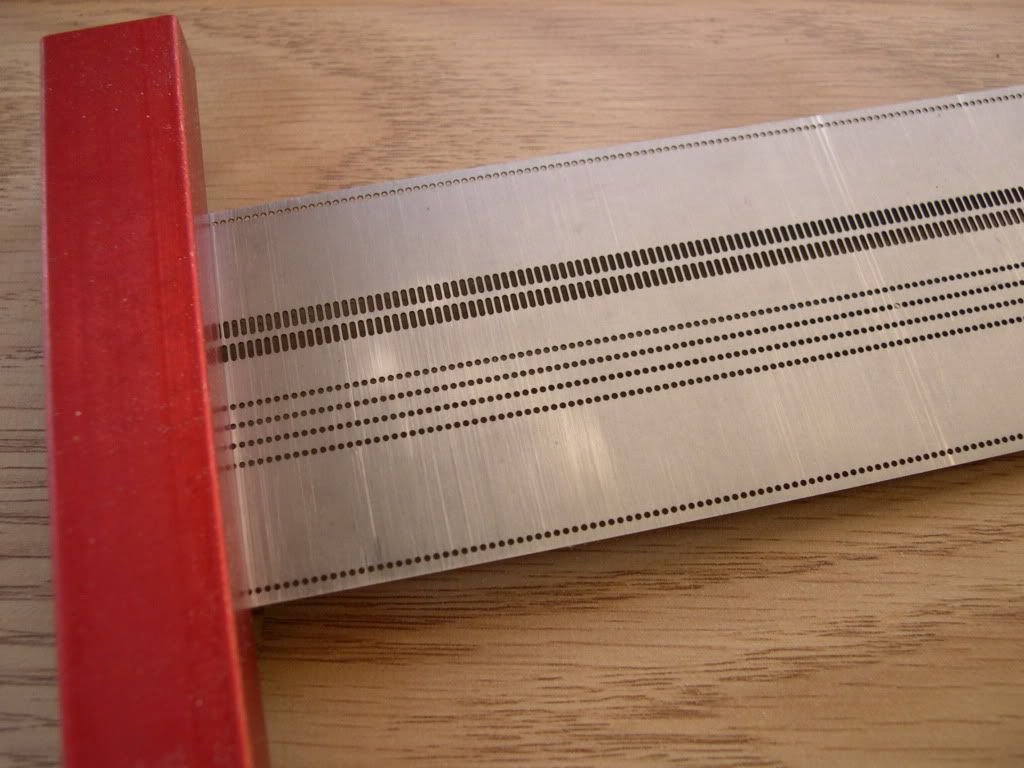
With the red end stop in place the rule can be dragged along to make a line parallel to the edge.

Image

Using two pencils these rules can be used to easily draw circles and arcs.
z650/1400 bonneville hybrid.

User avatar
Z1parR
Hardcore
Hardcore
Posts: 4901
Joined: 11th Oct 2009
Location: Chorley Lancs

#47 PostAuthor: Z1parR » Thu Mar 29, 2012 7:02 pm

Julian , this is an amazing lesson in do it once and do it right, then you don't have to re visit it .
But with you being a fussy bugger it could turn into the Forth Bridge paintjob :wink:
0172 . Geoff Parr

User avatar
Taffus
Moderator
Posts: 4159
Joined: 30th Aug 2007
Location: .21 club

#48 PostAuthor: Taffus » Thu Mar 29, 2012 7:14 pm

Where did you get the incra stuff?
(\__/)
(='.'=)
(")_(")Image

User avatar
j.wilson
100Club
100Club
Posts: 229
Joined: 23rd Jul 2011
Location: wimborne

#49 PostAuthor: j.wilson » Thu Mar 29, 2012 7:23 pm

I got mine from Tilgear but they were having a happy hour sale at the time so they weren't too spendy-
hunt around on the net.

http://www.tilgear.info/products/5642/7 ... le_metric/
z650/1400 bonneville hybrid.

User avatar
Al
Hardcore
Hardcore
Posts: 2233
Joined: 21st Oct 2007
Location: Farnbronx Sin City N.E. Hants

#50 PostAuthor: Al » Sat Mar 31, 2012 10:23 pm

Very nice work, its' got that scandinavian feel to it too which makes it seem more user friendly.
Keep the innovations coming.

AL
1981 J1

User avatar
j.wilson
100Club
100Club
Posts: 229
Joined: 23rd Jul 2011
Location: wimborne

#51 PostAuthor: j.wilson » Thu Apr 12, 2012 11:10 pm

So I thought I'd record a little project I have just started- as it will use the end of my bike lift.

There is a panel that can be removed at the end of my bike lift- so you can drop out the rear wheel.

I've made a woodwork bench top to cover my bike lift- and have left a gap at its end to drop in various power tools. The first one is a router table.

Routers are great- but really come into their own when mounted securely under a bench with the tool poking up thru the surface. You can run pieces of wood against the tool to add edge details (like tongue and grooves) and do it very precisely if you have a fence mounted on the table top too.

I have a nice cheap ebay router, and some nice cheap ebay Formica. I've got a £40 plate to hang the router from and gonna add to this an expensive fence/positioner, a remote depth adjuster and a remote switch for the router.

First the table top. 25mm MDF cut to size to fit across the bench top. I'm gonna cover this in Formica so that the wood slides easy on the top but also to stop the MDF absorbing water. Its important to cover both surfaces in the Formica as it will actually encourage warping if you only cover one face. To cover the edges. I was going to rout rads on the corners to stop me catching myself on them- only I realised that is not necessary as they will be close to the edge of my bench.
My bits so far.

Image

Router cost me £80 and the Formica cost £15.

I'm using an offcut piece of 25mm MDF.

Image
z650/1400 bonneville hybrid.

User avatar
j.wilson
100Club
100Club
Posts: 229
Joined: 23rd Jul 2011
Location: wimborne

#52 PostAuthor: j.wilson » Fri Apr 20, 2012 9:47 am

I made a little jig to hold my router and put a pivot hole in it 100mm from the edge of the cutter.
With the centre of a 100mm radius marked and drilled in the table top I screwed the jig and router down thru the pivot hole. I could then cut the corner rads on the table top.

Image

Once complete I used evostik to attach the laminate top to the table top. I did this both sides to prevent warping- I’m not sure why it warps but it seems it does so I didn’t take the chance.

I used the router fitted with a trimming cutter (its fitted with a ball race on the end so that this can be used as an edge guide) to remove the excess material around the edges.


Image


Image
Next job is to cover the edges and set in the router plate.
z650/1400 bonneville hybrid.

Rich
Hardcore
Hardcore
Posts: 2835
Joined: 4th Mar 2003

#53 PostAuthor: Rich » Sat Apr 21, 2012 6:53 am

"I’m not sure why it warps but it seems it does so I didn’t take the chance. "

The MDF is a lot drier than the atmosphere in your shed and will absorb some of the moisture expanding as it does so. If you only cover one side that will not absorb moisture and stay smaller than the other uncovered side which has absorbed moisture making more warpage than with both sides covered or both sides uncovered.
Rich
diplomacy is a form of art - I was never any good at art

User avatar
j.wilson
100Club
100Club
Posts: 229
Joined: 23rd Jul 2011
Location: wimborne

#54 PostAuthor: j.wilson » Sat Apr 21, 2012 8:44 am

Yep, that sounds pretty likely.

So laminating each side is a good idea.

I read of a guy who put loads of effort into a router table and bench only to have the top warp by 1mm after a week.
He thought it was due to the weight of the router, but he had only laminated on one side and the blog was very clear this would have been the cause of the problem.

Does anyone know what the brand name of a "sanding sealer" is for MDF?

I looked around B&Q and didnt know where to look and didnt know what to look for -other than its generic name.
z650/1400 bonneville hybrid.

User avatar
j.wilson
100Club
100Club
Posts: 229
Joined: 23rd Jul 2011
Location: wimborne

#55 PostAuthor: j.wilson » Sun Apr 22, 2012 5:14 pm

I attached my router to my track saw track- using an adapter that came with the router. This means I can rout a nice straight groove for the T track.

I marked out the groove and measured the track position with the vernier callipers.


Image

I held the track firmly in position by using special G clamps that slip into the groove on the underside of the track.


Image


Cutting the groove.


Image


And finally with the T-track fitted.

Image
z650/1400 bonneville hybrid.

User avatar
jimmock
Hardcore
Hardcore
Posts: 8947
Joined: 1st Dec 2009
Location: Central Scotland, near Zedinburgh.

#56 PostAuthor: jimmock » Sun Apr 22, 2012 5:16 pm

Fuckin' hell, There was me thinking I would only learn about Zeds on here too!!!!


Jimmock.
Jimmock. :wnkr


SPEED IS JUST A QUESTION OF MONEY...HOW FAST DO 'YOU' WANT TO GO?

I hate people I don't like !

User avatar
j.wilson
100Club
100Club
Posts: 229
Joined: 23rd Jul 2011
Location: wimborne

#57 PostAuthor: j.wilson » Wed Apr 25, 2012 9:09 am

Sockets.

Just thought I’d post an interesting discovery I made.
Well, it’s new to me, perhaps you all know it and it will make you laugh about me!

So, I have an old Draper socket set and I’ve lost a socket and I went onto Ebay to replace it.

I found some interesting information about the design of sockets.


Image


Image


Image

These surface drive sockets are interesting and I started to think a little more about them… I realised that there are many modern fasteners I come across that are actually NOT designed to be used with my old double hex draper style sockets.

Look at these pictures- they are familiar bolts used around bikes- note how weak and small the corners of the hex are. Those flange bolts have half their corners missing!


Image


Image


These fasteners will “round offâ€￾ very easily; clearly they are designed to be driven on their flanks by surface drive sockets. I never realised this before.

Whilst these bolt designs are used on modern bikes they are really common all on household white goods. Never really understood why my old sockets didn’t drive reliably on them- this answers my confusion.

From now on I’ll take more notice of the design of the corners of the fasteners I’m trying to turn: the double hex design is not meant for every type of hex fastener- but surface drives will drive them all.

I think I’ll get a set. £25 seems to get an 11 piece (8-19mm) long series 3/8â€￾ drive set.

Sorry if I’m teaching you to “suck eggsâ€￾.
z650/1400 bonneville hybrid.

User avatar
j.wilson
100Club
100Club
Posts: 229
Joined: 23rd Jul 2011
Location: wimborne

#58 PostAuthor: j.wilson » Wed Apr 25, 2012 11:29 am

Of course things are never quite that simple.

Image
Image

Below is a drawing of a “Number 7â€￾ rolled and flanged M6 machine screw with a 10mm head.
As can be seen it has a 4mm high head. The corners of the hex are rounded off 1mm deep leaving 3mm of straight corner edge.
The chamfer on the bottom edge of the socket is another important aspect that needs to be considered. On the socket cross section (single hex) below we can see that the contact point begins about 0.7mm into the socket- thus the torque force is applied over a contact line of between 2.3mm and 3.3mm long.

Image

Image

The surface drive socket pictured has a much larger chamfer of 1.5mm at the point of contact, thus the torque force is applied over a contact line of about 2.5mm long so it’s not quite as good as the single hex type (could be up to 33% less metal to spread the torque over).
Go for single hex with small chamfer.
z650/1400 bonneville hybrid.

Eric Frith
Regular Poster
Posts: 30
Joined: 12th Apr 2012
Location: Hertford

#59 PostAuthor: Eric Frith » Wed Apr 25, 2012 11:35 am

j.wilson wrote:Of course things are never quite that simple.

Go for single hex with small chamfer.


I did, and I find they are just right.....

User avatar
Big John
Hardcore
Hardcore
Posts: 1749
Joined: 3rd Nov 2005
Location: E London/Wisbech

#60 PostAuthor: Big John » Wed Apr 25, 2012 7:32 pm

I've been using a Richmond Metrinch socket set for many years now and not had a rounded off nut ever.
http://www.metrinch-tools.com/website/introductie.php
86 Z1100R x 2, z7/11r, ZRX400, Z1000B2, ,ZRX1100C4 & Z1000J3.


Return to “The Bottom Shed”

Who is online

Users browsing this forum: No registered users and 3 guests